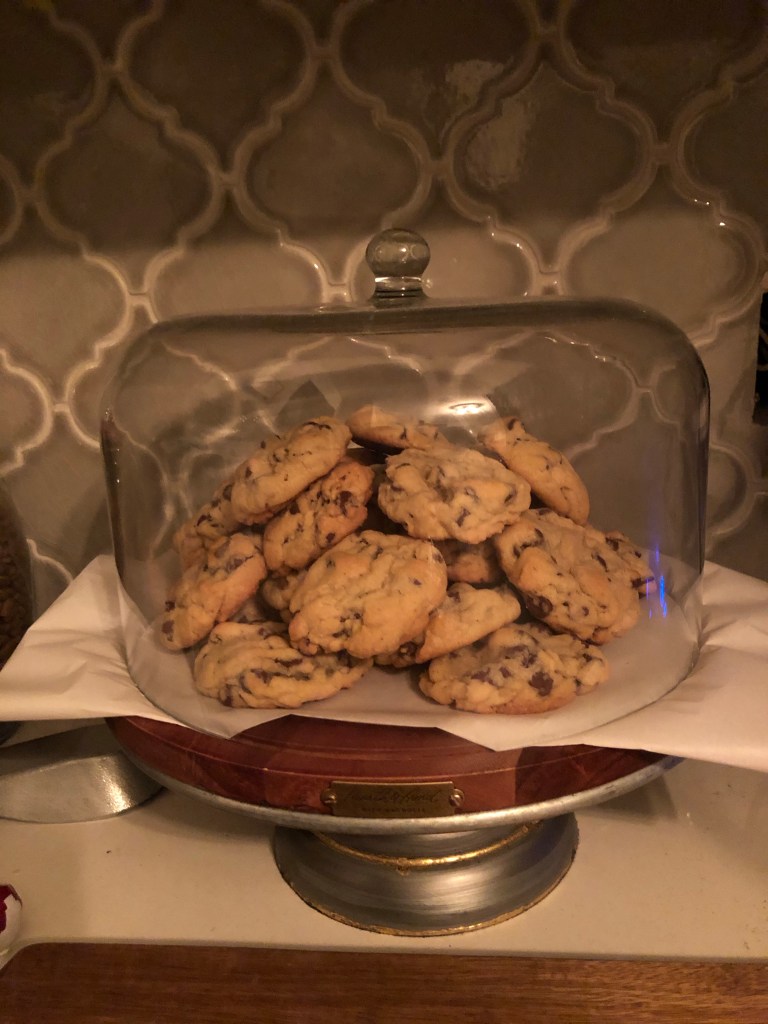
I never buy cookie dough… not because I’m Betty Crocker and I have to make everything from scratch, but because I just never think about buying any. I guess I figure if it’s not there, I won’t bake cookies, so I won’t eat them. Well, this pandemic has taught me to be resourceful and unfortunately I found a recipe that I had all of the ingredients for and of course it was delicious. Except for the time I accidentally only put half of the butter the recipe called for… oops. Yes, I accidentally created cookie biscuits. Don’t try it.
This recipe comes straight from Allrecipes.com, but I don’t add nuts-just chocolate chips!
Ingredients
1 cup butter, softened
1 cup white sugar
1 cup packed brown sugar
2 eggs
2 teaspoons vanilla extract
1 teaspoon baking soda
2 teaspoons hot water
½ teaspoon salt
3 cups all-purpose flour
3 cups semisweet chocolate chips
Directions
Preheat oven to 350 degrees F.
Cream together the butter, white sugar, and brown sugar until smooth. Beat in the eggs one at a time, then stir in the vanilla. Dissolve baking soda in hot water. Add to batter along with salt. Stir in flour, chocolate chips, and nuts. Drop by large spoonfuls onto ungreased pans.
Bake for about 10 minutes in the preheated oven, or until edges are nicely browned.
Well guys… I’ve been in severe depression ever since the Enchirito left Taco Bell’s menu. Yeah, yeah… I know they had a smothered burrito for a while, but it just wasn’t the same. I managed to make something similar kind of by accident. I was really hungry for some enchiladas with a red sauce. I realized what I really wanted was an enchirito, so I got to work. What I came up with was somewhat similar, so I guess it will do for now. I’ll keep you updated as I perfect it!
Ingredients
1 lb ground beef
2 (14.5 oz) cans red enchilada sauce (I used mild, but hot could work too if you enjoy your food a little spicier)
1/2 yellow onion, diced
1 4oz can mild green Chile peppers
6 burrito size flour tortillas
Shredded cheddar, cheddar jack, or monterey jack cheese (whatever you have on hand will work great!)
Black olives (optional, for topping)
Sour cream (optional, for topping)
Diced green onion (optional, for topping)
Directions
Preheat the oven to 350 degrees Fahrenheit.
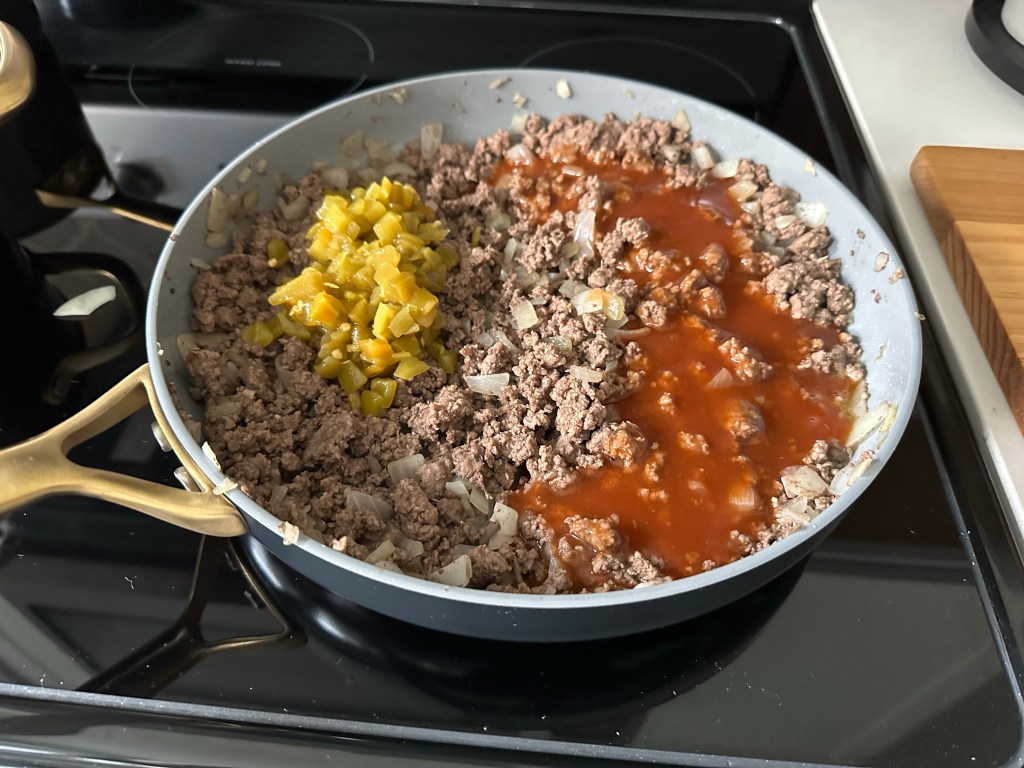
Brown the ground beef and onion until cooked through thoroughly and onion is translucent. Drain/remove the excess fat.
Mix 1 can of red enchilada sauce and 1 can of green chiles with the browned ground beef until well combined.
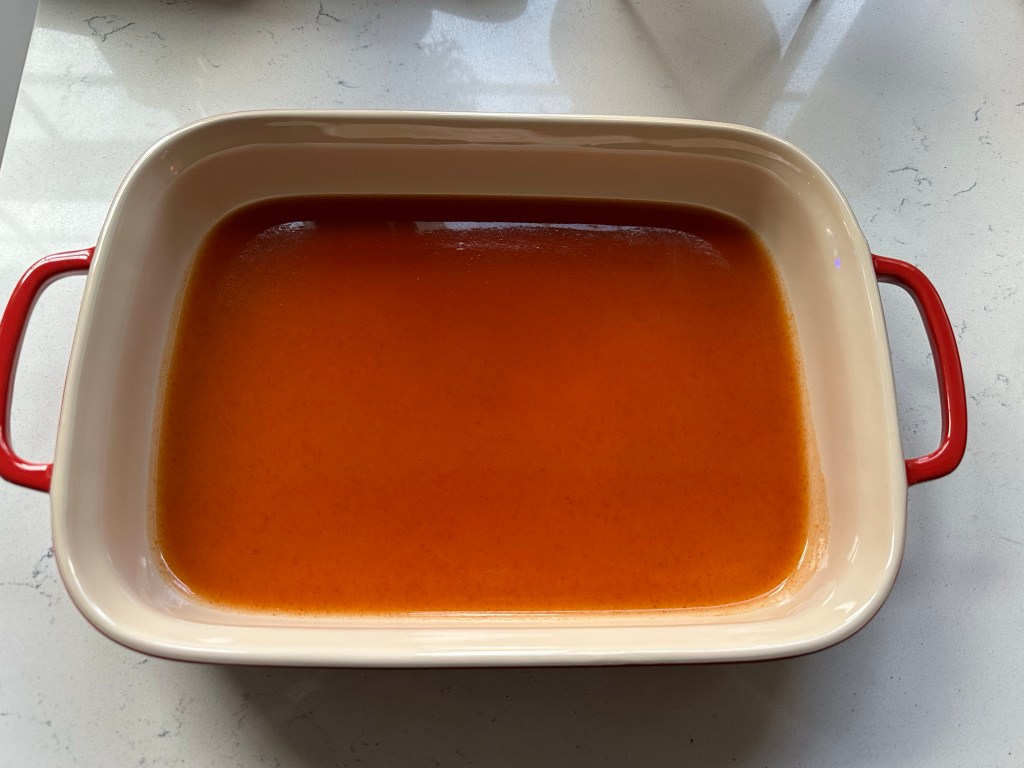
Pour 1/2 can of red enchilada sauce evenly in the bottom of a 9″ x 13″ glass baking pan.
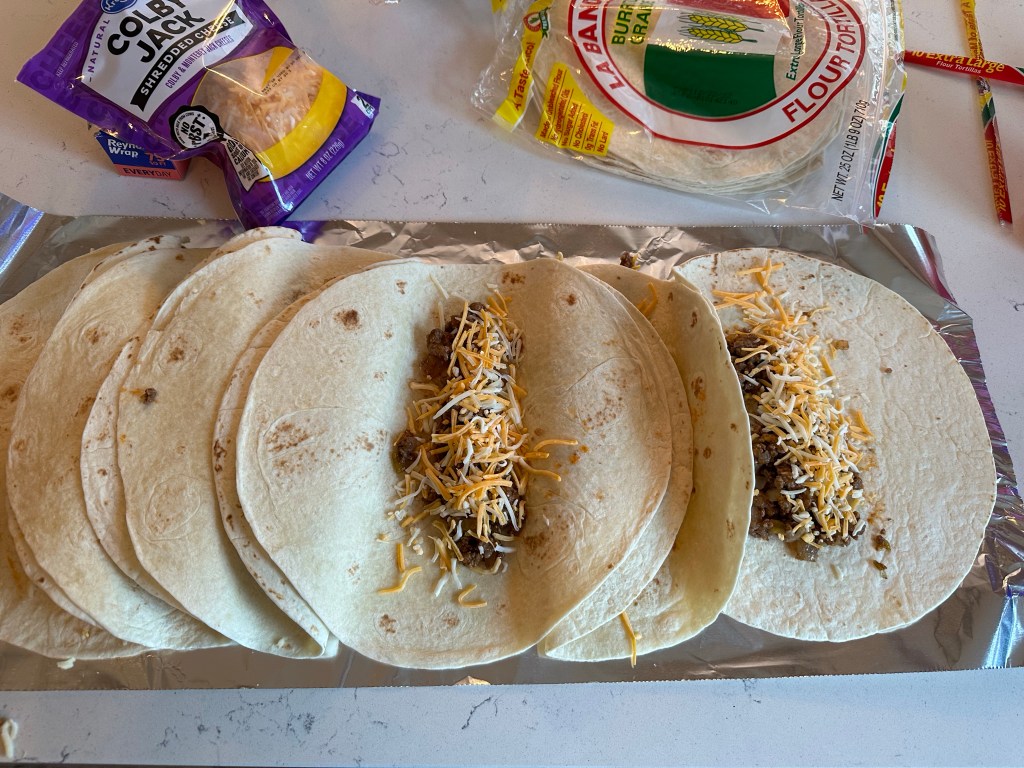
Spread aluminum foil on your work surface to assemble the enchiladas for easy clean up.
Lay out 6 tortillas and fill each tortilla with shredded cheese and the beef and sauce mixture. Roll each tortilla up and place in the sauce lined baking dish.
Top enchiladas with shredded cheese and cover with aluminum foil.
Bake covered 20 minutes. Remove the foil and bake an additional 10 minutes or until cheese is melted.
Top with sour cream, black olives, or diced green onion if desired. Serve and enjoy!
The weather is starting to change and we’re sprinting towards the winter months. This means dry skin, dry hair, dry nails. Ok, you can only moisturize so much and cuticle or nail oil is great… when you actually remember it. I don’t know about you, but things around here are extra crazy this time of year and 2020 has not been kind to anyone, so I definitely don’t have time for 500 steps in my skincare routine right now.
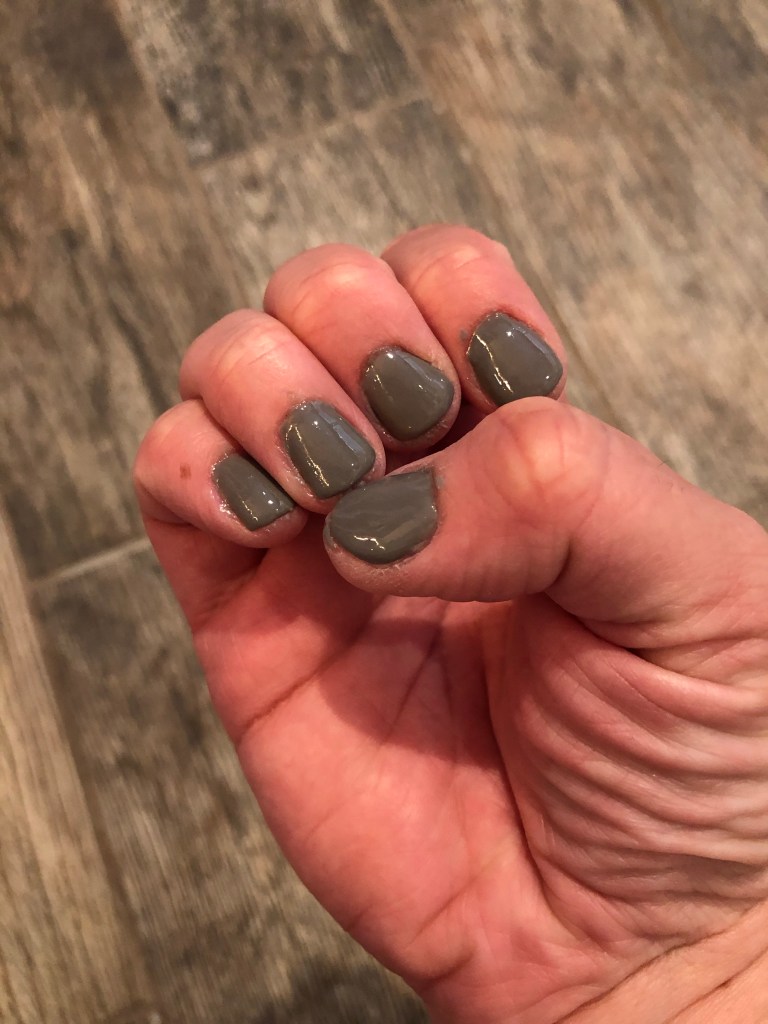
My nails keep splitting and breaking way, way, WAY back. If I paint them this won’t help with the breaking, so I thought maybe I’d go get them done soon with a gel manicure. Ok, that might help some, but it still won’t stop them from splitting or breaking too far back. I suddenly remembered seeing a Facebook ad for dip manicures. Hmm… ok, but are they sturdy enough to withstand the cracking, splitting, and breaking nails?
Like all of my posts, I’m sure you know where I headed. Time for some hardcore Amazon research. I found many kits, but I always opt for the ones with the best price and best reviews. Bingo… I found a starter kit that contained colors I love and there was a coupon with a lightning deal. I looked at all of the photos, read the reviews, and this seemed like the real deal, so I went for it.
What I liked about this particular set is it seemed like there were only a few steps, the kit came with everything already included, and the colors were perfect! I chose the kit with a gray and pink color scheme. This particular kit had a two different color options, so if I did fall in love with it, I could order a second set in a different color scheme.
The directions were simple and there wasn’t too much to read through. I was able to apply the dip powder easily and quickly. I completed my entire manicure in about half an hour. The manicure looked great for a first attempt. I know the second attempt will be even better now that I know what I’m doing. Next time I will make sure I don’t get sloppy with the base coat as it can go outside the nail line fairly easily. Once you go outside of your nail line it adheres to your skin and it’s a little difficult to correct. When applying regular polish I’ve always gone very far outside of my nail line and cleaned it up later, but this forces me to be a little bit neater.
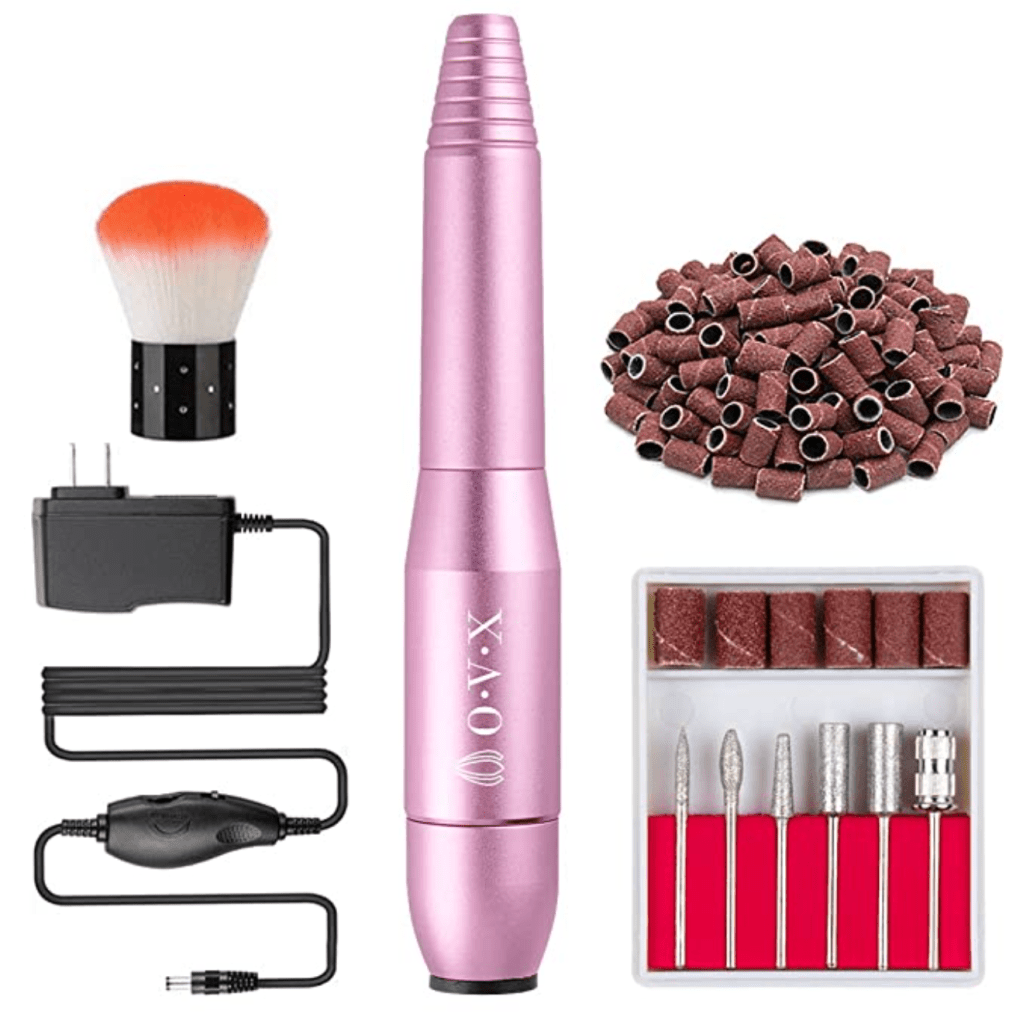
My nails are now strong, sturdy, and aren’t tearing, breaking, or chipping like they have been the last few weeks. I think this is a great solution to help me grow my nails out without them continually breaking. The colors are great in this kit, it is quick and easy to apply, and I found it to be very forgiving for a dip manicure newbie. For the price of one manicure I will now be able to keep up with them myself at home whenever I have time. I believe I will be purchasing an electric nail file to sand down the manicures when I need to fill in in a few weeks. Otherwise I think they’ll become a little too thick after fill-ins.
If you like a little more length than what you currently have, Amazon has a lot of options for tips. The directions in this kit even tell you how to apply the nail tips, then apply the dip manicure for a great finish.
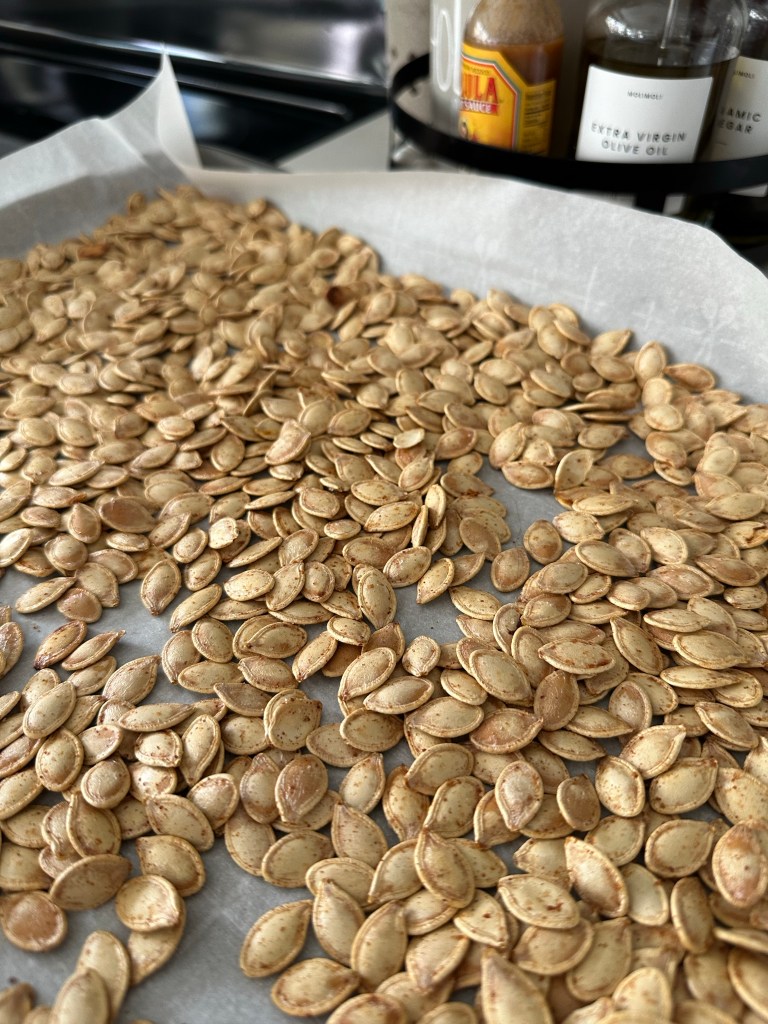
I know, I know… Halloween is over and most people have already thrown their seeds out by now, but in case you haven’t, here is a great “recipe”. I’m using quotes because it’s really just seeds and seasoning. Easy peasy lemon squeezy. Well, no lemon, but… you get it. I adapted this recipe from one I found over at Food.com.
Ingredients
Pumpkin seeds
Olive oil
Salt
Seasoning Salt
Garlic Powder
Directions
After removing seeds from the pumpkin, make sure all pumpkin slime and chunks are removed.
Rinse the seeds in a strainer thoroughly and allow to dry overnight on wax paper. Change the wax paper after 24 hours and allow to dry on a new sheet of wax paper for an additional 24 hours or until completely dry.
Preheat oven to 300 degrees Fahrenheit.
Toss the seeds in a bowl with olive oil. Use enough oil to very lightly coat the seeds. The seasoning will stick well with very little oil.
Add salt, seasoning salt, and garlic powder to taste. Other seasonings may be used to create different flavors.
Line a baking sheet with parchment paper. Add seasoned pumpkin seeds to baking sheet.
Bake seeds for approximately 45 minutes, stirring occasionally, or until golden brown.
After being stuck in the Victoria’s Secret conundrum for over a decade, I finally embraced the fact that it MIGHT NOT BE the only good intimates option *gasp* I know, I know… it’s kind of like Clinique. Abercrombie & Fitch. Lulu Lemon. There ARE other brands and yes… they can be comparable, if not better.
Yes, I have always gotten amazing deals from Victoria’s Secret in the past, but like every other brand name, those deals seem to be becoming few and far between lately. So, I did what any great shopper does and hit up my Amazon Prime for other options. I’ve had great luck lately just typing in whatever I’m searching for then BAM! An item with thousands of glowing reviews pops up as “Best Seller”. So, today I have two alternatives for you-Body by Victoria underwire bras and cotton bikini underwear.
Body by Victoria Underwire Bra Dupe
So, the best option that came up on Amazon was Maidenform’s Comfort Devotion Embellished Bra. Reviewers even posted photos comparing their Victoria’s Secret version to the Maidenform version. They are so similar that you can hardly tell the difference. Here are some pros and cons that I found with this dupe:
The fit and cut is nearly identical to the Victoria’s Secret version. In fact, reviewers posted photos of the Body by Victoria bra with the Maidenform version and they looked nearly identical. Maidenform’s version has a three hook and eye closure, while the Victoria’s Secret version has only two. I definitely prefer the three hook version as it helps everything stay in place and be much more secure. Maidenform’s version even seems softer than Victoria’s Secret’s. This could mean it won’t hold up as well as the Victoria’s Secret version, but I’ll keep you posted on how they wear!
Cons:
I don’t really know that there are many cons to this one. The straps seem a little stretchier, which could mean a little less support and the Maidenform version is definitely thinner. The Amazon selection of Maidenform also mostly have lace, which might not be the best style under tighter fitting t-shirts. Other than these minor cons, the bras are definitely comparable.
Amazon Essentials has the best dupe for Victoria’s Secret cotton panties. You know, the ones you always get free when you have a VS credit card? Who doesn’t love those?! In fact, I’m not even giving you a pro/con list for this one (yeah… I know your inner Rory Gilmore just died a little…). They’re that good. I even grab these before I grab any of my Victoria’s Secret versions. They wash well, they hold up well, and they’re just plain comfortable. These are just plain great. The cut is also comparable to Victoria’s Secret Cotton Bikini Panties. The price? $2.25 per pair. Seriously. Buy some.
It’s fall… time for chili! I’ve made a few different versions of white chicken chili, but this version that I adapted from The Chunky Chef is by far my favorite. Step on some crunchy leaves, grab a cozy sweater, and enjoy some chili!
Ingredients
1 lb boneless skinless chicken breasts – I usually use more than a pound for a more hearty chili. You can also use frozen and it still turns out great!
1 yellow onion – diced (I usually use frozen for a quicker recipe!)
2 cloves garlic – minced
32 oz. chicken broth
3 15oz cans great Northern beans – drained and rinsed
2 4oz cans diced green chiles – I usually use mild because kids will be eating it, but hot works great, too
1 15oz can whole kernel corn – drained
1 tsp salt
1/2 tsp black pepper
1 tsp cumin
3/4 tsp oregano
1/2 tsp chili powder
1/4 tsp cayenne pepper
small handful fresh cilantro – chopped (dried works great if you don’t happen to have fresh on hand!)
8 oz reduced fat cream cheese – softened
1/3 cup half and half
Monterey Jack cheese (optional, for topping)
Tortilla strips (optional, for topping)
avocado (optional, for topping)
Sour cream (optional, for topping)
Directions
Add chicken breasts to bottom of top slow cooker with salt, pepper, cumin, oregano, chili powder, and cayenne pepper.
Top with diced onion, minced garlic, great Northern beans, green chiles, corn, chicken broth and cilantro. Stir.
Cover and cook on LOW for 8 hours or on HIGH for 3-4 hours.
Remove chicken to large mixing bowl, shred, then return to slow cooker.
Add cream cheese and half and half, stir, then cover and cook on HIGH for 15 minutes, or until chili is creamy and slightly thickened.
I always buy pork chops or pork loin and never know what to do with them. I love breaded, pan fried pork chops, but it’s hard to pan fry them lately with a 2 year-old running into the kitchen every 5 minutes while I’m cooking hurling Hot Wheels cars across the floor. I mainly use this recipe as a dry rub for any kind of pork I prepare. Although this recipe is meant for baked pork chops, it’s also great on a pork loin in the Crock Pot for 8 hours on low. If you decide to use the slow cooker version, add around a cup of chicken broth to the Crock Pot.
I never thought I would see things that I’m seeing happen before my very eyes in the land of the FREE (well… what used to be free…) and the home of the brave. Ladies and gentlemen, we are no longer a nation of freedom. We are a nation of censorship, division, and false information.
Today I encountered something I never thought would happen to me-censorship. Censorship of my personal social media account. With everything going on in our country at the moment (I’m not even opening that can of worms…), a quote came to mind: “If you tell a big enough lie and tell it frequently enough, it will be believed.”
The author if this quote is none other than… you guessed it… Adolf Hitler. The reason I decided to post this quote was to show that the media can’t be trusted. We are being fed lie after lie and not only is it being considered the truth, but no one is even questioning it. Where does the information come from? Is it a reliable source? Is it an OPINION? Contrary to popular belief, opinion isn’t fact. Just because you want to believe something doesn’t magically make it true.
Back to censorship. Posting this simple quote to try to inspire others to really think about what information is being digested left me banned from my personal Facebook account for two months. I was notified that my post was removed because it didn’t meet community standards. I was able to respond to the removal and stated that I didn’t feel I broke any community standards. What was wrong with my post? The fact that it was a quote from a communist dictator? Huh… the irony is strong with that one. Or maybe Zuckerberg doesn’t want mention of the Holocaust since it didn’t really happen *full eyeroll* Maybe it hit too close to home because of the current political climate. You know, gotta keep people as dumb as we can so they don’t know they’re being lied to. Regardless of the reason, this is blatant censorship at its finest.
Now, me being the stubborn person I am, I took this screenshot and naturally posted my outrage that this was removed and being censored. I’m sure you know what happened next…
Not only was my quote removed, but the post of the screenshot of my removal was removed and I was banned from commenting and posting for 24 hours or advertising or going live for 60 days… SIXTY… six zero days. Guys… that’s TWO MONTHS. Two. Months. Can you imagine how devastating this would be if this was done to a business?
This is why it’s important to pay attention to what is happening around us. We can’t keep letting this happen. I will not be silent about what I see happening around me. Don’t let yourself be silenced.