Once upon a time I came across this awesome chicken soft taco recipe from Kroger in a packet of coupons. I put that awesome recipe in my handy dandy recipe app to keep it “safe”. Then, after upgrading my phone I lost all of my recipes. The end.
Sorry… that story didn’t have a happy ending, but I was determined to find at least a similar recipe to the original. I didn’t. BUT… I am piecing together what may end up being even better than the original, so I’ve put it together here for the masses. You’re welcome.
These tacos are delicious and there is no cooking involved. Seriously! No baking, grilling, or crock-potting. Yes, I just made crock-potting a verb. I also use my favorite Copy Cat Chuy’s Creamy Jalapeno dip recipe for these tacos. The cilantro slaw portion of this recipe is inspired by One Lovely Life. It is a great mix of sour, sweet, and crunch to top the tacos. If you love the slaw, check out the rest of the recipe for great fish tacos!
Ingredients
Copy Cat Chuy’s Jalapeno Dip
1 whole large jalapeno, chopped
2 cloves garlic, minced
3 Tbsp fresh cilantro
16 oz light sour cream
1 oz package of ranch dressing mix
1/2 lime, juiced
4-6 Tbsp milk
Cilantro Slaw
2 cups shredded purple cabbage
2 Tbsp cilantro
Juice of 1/2 lime
3/4 tsp honey
1/8 tsp salt
1/8 tsp pepper
Chicken Tacos
1 Rotisserie chicken, meat separated and shredded
Corn tortillas (or hard shells if preferred)
salsa of choice
avocado, sliced (optional)
Directions
Prepare Creamy Jalapeno Dip
Combine jalapeno, garlic, and cilantro in blender or food processor.
Pulse until finely chopped.
Add light sour cream, ranch dressing mix, and lime juice and pulse to combine.
Add milk and pulse. You can add it slowly to get the consistency you want. The Chuy’s version is pretty thin, so I liked 6 tablespoons.
Refrigerate for a few hours to allow the flavors to combine.
Prepare Cilantro Slaw
In a medium or large bowl, combine red cabbage, cilantro, lime juice (start with 1 Tbsp), honey, salt, and pepper.
Taste and add additional lime juice or honey as desired.
Stir to combine well and set aside until ready to serve. The salt and lime juice will help soften and break down the cabbage.
Prepare Tacos
Add chicken, avocado, slaw, and jalapeno dip to a tortilla or hard shells and serve with fresh cilantro and lime wedges. Enjoy!
I love having this recipe when I end up having an abundance of zucchini. It’s that time a year again… zucchini season! That means A LOT of zucchini will be consumed and we begrudgingly making a million loaves of zucchini bread. While I love zucchini bread, sometimes I want something different. This recipe is just that. My kids love it, too!
I found this recipe from Ready Set Eat. This recipe uses Egg Beaters, but usually use regular egg and it turns out great-and possibly better. It also has feta, so I’m usually a fan of any recipe with feta. This is also a low-fat recipe, which makes it even better!
Ingredients
3 small zucchini, sliced thin
1 cup fat free small curd cottage cheese
1 egg
1 cup Italian seasoned croutons, crushed slightly
1 can (14.5 oz) stewed tomatoes, drained
1/2 cup crumbled feta cheese with garlic and herbs
Directions
Preheat oven to 375 degrees Fahrenheit. Spray an 8×8-inch baking dish with cooking spray. Place zucchini in medium microwave-safe bowl. Cover; microwave on high 5 minutes. Drain well, patting dry with paper towels. Layer zucchini in bottom of baking dish.
Combine cottage cheese and egg in same bowl; mix well. Spread cottage cheese mixture over zucchini. Top with croutons and drained tomatoes; sprinkle with feta cheese. Cover loosely with aluminum foil.
Bake 15 minutes. Uncover; bake 10 minutes more or until bubble around edges and set. Let stand 5 minutes before serving.
Breakfast foods are some of my favorite foods… biscuits and gravy, eggs and bacon, and of course… breakfast sandwiches! I’ve made breakfast sandwiches at home for years, usually one at a time, but that became a pain when kids came along (ain’t nobody got time for that!). Since then I’ve perfected my breakfast sandwich game big time. I hope this saves you time AND money at the drive-thru! The best part about making these is the kids LOVE them! They’re so easy to freeze and thaw in the microwave and come out perfect every time.
I use a whoopie pie or muffin top pan (you can find them on Amazon!) for perfect eggs. You can also use a cupcake or muffin pan, but they don’t turn out as evenly done. Ramekins also work, but I find that they’re a little more of a pain since they’re not confined to a single pan.
Ingredients
12 English Muffins
12 eggs
12 slices White American cheese (or any other cheese that you prefer-Gouda is excellent on these sandwiches!)
12 slices of bacon (usually about a pound turns out just right), 12 sausage patties, or 12 slices of ham (Canadian bacon)
salt
pepper
Directions
Heat oven to 325 degrees Fahrenheit.
Prepare bacon or other desired meat.
Spray the whoopie pie or muffin pan with nonstick spray. Crack an egg into each cup. Gently break the yolk of each egg to allow for even cooking. Add salt and pepper to each egg to taste. Cook in the oven 10 – 15 minutes or until yolks are cooked through.
While the eggs are cooking, separate all of the English muffins and place on a working surface like a pan or covered counter top. Place a slice of cheese on the bottom half of each muffin. Fold the corners in so no cheese will melt outside the muffin.
Once eggs are thoroughly cooked, place an egg on each slice of cheese. Top with bacon or meat of choice and add the top bun.
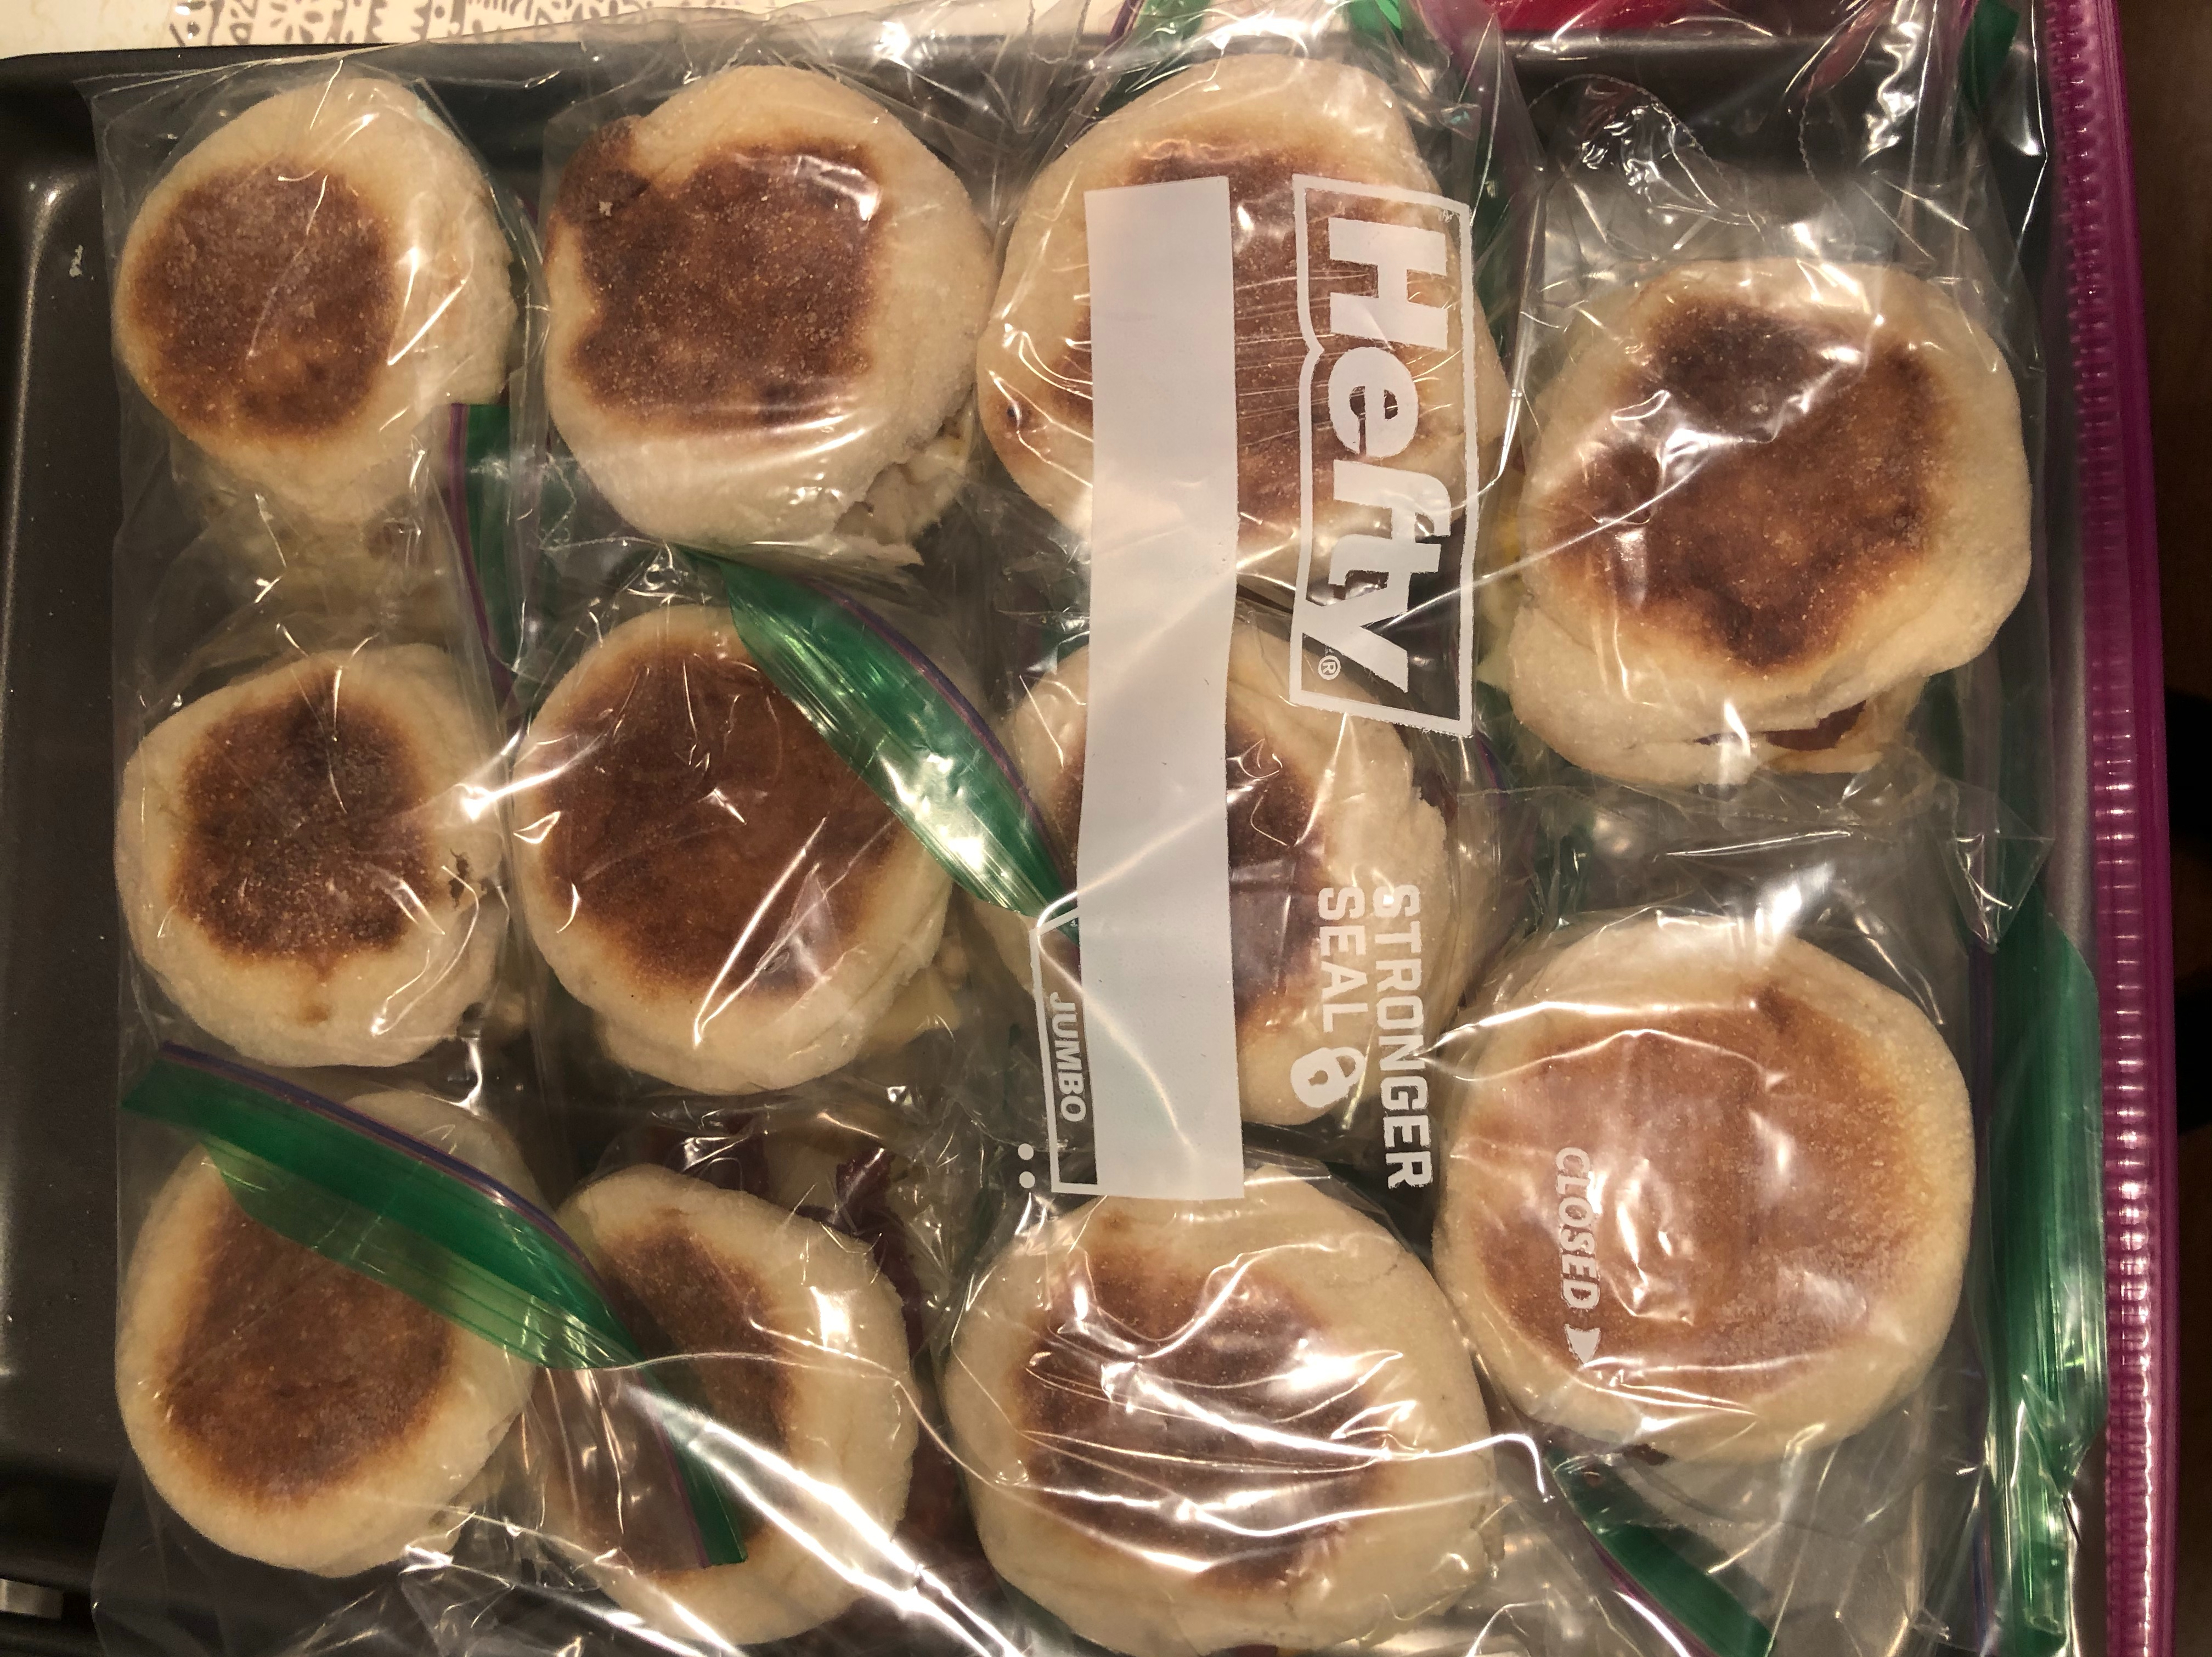
Allow the sandwiches to cool completely and add to a Ziploc bag. Place all sandwiches in a large freezer bag and place in the freezer.
To thaw the sandwiches, wrap the sandwich in a paper towel and heat in the microwave for 3 minutes and 45 seconds on 50% power, turning the sandwich over every minute.
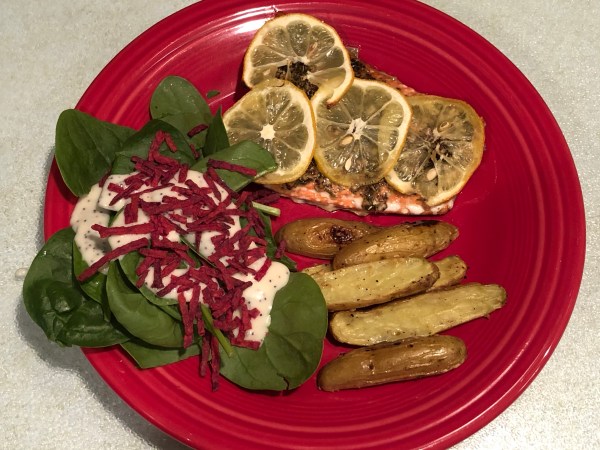
Fingerling potatoes – yet another thing I never would’ve tried if it weren’t for Misfits Market. These potatoes are a bit like a regular russet potato roasted, but they seem to have a little more flavor. This is definitely a new side dish I’ll be making from now on! It’s easy, quick, and is a good twist on the typical potato side dish. This recipe was adapted from a recipe from Inspired Taste. Their recipe has a potato salad sauce that would be great with this side dish!
Ingredients
1 1/2 lbs fingerling potatoes, scrubbed, and halved lengthwise
1 tsp minced garlic
2 Tbsp extra virgin olive oil
1/2 tsp sea salt
1/2 tsp black pepper
Directions
Heat the oven to 400 degrees Fahrenheit.
In a medium sized bowl, coat the potatoes in olive oil, garlic, sea salt, and black pepper.
Place seasoned potatoes on parchment paper on a baking sheet and bake for 15 – 20 minutes or until browned to the desired golden color.
For some strange reason making ribs has always intimidated me. I guess because it’s something other than boring chicken or a roast. Who knows the real reason, but I finally decided to attempt ribs in the crock pot. I bought two racks of baby back ribs a while ago and made one rack in the Instant Pot. I wasn’t particularly impressed, so I wasn’t too thrilled about making the other rack that has been in the freezer making me feel guilty every time I open the freezer door to thaw my (boring) meat for dinner for the past month or so.
I knew there had to be an easier way than the Instant Pot for ribs, so the search was on for a great crock pot recipe. Spend With Pennies NEVER disappoints! I started with their Crock Pot Ribs recipe and tweaked the ingredients based on what I had on hand and the amount of ingredients I needed. They turned out amazing! I will never make ribs any other way from now on and I will no longer be intimidated by ribs!
Ingredients
2 racks baby back ribs
1 onion
4 cloves garlic
1/2 cup water
Barbecue sauce
Rib Rub
2 Tbsp paprika
2 Tbsp brown sugar
1 1/2 tsp garlic powder
1 1/2 tsp onion powder
1 tsp black pepper
1 tsp lemon pepper
1 tsp salt
Directions
Combine all of the ingredients of the Rib Rub together well.
Remove the silver membrane on the back of the ribs. Cut ribs into more manageable pieces for the crock pot. I usually cut mine into sections of two ribs.
Add water to the crock pot. Coat ribs in the Rib Rub evenly and add to the crock pot with the onion and garlic.
Cover ribs in a thin layer of barbecue sauce.
Cook ribs on low for 8 – 10 hours or until tender.
Add ribs to baking sheet and brush on a thin layer of barbecue sauce. Place sheet of ribs in the oven under the broiler until they reach a desired crispiness.
The people are taking a knee, but what are they kneeling for at this time?
Jesus is King: Lord of Lords! He is the ONLY person I will be kneeling for.
God loves His creation, one and all… even though we might stumble and fall.
Red and yellow, black and white, they are precious in His sight.
So, here is the church. Here is the steeple.
It’s time to OPEN THE DOORS and see all the people.
But I, through the abundance of your steadfast love,
will enter your house.
I will bow down toward your holy temple
in the fear of you.
Lead me, O Lord, in your righteousness
because of my enemies;
make your way straight before me.—Psalm 5:7–8
Well, thanks to a friend’s Facebook post I have started a new adventure. I am now teaching English to children in China. No… seriously. I am.
If you know me at all you know that I can’t stand to have only one thing on my plate. Instead, I have plates on poles that I spin while standing on one foot attempting to balance them all perfectly not letting one single plate crash to the ground.
Scrolling through Facebook I notice a friend tagged me in a post about VIPKid. VIP-what-huh? I thought “That’s odd. What is this and why am I being tagged?”. I read her post talking about teaching Chinese kids English online. Ok, that’s pretty cool, but she’s a teacher. A professional teacher that knows what she’s doing. That’s not me. I’m an engineer. I don’t have a teaching degree or any certifications, and I don’t want to recruit people. Not my thing. Looks really cool, but not my thing.
Fast forward and I keep seeing her posts about her students and they sound adorable. I read on and she explained that all you need is a bachelor’s degree, webcam, laptop with a camera, or an iPad, a backdrop, and a headset with a microphone. Hmmm… ok, I could do this. Wait… how many people do I have to recruit to actually make money? None. Ok, what is the quota of classes I have to teach to actually make money? None. Surely there’s something to this I’m missing…
Ever the skeptic, I checked out their website and watched a few YouTube videos. Ok, it can’t be this easy. I checked out some reviews. They were all honest reviews and it seemed to all check out. Fine. I gave in. This could be my next spinning plate to balance. The good news is this one would actually make some extra cash instead of spending it. This side gig is rewarding, fun, doesn’t cost anything to begin, and doesn’t feel like a job. To all of those mommas out there, the hours are WHEN YOUR CHILD SLEEPS! Finally, a mom friendly side gig (or main gig!) that is legitimate (yep… I’m looking at you, pyramid schemes disguised as “multi-level marketing businesses”).
If you’re interested in VIPKid, how to get hired, and how teaching classes has been so far (with an HONEST review), look no further… I’ll fill you in! If there are any questions this blog doesn’t answer or you’d like me to mentor you through the VIPKid process, please drop me a line using the contact form at the bottom of this post.
This is a long post and if you’re like me and don’t want to read a novel to get the information you actually WANT to read, here’s a handy breakdown of what this post contains so you can skip to the part you’re actually interested in:
Where to Begin (the Qualifications)
The Demo or Smart Demo
The Mock Class
The Contract
Booking Classes
How Many Bookings Can I Expect?
What Classes Should I REALLY Certify In?
How Much Can I Actually Make Teaching for VIPKid?
Would I Recommend VIPKid?
I’ll follow this post up with some other great VIPKid insights I’ve gained as well as classroom tips, tricks, and stories.
Where to Begin (the Qualifications)
VIPKid requires at least a Bachelor’s degree (ANY Bachelor’s degree… Underwater Basket Weaving? Yep! They accept it!) and at least a year’s experience “teaching” children. Were you a coach? A Sunday School teacher? Did you say hi to a kid in the hallway once? Ok… maybe not the last one, but you get the gist here. ANY experience counts… you don’t have to solely have teaching experience!
Alright, now that you know the qualifications, here’s how to see if you pass the initial qualifications: enter your information on their website OR you can use a referral link. If you prefer to use my referral link, you will be listed as my referral and I will be able to provide tips and information throughout your process. Please contact me using the form at the bottom of this blog if you plan on using my referral link and I would be happy to help!
The Demo or Smart Demo
If you qualify after the application process, you will be required to provide a full (5 minute) Demo or a shortened Smart Demo.
The Demo
The Demo is a shortened 5 minute demonstration of your teaching skills. You can complete this demo and record your class (pretending you have a student in front of you) or you can present this demo live to a VIPKid staff member. VIPKid looks at several things during a Demo:
Nancy Taylor is a VIPKid brand ambassador and makes excellent videos to demonstrate and explain parts of the VIPKid hiring process as well as helpful classroom tips. Here are her tips for the Demo:
The Smart Demo
The Smart Demo is a very quick, approximately 2 minute video taken on a mobile device with the following format:
Record a short video demo
Immediately receive feedback
Lesson tips are provided throughout the process
The same tips for the Demo apply to the Smart Demo. Check out this video from Nancy Taylor for some helpful tips on the Smart Demo.
The next step in the VIPKid hiring process is the Mock Class. The Mock Class allows applicants to demonstrate the VIPKid tools they have learned in a Mock Class setting with a mentor.
The Mock Class
For the Mock Class portion of the VIPKid hiring process, applicants will teach a class to a mentor. This class is a PowerPoint that is approximately 10 slides long. Think of the Mock Class as job training. Most applicants do not pass their first Mock Class, but go on to complete 2, 3, or more Mock Classes. Mock Classes are scheduled with a mentor who will pretend to be a student, observe your teaching, then provide feedback on how you completed the lesson. The Mock Class only lasts about 30 minutes and if you do not pass the first time, you schedule another 30 minute time block until you pass
Here are a few tips for the Mock Class:
Reward system and supplementary tools: use them to motivate students and support the overall lesson objectives
Modeling: ensure that modeling follows the “I do- we do- you do” sequence. Use hand gestures, interactive functions, and props when modeling.
Lesson Objectives: meet the lesson objectives that are laid out in the beginning of the lesson (E.g. Vocabulary, sentence frames, HFW, phonics, math, social studies, etc.)
TPR: use body language to explain the vocabulary
Speaking Speed and Language: Teacher output (speaking speed, difficulty and complexity of language) is appropriate for the student’s level and incidental language (filler language, etc) is avoided or minimized.
Extension: Teacher extends the lesson content according to the student’s language proficiency level by adding level-appropriate new knowledge or drawing on what the student has previously learned.
Phonics: learn how to do TPR for phonics
There are two level options for new hires to certify for at VIPKid. There is the 2/3 level certification as well as a level 4/5 certification. Applicants may choose one level option or complete both. If you complete both you don’t have to go through the hassle of certifying for two separate levels after you pass a Mock Class, but you will be certified for all four levels. If you only choose to complete and pass one Mock Class you will have to qualify to certify for each other level separately later, which can take longer and be a bit more of a hassle (see my section about Certifications).
VIPKid provides Mock Class PowerPoint slides for applicants to prepare for each demo. VIPKid also provides lesson objectives for mock classes A & B. I will warn you, I didn’t find the objectives particularly helpful, but the PowerPoint slides are amazing to practice from. They are the exact lesson and you can practice pacing, TPR, and prepare props for each lesson.
Here are Nancy Taylor‘s sample Mock Classes for both A & B. I found that these helped me prepare the most for the Mock Class.
Mock Class Levels 4/5
Here is a sample and tips for passing the Level 4/5 Mock Class from Nancy Taylor:
The Mock Class mentors are very informative and helpful. Their job is to make sure you’re prepared for your first VIPKid class. If you do have to schedule multiple Mock Classes, don’t be discouraged! Think of it as getting more practice and you’ll be more prepared for your first class! Once you pass your Mock Class you’ll be prompted by VIPKid to sign your contract.
The Contract
After being contacted by VIPKid that the Mock Class has been passed, they’ll allow you to sign your contract. To complete your contract you must submit the following:
Contact information
Profile photo – something professional that will grab the attention of parents booking classes
Featured photos – fun photos that show your personality
Introductory video – a fun video that will help parents see your teaching style and will encourage them to book you for classes (check out Nancy Taylor’s tutorial for making a video using your iPhone below)
About me – add information that will tell parents more about you, your teaching style, and what you hope to do to help their children learn English
VIPKid Certification – all applicants must obtain the VIPKid Teachers of English to Speakers of Other Languages (TESOL) certification prior to signing a contract (you can read more about the VIPKid TESOL in the Certifications section of this post)
Degree information – VIPKid only accepts a photo of your degree
Certifications – list any teaching certifications you may have
Your contract will include your base pay (VIPKid uses incentives in a tiered system) information as well. Once your contract is signed, your base pay is set and you are ready to teach!
Booking Classes
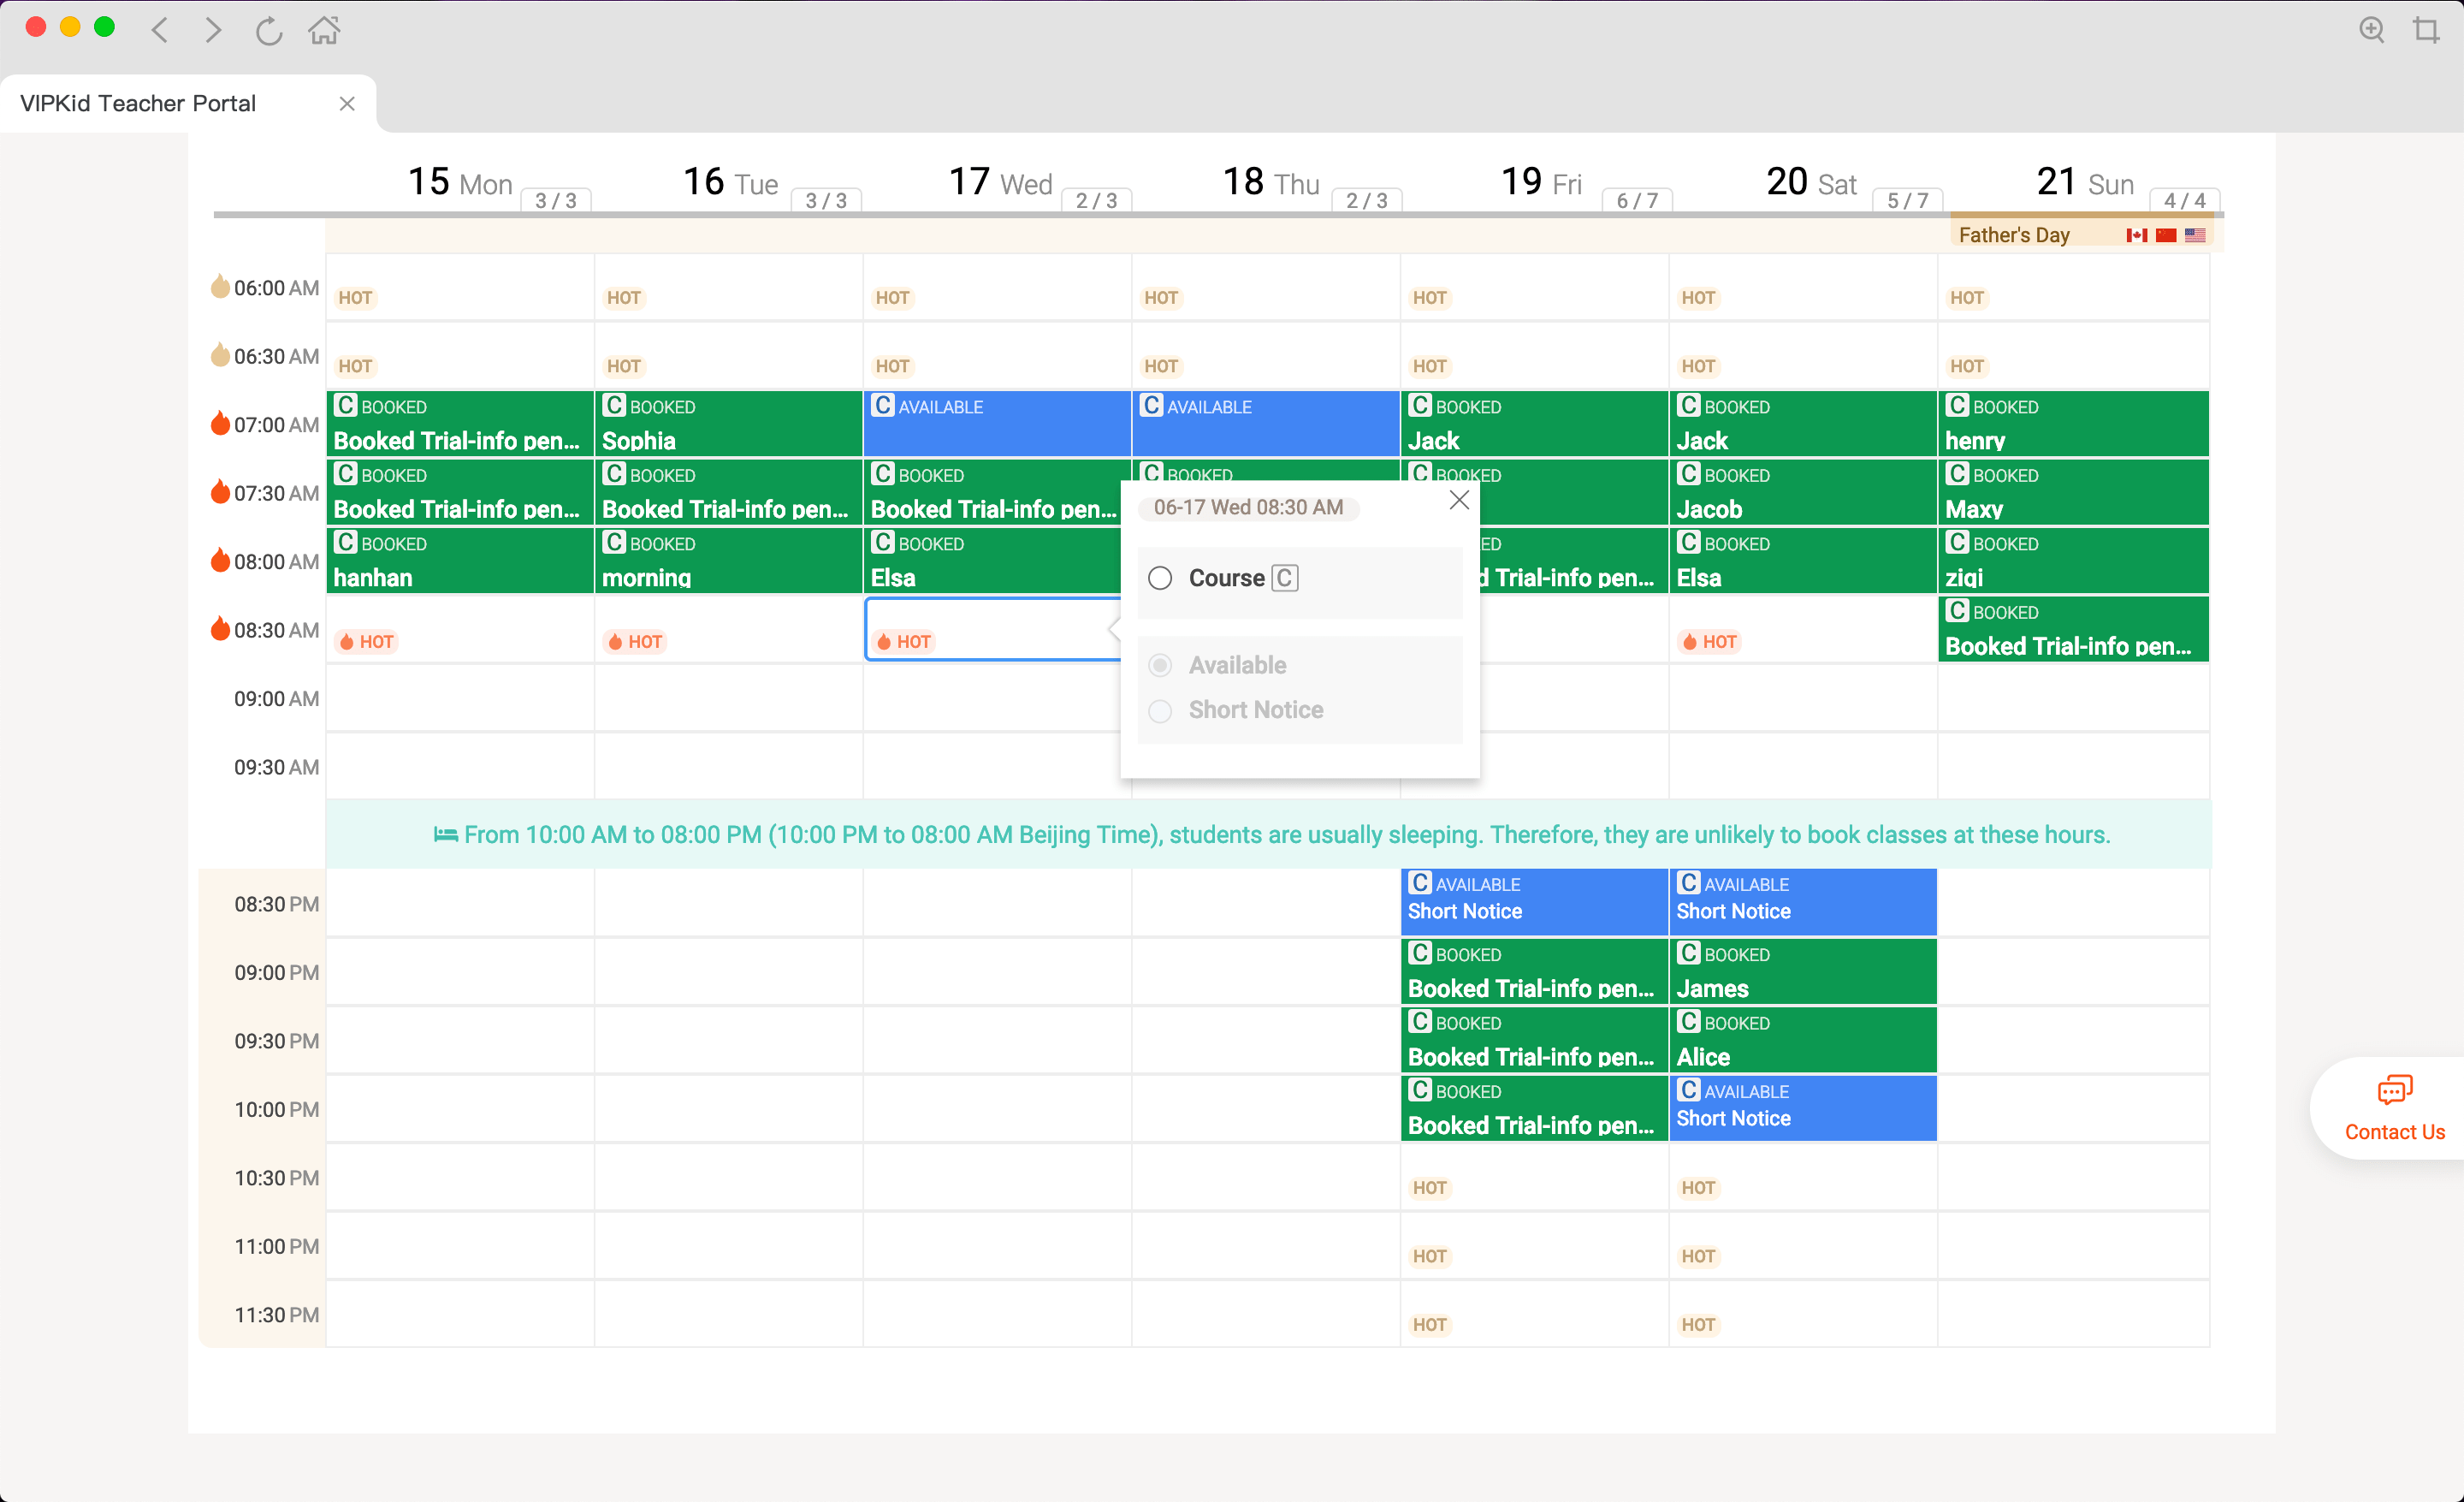
Once your contract is signed there will be a short window of time that booking will be unavailable to you (around an hour or so). Once this window of time ends, you may begin booking your classes. Booking slots may be opened and marked “Short Notice”. Short Notice denotes that you are willing to teach a course with less than 24 hours notice up to an hour before the class begins.
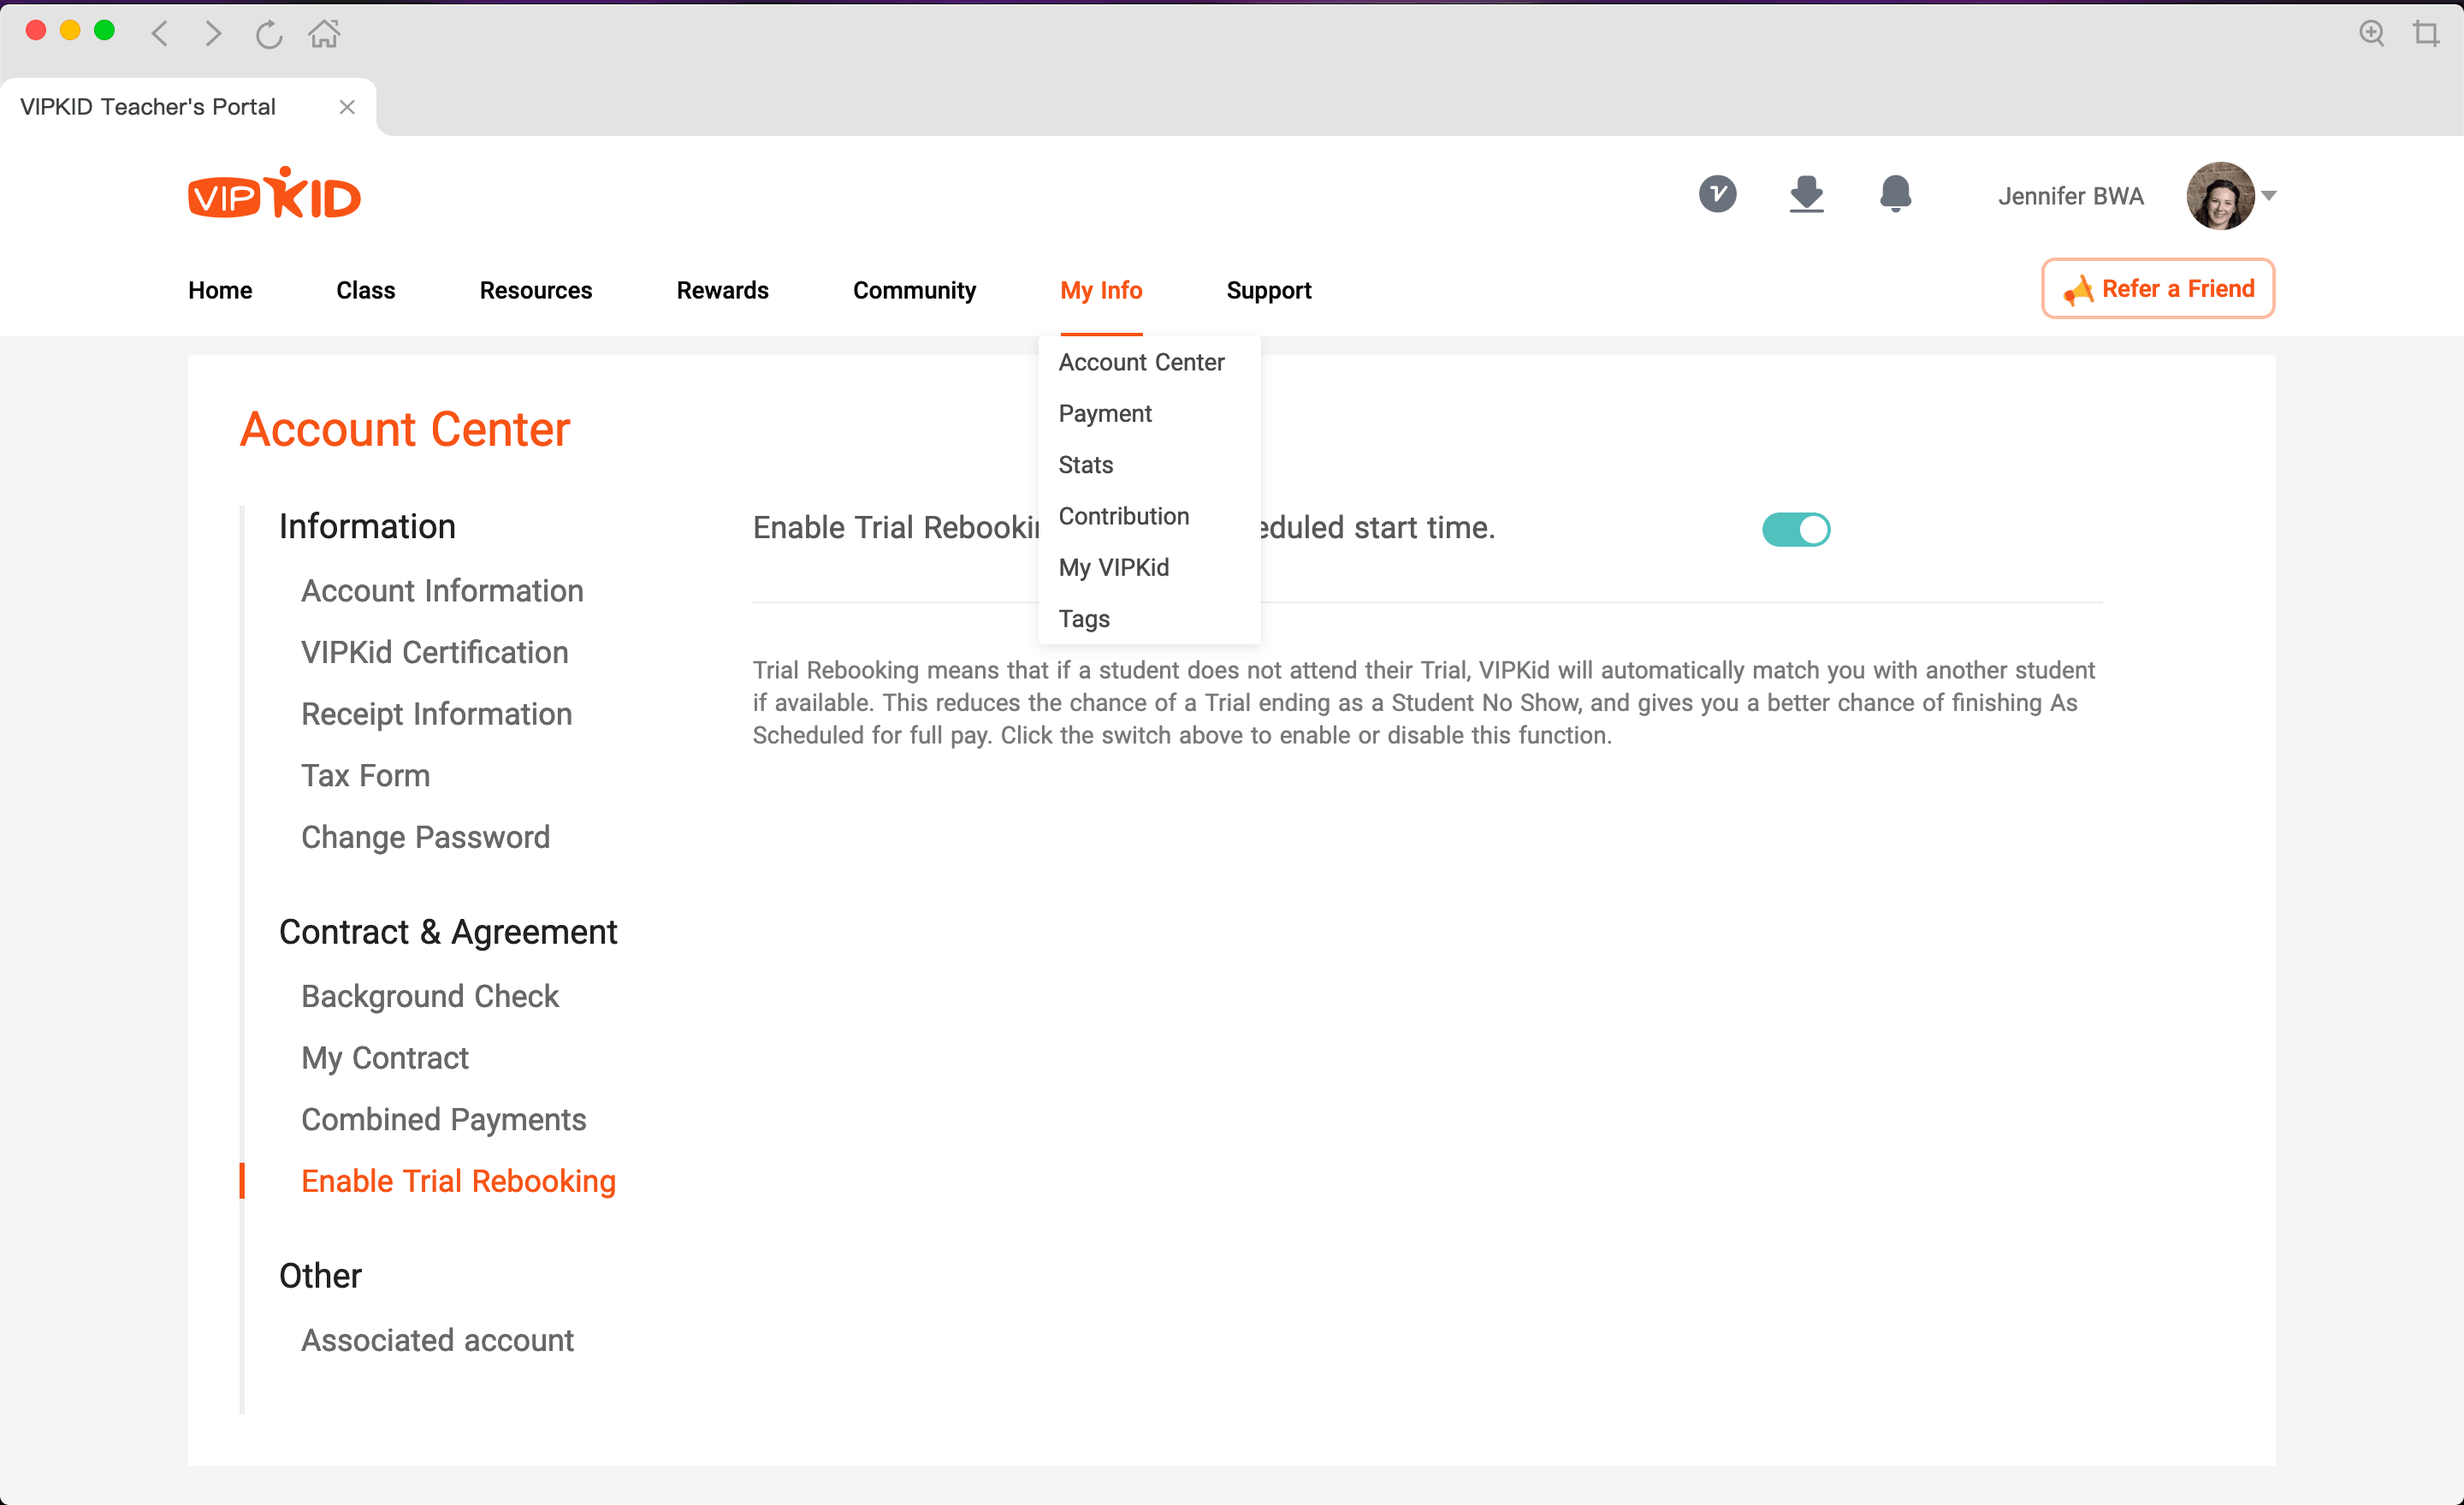
If you choose to become certified in trials (trial classes for those interested in signing up for VIPKid), there is an option to turn on a function called Trial Rebooking. If a trial student doesn’t show up to class, you may be moved to a new classroom with a new student at a moment’s notice. This function is great to ensure you have a student to teach and receive full pay. If you’d prefer to get some practice before being rebooked at a moment’s notice, this function may be turned off in Account Center in the Teacher Portal.
Just make sure that whatever slots you open you are able to teach at those times. There are penalties (financial and potentially harmful to your contract renewal or dismissal) for canceling a class or not showing up for class.
How Many Bookings Can I Expect?
There is no easy answer for this one. I had around 6-7 classes my first and second month as a VIPKid teacher. Apparently, this isn’t the norm-it’s usually much lower and some teachers don’t receive any bookings at all their first few months. My third month I only taught one or two classes, but during this time the entire country was navigating COVID-19. This was a terrible time to be a newbie because not only were brick and mortar teachers home and opening more slots (of course students will choose veteran teachers!), but bookings were down in China due to the children returning to school and their normal lives at this point. Add to all of this chaos the thousands of new hires due to people in America looking for any work from home opportunities they could find.
Last month I taught approximately 20-25 classes and this month I will be teaching many more as my schedule is almost full. I noticed a large increase in bookings when I certified to teach trials and gained more experience. The more classes you certify for, the better chance your schedule will be booked.
VIPKid just recently changed their pay incentive system for veteran teachers. Newer teachers (which is the category I fall in) seem to be booked more often, since we’re technically receiving less pay. This hasn’t been outright stated, but from what I’ve observed in teacher groups this seems to be the case. Just as the number of classes I’m teaching seem to increase, it seems that I have observed more veteran, higher paid teachers receiving fewer bookings and sometimes zero bookings.
All of this being said, this isn’t an instantaneous money maker. It takes time to market yourself and build up regular students or become comfortable teaching trials to gain new students.
What Classes Should I REALLY Certify In?
All. Of. Them. No, really. Whatever is available to certify in, certify in it. If you decide you don’t like teaching a particular type of class you can send a ticket to VIPKid to have that certification removed if you don’t care for that type of class.
Certifications will only become available if you’ve received an advanced certification in a prior level, taught a certain number of classes, or received a certain amount of 5 Apple feedback from parents.
An Advanced Certification is received after teaching five classes of a newly certified level. After five classes are taught, VIPKid will review one of the five classes taught and if the teacher passes, they’ll receive an Advanced Certification for that level and may teach as many courses in that level as they receive bookings for.
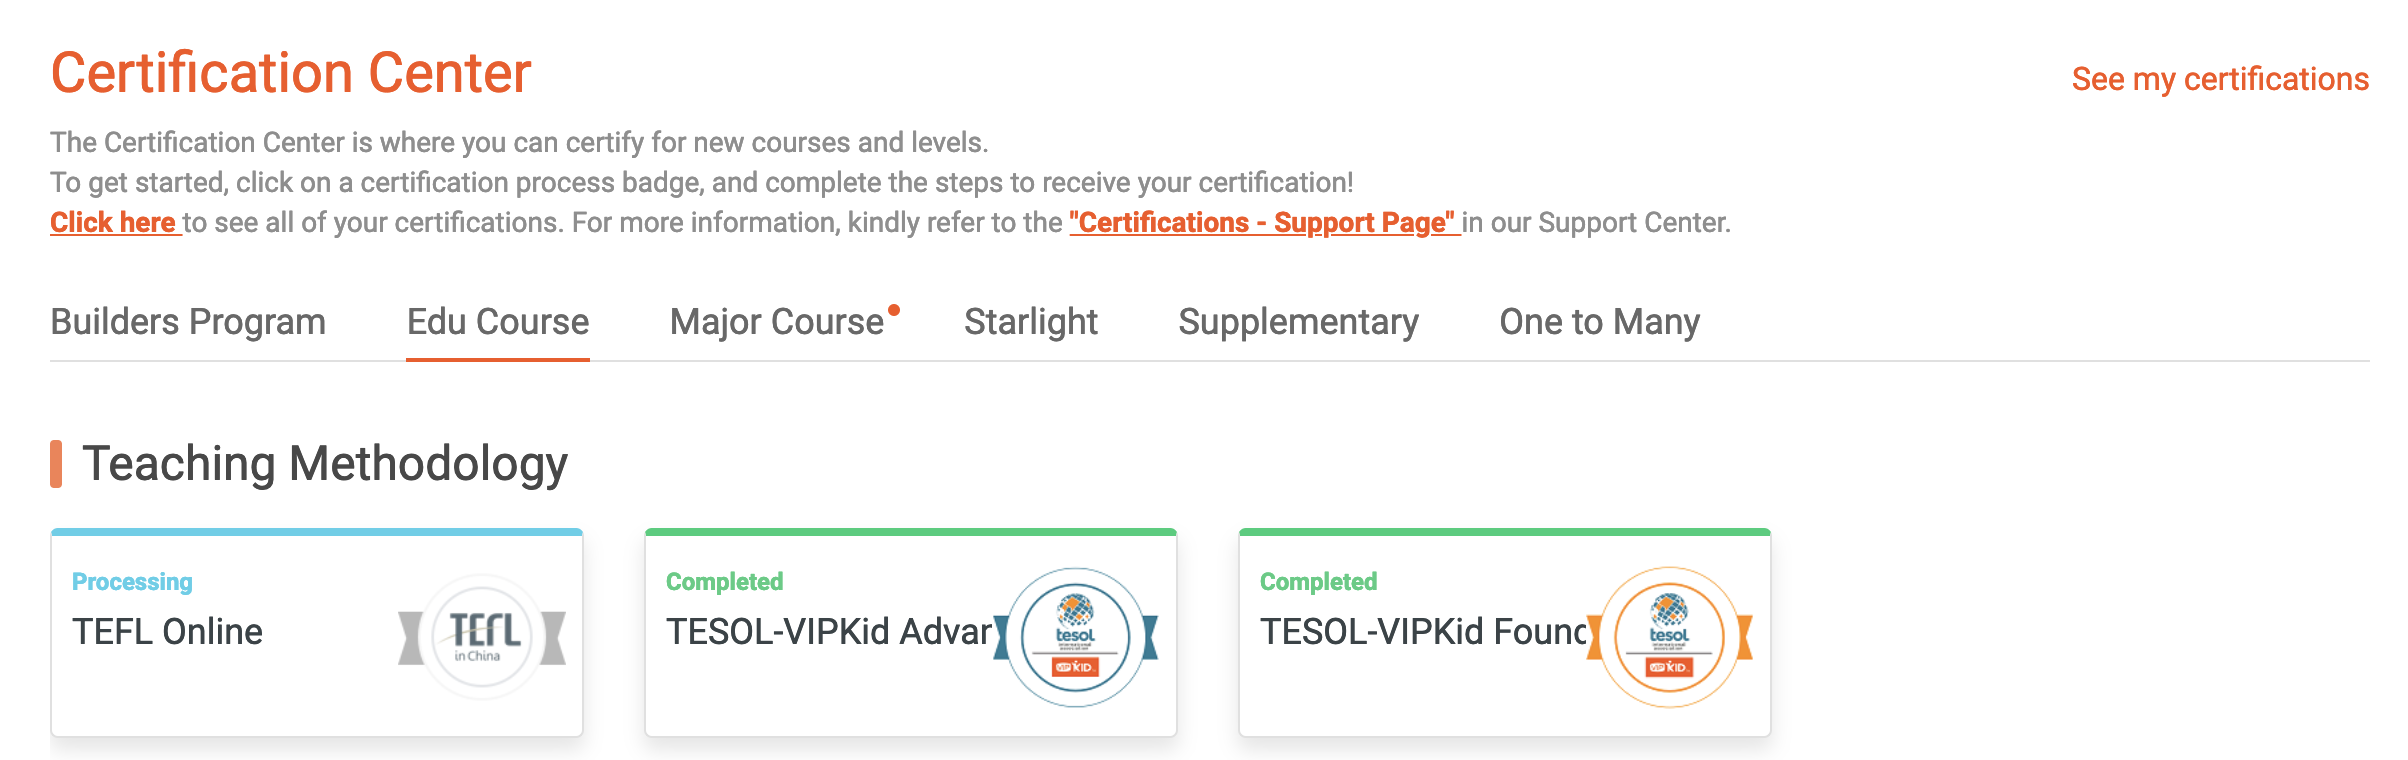
If there is a level or supplementary course a teacher would like to become certified in, the certifications will be listed under Resources ⇒ Certifications.
Major Course and Supplementary courses will be the first certifications any VIPKid may qualify for. Clicking on the course will provide details about what is necessary to qualify for the certification at the bottom of the page.
There are also TESOL and TEFL Edu Courses available. These should be certifications that all VIPKid teachers obtain. Parents can see that teachers have certified for all of them and they will be more likely to book classes with teachers who hold these certifications.
How Much Money Can I Actually Make Teaching for VIPKid?
The answer to this question is similar to the question, “How Many Classes Can I Expect to Book?”. It just depends on how many slots are left open consistently, how many courses you’re certified for, and how many bookings you’re getting.
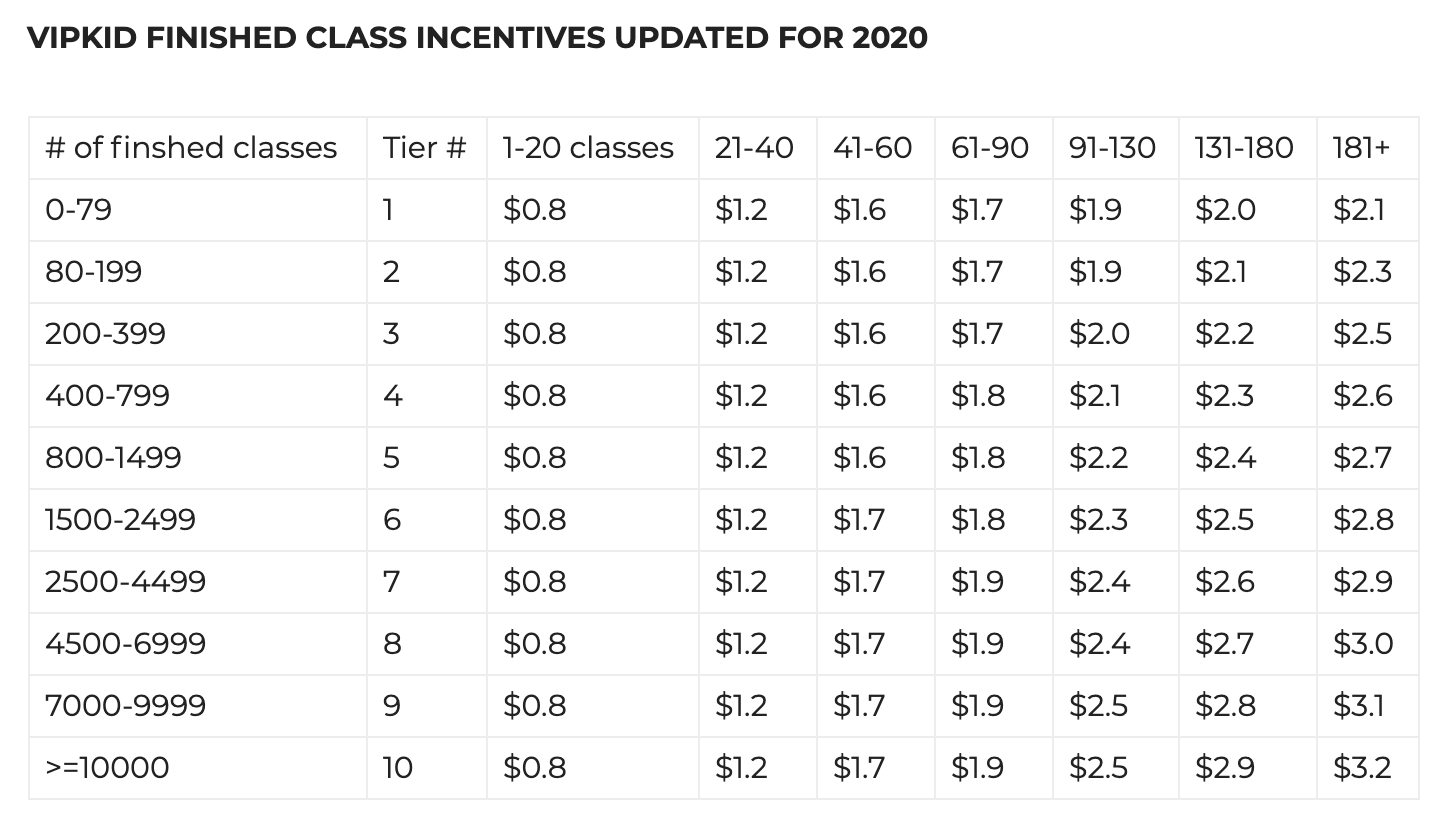
VIPKid has incentives for finishing courses as scheduled. These incentives are applied in a Tier system on top of a teacher’s base pay. Teacher Chelsey breaks down the different tiers in her Incentive Chart.
VIPKid also provides short notice incentives. If a teacher opens short notice slots, they may be booked for a class with less than a 24 hour notice up to within one hour of the scheduled class. If a short notice class is completed as scheduled, teachers receive an extra $2 on top of their base pay.
If teachers certify in trials, teach a trial class, then a student signs up for VIPKid, teachers receive a $5 incentive. This is why trials are great to teach because you not only might have a potential new regular student (yay regular bookings!), but you will also receive an extra $5 if they sign up for VIPKid.
If you’d like to get a feel for what I made my first few months with VIPKid, here is a breakdown:
Month 1: $60.20
Month 2: $60.20
Month 3: $13.30
Month 4: $264.60
Month 5 (current month, half way through the month): $401.40
Since my bookings started picking up a lot this month, I closed a lot of slots so I could give myself a bit of a break. My goal is to make around $700/month with VIPKid. If bookings are consistent, this will be easily achievable.
Would I Recommend VIPKid?
YES. Yes, yes, and… yes. I am not dependent on the income from VIPKid, so the fluctuation in bookings, the slow start, and the current impact coronavirus and relationship with China doesn’t deter me from making extra money while my bookings are currently increasing. The pay is decent for a 25 minute course I can teach before my kids wake up or after they go to sleep at night.
The prep for classes is fairly minimal. I enjoy grabbing props to use for lessons, preparing what reward I will give my students, and seeing their smiling faces when they come on the camera every class. Are there some that don’t want to be there? Absolutely! But when you turn a child around and they begin to actively participate and enjoy class it’s great. You also have to remember… it’s a 25 minute class. It will be over shortly if it doesn’t go so well and you get another shot during the next class.
Once you get a rhythm down it’s easy to be excited about trying new reward systems, new camera technologies in the classroom to make it more interesting, or using very simple props. The great part about VIPKid is you can open as many or as few booking slots as you’d like-YOU are in charge. Don’t want to spend a lot of time on props? Don’t! Grab an apple, a banana, something that has the color that is in the lesson and you’re DONE. It’s all about the delivery and how you would like to run your classroom.
VIPKid provides all of the tools to make your classes a success. Bookings may be slow to roll in at first, but they’ll come in time. It’s great to sign up, see if it’s for you, then figure the rest out along the way!
Contact me with any questions about VIPKid you may have! I would be happy to help with anything I can to help you on your VIPKid journey!
If you need to extract image frames from a video file, here is an easy (and free!) way to do just that.
**Note: You must run VLC Media Player as Administrator for this to work**
If you don’t have VLC Media Player, download the latest version here. Open VLC Media Player and open the video file that you wish to extract image frames from. Open Tool Preferences.
Under Video (top icon), select Show All Settings (it will default to simple settings only).
Expand the Video Filters section and select “Scene filter” (Video⇒Filters⇒Scene filter).
Fill in all of the specifics for your purposes and the location you wish the image files to save to. Head back to the main VLC Player interface, play the video, and voila! Your image files will be saved to the designated file location.
Yeah. Me too. Seriously… Bill Gates can shove it. I am a die-hard Apple fan to the core (ha! See what I did there??? To the core!). Why? Because they WORK. I am by no means the most tech savvy person, but I’m also not a 95 year old grandmother trying to use Tik Tok. My Apple products don’t get bugs, updates don’t crash every application or development environment I have, and they just. work. Seriously.
Coding algorithms and mathematical computations are totally my thing and I don’t like wasting my time trying to set up an environment, so this really ticked me off after installing updates I really didn’t want to install in the first place. Updates installed, then BAM…
Steve Jobs never would’ve done this to me… just sayin’. Ok, so it won’t activate. I uninstalled and reinstalled this newest version of Python and still… no dice.
Here’s how I was able to actually open Python from the Anaconda Navigator because… guess what? The Anaconda Navigator wouldn’t open either. Fun times, people… fun times.
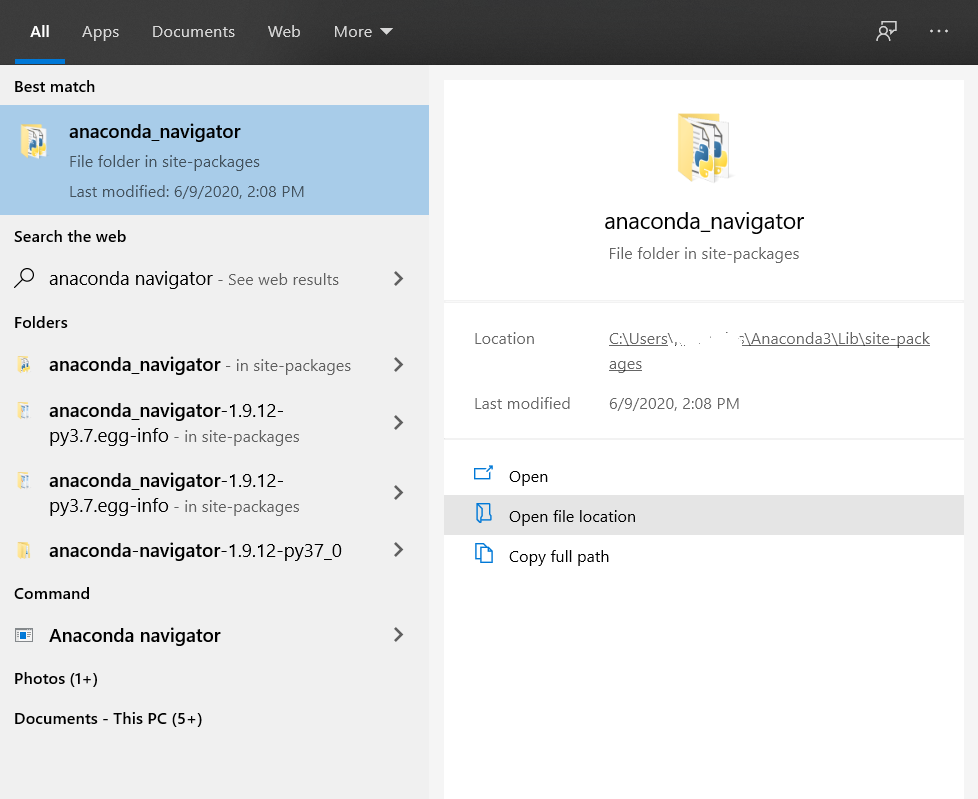
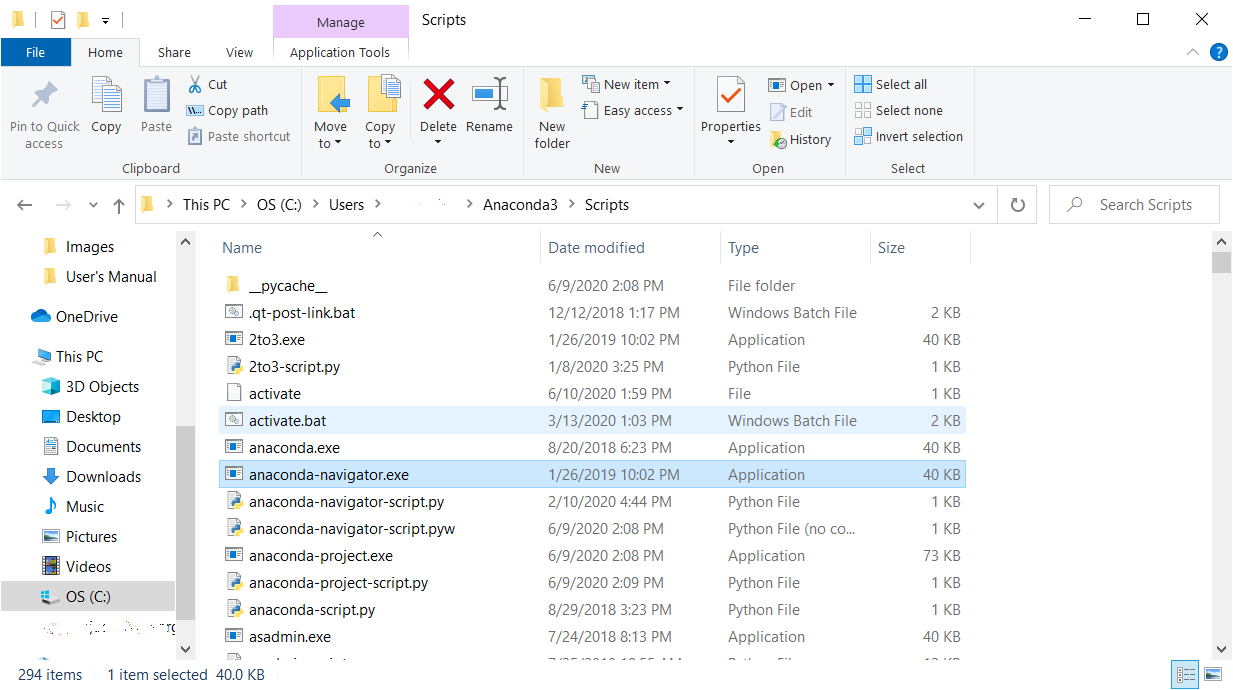
Find the folder that your Anaconda Navigator is located in by doing a search in the Start Menu.
Open the file location and locate the Scripts folder. Run the Navigator executable in the Scripts folder (anaconda-navigator.exe).
This should bring up the Anaconda Navigator interface so you can open Spyder and be on your way back to Python. If you prefer to skip the navigator altogether and jump straight to Sypder, run the Spyder executable (spyder.exe) and you’ll be good to go.
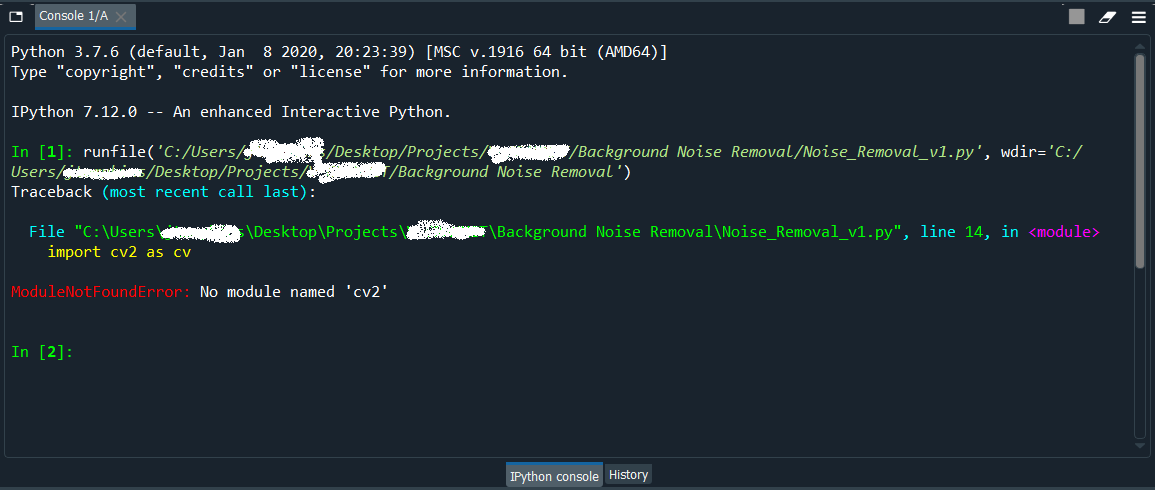
Until… OpenCV now shows that it isn’t installed. Really… REALLY?! Guys… this was JUST working yesterday just fine. I just want to run my code and be on my way, but nooooooooo. Of course not.
Ok. Next troubleshooting steps… How do I make sure it’s mapping to OpenCV? It’s there… I promise! For some reason it doesn’t map to the correct location (I promise OpenCV WAS installed prior to this Windows update debacle…). To make sure the module is in the correct location, run a simple OpenCV install in the command prompt and you should be good to go:
pip install opencv-python
Drop me a line below if you find a better, more elegant way than opening the Anaconda executable… it’s a pain! Happy coding, everyone!
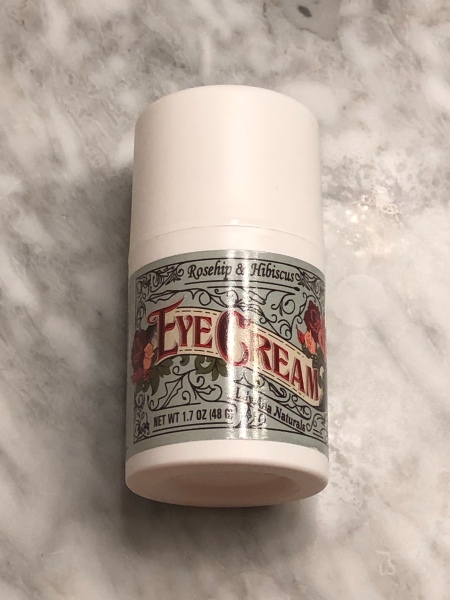
I’ve been setting my alarm earlier and earlier lately (I know… it’s quarantine… I should be sleeping in…). When I finally get out of bed I have very little time to get ready, but I NEED to look awake since I’ll be on camera teaching students. My tricks? Eye brightener, highlighter, and my trusty eye cream that even graced the list of Best Eye Creams from ConsumersAdvocate.org. So quick and easy! The three products I always use are also affordable AND on Amazon. Win-win!
I’ve written about this eye cream before and it seems to have a cult following. It has great ingredients, is never greasy, is affordable, and is convenient since it’s on Amazon. The awesome people at ConsumersAdvocate.org have placed this eye cream at number 2 on their Best Eye Cream Based on In-Depth Reviews list!
I’m a firm believer in concealer because… kids. I’ve always loved Maybelline’s Instant Age Rewind‘s concealer, but lately I haven’t even had time for that. The TONYMOLY Panda’s Dream Brightening Eye Base is so easy to use that it’s fool-proof! Since it’s not really a concealer, but an eye base, you don’t have to match shades of skin tone, you can swipe it on, smooth it, and GO! I usually finish the under eye area off with powder, otherwise my mascara does stick to the base after a few hours and no one likes the raccoon look.
This base does a wonderful job of neutralizing dark circles and when paired with a little powder almost works as good as a concealer.
I keep seeing Facebook ads for Thrive Cosmetics highlighters. I can’t tell you how many freaking times I’ve clicked on those things! I just don’t want to become addicted to a product that I have to order from a company directly. Amazon, Target, and Ulta are my go-tos, so I figured they had to have something similar. Of course Amazon came though for me. The jane iredale Highlighter Pencil does everything the Thrive pencil does, has two different shades in one pencil, and came with a great sharpener. I use the pink toned color under the brow as a highlighter, under the lower lash line, and along the inner portion of the lid. The white color is great in the lower lash line and inner corner of the eye to open up the eyes. It makes my eyes appear so much more awake and open.
Alright… go open your eyes! Moms, I know you can identify with the lack of time and dark circles. You’re welcome!

 These tacos are delicious and there is no cooking involved. Seriously! No baking, grilling, or crock-potting. Yes, I just made crock-potting a verb. I also use my favorite Copy Cat Chuy’s Creamy Jalapeno dip recipe for these tacos. The cilantro slaw portion of this recipe is inspired by One Lovely Life. It is a great mix of sour, sweet, and crunch to top the tacos. If you love the slaw, check out the rest of the recipe for great fish tacos!
 I love having this recipe when I end up having an abundance of zucchini. It’s that time a year again… zucchini season! That means A LOT of zucchini will be consumed and we begrudgingly making a million loaves of zucchini bread. While I love zucchini bread, sometimes I want something different. This recipe is just that. My kids love it, too!
 Breakfast foods are some of my favorite foods… biscuits and gravy, eggs and bacon, and of course… breakfast sandwiches! I’ve made breakfast sandwiches at home for years, usually one at a time, but that became a pain when kids came along (ain’t nobody got time for that!). Since then I’ve perfected my breakfast sandwich game big time. I hope this saves you time AND money at the drive-thru! The best part about making these is the kids LOVE them! They’re so easy to freeze and thaw in the microwave and come out perfect every time.


 Fingerling potatoes – yet another thing I never would’ve tried if it weren’t for
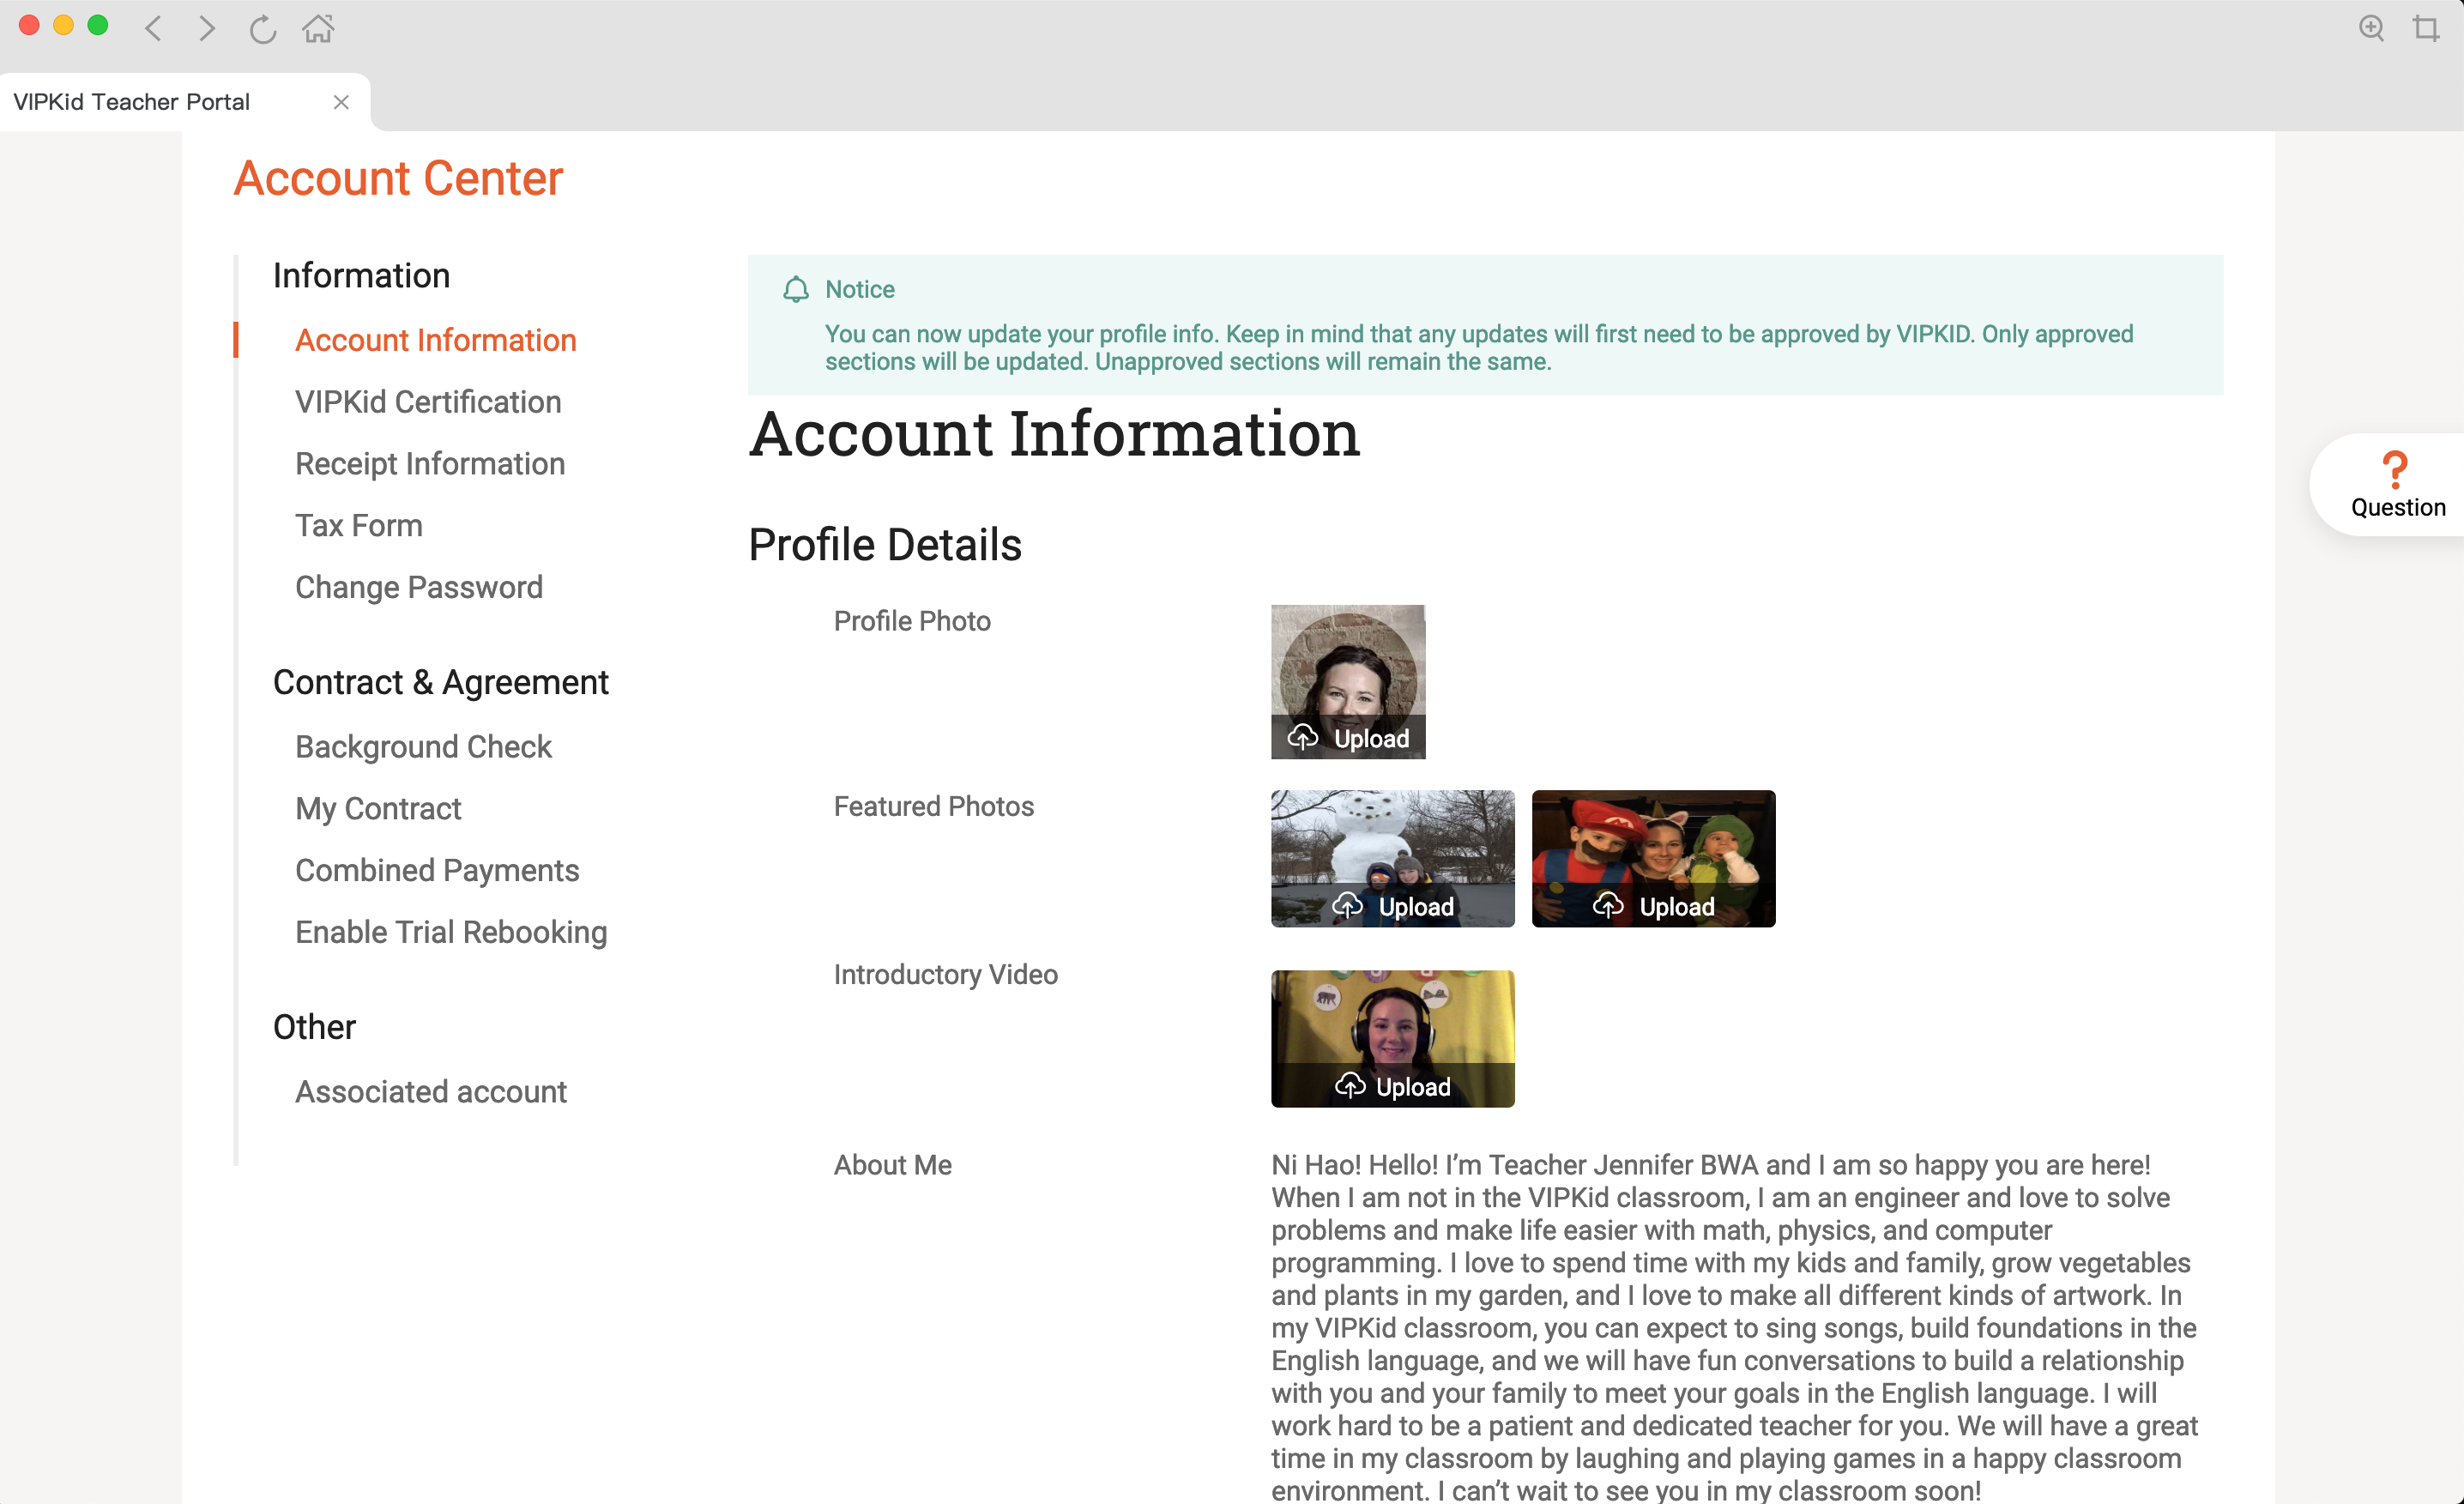


 I’ve written about this eye cream before and it seems to have a cult following. It has great ingredients, is never greasy, is affordable, and is convenient since it’s on Amazon. The awesome people at
 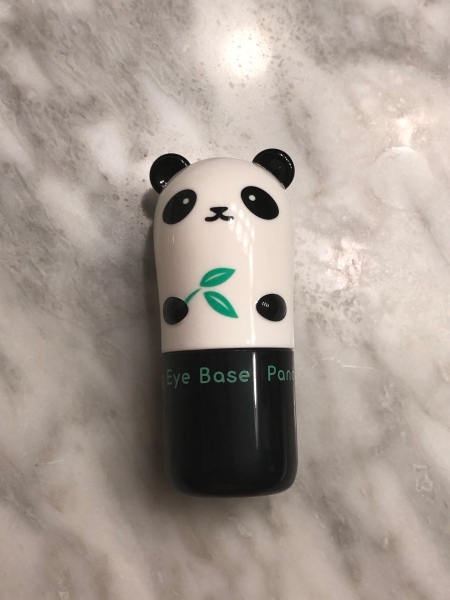 I’m a firm believer in concealer because… kids. I’ve always loved
 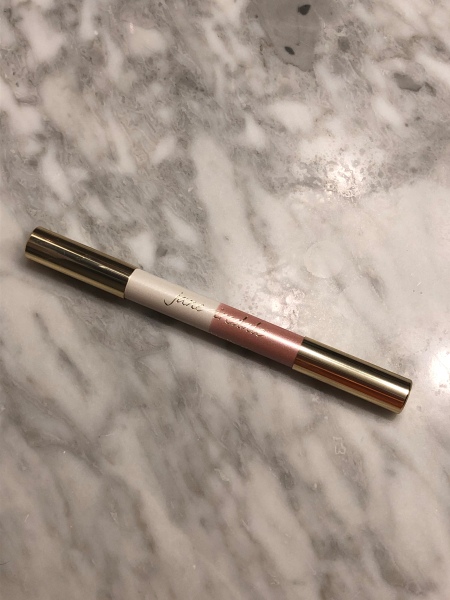 I keep seeing Facebook ads for Thrive Cosmetics highlighters. I can’t tell you how many freaking times I’ve clicked on those things! I just don’t want to become addicted to a product that I have to order from a company directly. Amazon, Target, and Ulta are my go-tos, so I figured they had to have something similar. Of course Amazon came though for me. The