How to Clean White Baseball Pants

How to Clean White Baseball Pants

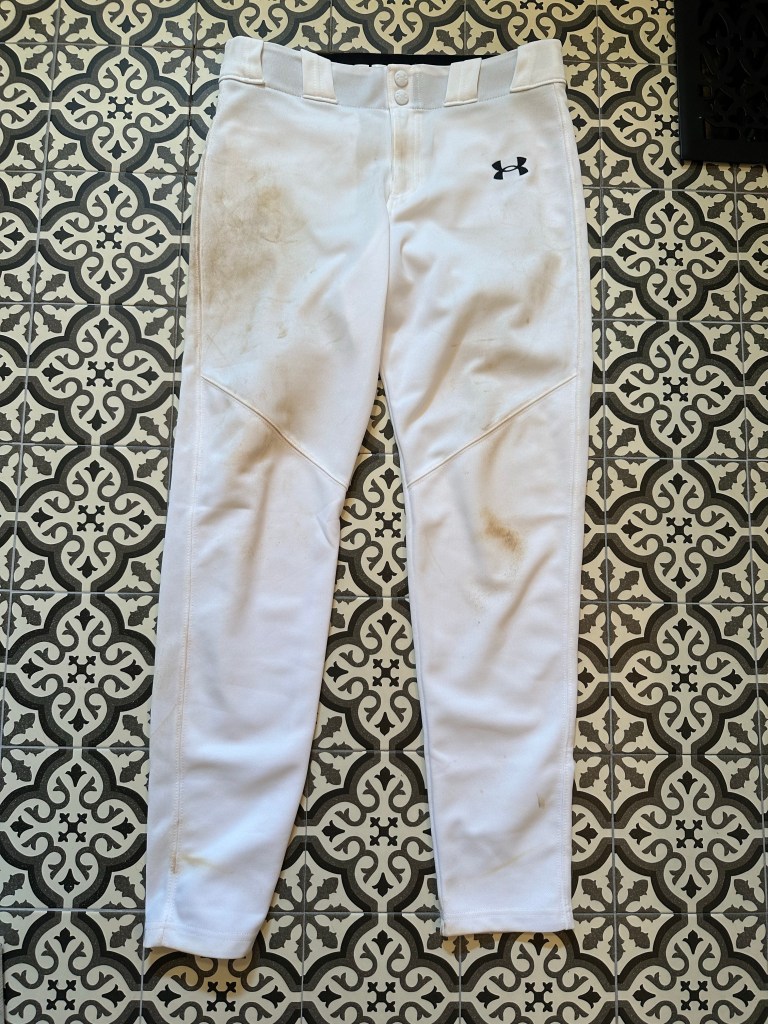
If you know me at all, you know my hatred of white baseball pants. I protest them so loudly I even proudly wear my “Moms Against White Baseball Pants” to many games. Even with all of my protesting, here we are with white baseball pants since they were required on past teams.

If you’re part of the white baseball pants club, here are some of my tried and true tips to keep them sparkling white!

Treat and Presoak

Home Depot and Lowe’s buckets aren’t just handy for home projects. They’re a critical part of my laundry arsenal. Add a bit of powdered Biz into the 5 gallon bucket and fill it with warm water. Spray any stains on the pants liberally with Shout. Allow the pants to soak 24 hours.

Regular Wash

Add the pants to the washing machine after soaking with regular detergent as usual. Add a small amount of powdered Oxy Clean White Revive to the washing machine drum and wash as normal in a slightly warm or warm cycle. If any stains persist, spray with Shout again and scrub and wash with Oxy Clean White Revive again.

Dibs on the Coach Game Day Outfit

Dibs on the Coach Game Day Outfit

This one is self explanatory… I’ve loved this shirt since the first time I saw it and impulse bought it because it can be used for any sport. Check it out on Etsy or the other items in this outfit below!

Dibs on the Coach Shirt

White Converse All Stars

High Waist Distressed Jeans

Kate Spade Crossbody Bag

Warm Weather Game Day Outfit

Warm Weather Game Day Outfit

Well, here in Ohio the weather can’t just magically be fall. That means a few last minute warm weather game day outfits! This one relies on maximum airflow, so as usual, my main choice is a dress. Pair it with a favorite sun hat and a team accessory and you’re set! Find all of these items below to cheer on your favorite team!

Black Midi T-Shirt Dress

Sun Hat

Crossbody Bag

Ankle Strap Sandals

Kate Spade Aviator Sunglasses

Custom Acrylic Team Name Earrings

Fall Football Game Day Outfit

Fall Football Game Day Outfit

It’s game day and it’s finally feeling like fall (even if it’s only for the next few days). I decided to bring out the sweatshirts to get ready for fall. This sweatshirt is one of my favorites because although it’s not very thick or bulky , it’s so warm!

Find all of these game day favorites linked below!

Weekends. Coffee. & Football Sweatshirt

Beaver Baseball Cap

Football Earrings

Aviator Sunglasses

White Sneakers

Band Tee, But Make It Rap

Band Tee, But Make It Rap

When you’re momming all day you don’t really have time to think too much, which is why I live in tees, straight leg jeans, and sneakers. No one has time to be uncomfortable! As much as I love band tees, you never see many rap tees, which is why I absolutely love this one from Amazon! You can shop this entire look with the breakdown below!

Biggie Tee

🛒 Yoya Biggie Tee-Shirt

Nike Women’s Court Legacy Lift Low-Top Sneakers

🛒 Nike Low-Top Sneakers

Cat Eye Sunglasses

🛒 Olieye Polarized Cat Eye Sunglasses

High Rise OG Straight Ankle Jeans

🛒 Old Navy High Rise OG Straight Ankle Jeans
Perfect Instant Pot Rice

Perfect Instant Pot Rice

After searching for what seems like forever for a tried and true way of making rice, this is it! I found this recipe from Green Healthy Living and it’s foolproof! I use this recipe for all types of rice and it has really upped my chicken fried rice game.

Ingredients

  • 1 cup rice (any kind will do-adjust cooking time according to rice type listed in directions below)
  • 1 cup water
  • 1/2 tsp salt

Directions

  1. Rinse rice thoroughly using a fine mesh strainer. Add all ingredients into the Instant Pot. Double, triple or quadruple all ingredients in same amounts if a larger portion is desired.
  2. Make sure sealing ring is placed properly in lid, add lid, turn shut and turn knob to sealing position.
  3. Cook on high pressure for the number of minutes instructed below depending on the type of rice:
    • White Rice (Basmati or Jasmin): 3 minutes
    • White Sushi Rice: 5 minutes
    • Brown Rice (Basmati): 22 minutes
    • Short Grain Brown Rice: 24 minutes
    • Red Rice: 30 minutes
    • Wild Rice Blend: 28 minutes
    • Wild Rice: 30 minutes
    • Black Pearl Rice: 30 minutes
  4. Natural Pressure Release until pin drops. Takes on average 9-12 minutes (max. 18 minutes for 1 cup and max 30 mins for 4 cups).
  5. Remove all rice from pot immediately to avoid it sticking to the bottom. If needing to keep warm, leave rice in pot after natural pressure release without opening the lid to avoid steam being released and drying out the rice, which makes it stick to the bottom.
Nugget Dupe Just in Time for Christmas!

Nugget Dupe Just in Time for Christmas!

If you’re a mom of a child of any age, you’ve likely heard this, “Mom! Mom! Can I PLEASE have a Nugget?! They’re SO fun!”. I’m all for toys that use their imagination, let them climb and play, can be used for multiple things, and don’t take batteries, but $300 for cushions is hard to justify or wrap my mind around.

I searched and searched for several years for great dupes, but all of them were nearly the cost of a Nugget with horrible reviews or the colors were just so awful they would look terrible in any space, so I gave up. I was adding something to my Kohl’s cart one day when an ad popped up for the Yourigami Folding Convertible Kids and Toddler Play Couch. I was shocked that the colors would go great in any space and the cushions looked very similar to the style and size of the Nugget. But, what were the reviews like? The reviews were great and the cushions have removable covers. SCORE! The price? $259 (the price of an original Nugget), but there was a 40% off sale using a Kohl’s card and an extra $10 off a Home purchase. This brought the total down to $149.40 before tax with free shipping. Done deal!

The package arrived right to our door in a compact package and when left out the cushions bounce back and reshape over a few days. This price I can live with! The kids will love this for Christmas and we’ll get a lot of use with much less guilt than the hefty price of a Nugget.

While the 40% off sale is over, they’re bound to have one again and there is currently a Black Friday sale making the sale price of this convertible couch $169.99 and a code may be used for an additional 15% off (SAVE15), $5 off in store pickup option, as well as receiving $30 Kohl’s cash making the total $110.24.

Easy Oven Baked S’Mores for a Crowd

Easy Oven Baked S’Mores for a Crowd

So, you planned an awesome camping party in your backyard complete with hot dogs and s’mores. Of course, Mother Nature can’t help but throw a wrench in your carefully made party plans and decides to rain at the very start of your party. A few things immediately happen: 1. You do a happy dance that all of the tiny humans will fit snuggly on your basement sectional and an air mattress for “indoor camping”. 2. Be thankful you have a Crock-Pot for hot dogs to feed a crowd. 3. Be thankful you have an oven so the much anticipated s’mores are still a possibility.

This recipe is for the latter. All you need is a sheet pan and an oven and you’re in business!

Ingredients and Materials

  • Hershey chocolate bars
  • Graham crackers
  • Marshmallows
  • Parchment paper (optional, but helps with cleanup!)
  • Sheet pan

Directions

  1. Set oven to “Broil” and allow to heat while preparing the s’mores for baking.
  2. While the oven is heating, prepare all s’more ingredients by breaking the graham crackers in half and breaking the chocolate bars into thirds and set aside.
  1. Place parchment paper on a baking sheet. Add desired amount of Graham cracker halves according to the number of s’mores you plan on serving. Add a marshmallow to each graham cracker half. **Note: Depending on the heat of your broiler, it is advised to wait to add the chocolate AFTER roasting the marshmallows as the heat of the oven could completely liquify the chocolate.**
  2. Place the pan in the oven to toast the marshmallows. This should only take 30 seconds to 2 minutes, depending on the temperature of your broiler. Watch the s’mores carefully as the marshmallows heat very quickly and can burn. Remove from the oven when the marshmallows start to turn a golden color on top.
  3. Add chocolate to each marshmallow and top with another graham cracker half. Serve immediately or allow to cool and store in an airtight container.
Easy Kids’ Crazy Hair Tutorials

Easy Kids’ Crazy Hair Tutorials

There are always spirit days at school, VBS, and camps. Our kids always get into spirit days and crazy hair day is no exception! I’ve pulled together a few styles that have been fairly easy, use mostly things we already had around the house, and the kids love. So, get ready to get CrAzY!

The Lizard

This hairstyle is great for boys whose hair is a little longer on top and shorter on the sides. It’s also much easier for older kids since their hair is a little less fine and soft than younger kids.

Materials

  • Hair spiking glue (we love got2b Glued and purchase it at Target, but it’s available at most grocery or beauty stores)
  • Firm hold hairspray
  • Green spray temporary hair color
  • Green and pink pipe cleaners
  • Large googly eyes

Directions

  1. Create a mohawk using the spiking glue. Create a pointed “nose” in front and down the forehead. Create a “tail” in back by allow the spiked mohawk to drift to one side.
  1. Spray the mohawk well with heavy hold hairspray and allow to dry well.
  2. Create legs and feet and lizard tongue while the hair dries. Create two legs/feet by bending both ends of each of two green pipe cleaners into the shape of feet. To create the tongue, cut a pink pipe cleaner in half and curl one end in the shape of a spiraled tongue. Bend the opposite end of the pink pipe cleaner into a hook shape to hook onto the hair when inserted.
  3. Once the hair has dried, insert the legs through the mohawk where lizard legs would be. Insert the tongue into the front “nose” of the lizard and hook on the hair inside so it will stay in place.
  4. Spray the “lizard” part of the hair with the green temporary hair color.
  5. Use the spiking glue to glue googly eyes onto the head of the lizard and allow to dry well.

The Surfer and the Wave

This is another great style for a longer boy’s cut. Longer hair on top creates a better “wave” effect. Everybody’s surfin’ now!

Materials

  • Hair spiking glue (we love got2b Glued and purchase it at Target, but it’s available at most grocery or beauty stores)
  • Firm hold hairspray
  • Blue spray temporary hair color
  • Blue pipe cleaner or other wire
  • Surfer Lego or other ocean toy (sharks, fish, or other beach toys work great for this wave hairstyle, so work with what you have!)
  • Hot glue and glue gun

Directions

  1. Create a “wave” hairstyle by a slightly off-centered, curled mohawk type hairstyle. Allow the style to dry well.
  1. While the wave hairstyle dries, prepare the ocean item that will be the wave by hot gluing a pipe cleaner to the toy. Cut the pipe cleaner shorter and create a hook shape at the end to hold onto the hair inside the wave.
  1. After the hairstyle has fully dried, spray all of the hair with blue temporary hair color.
  1. Insert the ocean toy into the wave hairstyle and hook the pipe cleaner around hair inside the wave. Spiking glue can also be used to help secure the item onto the hairstyle.

Crazy Colored Spikes

This is another great style for longer hair and is easily customizable with whatever color(s) you can find.

Materials

  • Hair spiking glue (we love got2b Glued and purchase it at Target, but it’s available at most grocery or beauty stores)
  • Firm hold hairspray
  • Colored spray temporary hair color (any color combination you like!)

Directions

  1. Create spikes with an even amount of hair in each section all over the head using spiking glue.
  2. Spray each slime well with firm hold hairspray and allow to dry well.
  3. After the hairspray has dried thoroughly, spray each spike with the desired hair color spray.

Pigtails and Pom Poms

This hairstyle is great for kids with very fine, soft hair. Our son’s hair had grown longer than normal and this style worked perfectly for his soft, fine hair that wouldn’t have spiked very well with a lot of product in it.

Materials

  • Small rubber bands
  • Hair spiking glue (we love got2b Glued and purchase it at Target, but it’s available at most grocery or beauty stores)
  • Pom poms
  • Goggly eyes
  • Any other light craft item such as pipe cleaners or sequins that can be pasted onto the hair

Directions

  1. Create several pigtails by looping or twisting hair in small sections with small rubber bands.
  2. Glue Pom poms, sequins, googly eyes, or any other small craft items onto the hair with spiking glue.
  3. Twist pipe cleaners or other craft wire into the hair for a little extra creative flair!
How to Tie Dye a Children’s T-Shirt

How to Tie Dye a Children’s T-Shirt

Well, I bought a tie dye kit from Michael’s over two years ago and I’m pretty sure our oldest has asked me to make t-shirts at least once a week since I purchased them. The youngest? Well, he’s a typical second child and says “I don’t want to do that…”. Anyways, for a first time tie dye experience this was pretty painless, so I figured I’d provide some tricks and tips I found helpful during the process. Happy dying, everyone!

Supplies

  • T-shirt or item you wish to tie-dye
  • Bottles of dye (I purchased a kit that make it pretty painless from most craft stores-if you would like to use the same one we used, you can find it here on Amazon)
  • Fork
  • Rubber bands
  • Rubber gloves
  • Large baking sheet
  • Large cooling rack
  • Large piece of cardboard

Directions

  1. Begin by sticking a fork in the middle of the shirt or item you are dying and twisting until the entire piece is twisted around in a type of cinnamon bun shape. **Note: If you want a very solidly colored tie dye, soak the shirt in water prior to twisting the shirt into a bun shape. If you’d like a shirt that has some white left in the pattern like ours is shown above, do not soak the shirt yet.**
  1. Place rubber bands evenly around the bun shaped fabric.
  1. Soak the bun shaped fabric in water. The more saturated the piece, the more solid the dye will be. The less saturated, the more white there will be. If you want solid color tie dye, soak the shirt prior to twisting and placing rubber bands around it.
  1. Sit the soaked shirt on a wire cooling rack over a large baking sheet. Apply the dye one section at a time saturating the shirt as much or as little as you’d like. The more saturated, the darker and more solid colored the shirt will be.
  2. Allow the shirt to sit and soak in the dye. You can allow it to soak overnight for a very saturated and blended look or allow it to sit for an hour or so before opening the shirt to dry.
  1. Using gloves, cut the rubber bands off of the shirt.
  1. Open the shirt and place the wire rack and pan on a large piece of cardboard to dry. Allow the shirt to dry for 24 hours. After the shirt has fully dried, place the shirt in a dryer and tumble dry on low for 30 minutes to set in the dye.
  2. Enjoy your new shirt!