Caramelized Baked Chicken Legs (Slow Cooker Option!)

Caramelized Baked Chicken Legs (Slow Cooker Option!)

Caramelized chicken legs honey soy sauce baked easy edited
Photo Credit: Bless This Mess.

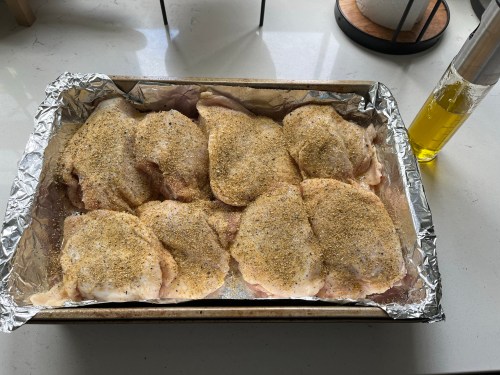
These chicken legs are absolutely amazing.  They’re sweet, savory, juicy, and tender.  Heck, even my four-year-old says “you make the best chicken, mom!” when I make these for dinner.  I love making them on a weeknight because I can sit out all of the ingredients the night before, mix the sauce, pour it over the chicken, and BOOM-delicious protein with very little prep.  Our oldest loves to do the “ingredients” when I cook, so he usually adds all of the ingredients of the sauce to the bowl, mixes it all up (or “mixa mixa mixa” if you’re privy to Danielle Tiger… if you are, I’m sorry :/), then I add the mixture to the chicken.  I got this recipe from Bless This Mess.-check out the original recipe here!

There is even a slow cooker option for these chicken legs.  I typically prefer chicken legs in the oven because they get a little crispier, but since these are in a sauce anyway it makes for a great slow cooker recipe.

Ingredients

  • 2 1/2 lbs chicken legs
  • 3/4 cup honey
  • 1/2 cup soy sauce
  • 1/4 cup ketchup
  • 2-3 cloves garlic, minced
  • salt and pepper, to taste

Directions

Oven Directions

  1. Preheat the oven to 350 degrees. Lay the chicken legs out and give them a good sprinkling of salt and pepper on both sides. Put them in a foil-lined baking dish with high sides (the foil is to make clean up easier – it’s not essential). A high-sided sheet pan is the best option because it has sides to keep everything in, but it is big enough that the chicken isn’t drowning in the sauce. It will caramelize best if half of the chicken is poking out of the sauce while cooking.
  2. In a glass measuring cup measure out the honey, soy sauce, and ketchup. Add the minced garlic and stir. If the mixture doesn’t combine well, microwave it on high for thirty seconds and stir again. Pour the honey mixture over the chicken legs.
  3. Put the chicken legs in the oven and bake for 45 minutes. Take the chicken out of the oven and rotate it so that the bottom that was in the sauce is now on the top out of the sauce. Put the legs back in the oven. Raise the heat to 425 degrees and bake until the sauce is bubbly and starts to caramelize on the chicken legs. This should take about 15 minutes. Remove the chicken from the oven and allow to rest for 5 minutes before serving.

Slow Cooker Directions

  1. Place all of the chicken legs in the bottom of a slow cooker. Pour the sauce over the chicken legs. Slow cook on low for 6 hour or on high for 4 hours, until the largest piece of chicken registers 165 degrees on an instant read thermometer.

Enjoy!  Be sure to check out Bless This Mess. for more awesome recipe ideas!

Reuben Crescent Bake

Reuben Crescent Bake

reubenReuben.  ‘Nuff said.  This Reuben dish feeds an entire family and combines all of the favorite ingredients of a Reuben with a crescent dough.  Now, if I’m being honest, I’ll have to say that the rye bread makes the sandwich, because it does.  But, on a busy weeknight this meal is a great option!  I have adapted the recipe (larger quantity mainly) from this one found here at allrecipes.  Check it out if you’d like to see the original!

Ingredients

  • 2 rolls Pillsbury crescent dough (8 oz)
  • 1 1/4 lb corned beef deli meat (I prefer it to be sliced thick, but any thickness will do!)
  •  16 (at least) slices of Swiss or baby Swiss cheese
  • 2/3 cup Thousand Island Dressing
  • 1 1/2 cups sauerkraut, drained and squeezed dry
  • 1 egg white, beaten
  • caraway seeds (according to taste)

Directions

  1. Preheat oven to 375 degrees F.  Grease a 9″x13″ glass baking dish.
  2. Mix together the sauerkraut and Thousand Island Dressing until well combined.  Unroll the crescent roll dough into the bottom of the greased baking pan.
  3. Bake the dough crust in the baking dish until lightly browned, 8 – 10 minutes.  Remove from oven and place slices of cheese in a single layer on top of the baked dough.  Top the slices of cheese with a layer (or two) of the corned beef.  Next, layer the sauerkraut and Thousand Island dressing mixture on top of the corned beef.  Add another layer of Swiss cheese.  Lay the second sheet of crescent dough over the Swiss cheese.  Brush the top of the dough with beaten egg white and sprinkle with the desired amount of caraway seeds.
  4. Bake in the oven until the cheese is melted and the crust is golden brown, 15-20 minutes.  Let stand 5 minutes prior to serving.

Enjoy!

Pizzadillas

Pizzadillas

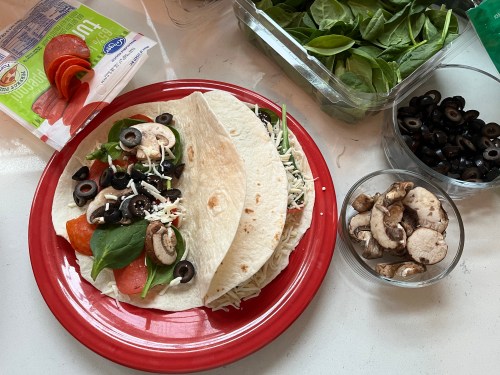
I have to give credit where credit is due on this one… thanks, Mom!  This recipe is quick, easy, and pleases even the pickiest of eaters.  As long as you have tortillas and cheese in the house, I guarantee you have any other ingredients you will need to make this easy recipe.

Ingredients

  • Flour tortillas (I like the large burrito size)
  • Shredded mozzarella cheese
  • Pizza toppings.  Here are some of our favorites
    • turkey pepperoni (makes for a less greasy and easier to eat pizzadilla, but traditional pepperoni works just fine, too!)
    • diced ham
    • shredded or diced chicken
    • mushrooms
    • black olives
    • fresh spinach
    • diced bell pepper
    • diced onion

Directions

  1. Heat a large skillet on medium heat and spray non-stick spray in the skillet evenly.
  2. Add toppings such as cheese, meat, and vegetables to half of a tortilla and fold over.
  3. Heat the pizzadilla with toppings inside in skillet until partially melted and lightly browned on the bottom.
  4. Flip pizzadilla and brown other side.
  5. Cut into even triangles using pizza cutter or knife.
  6. Serve with pizza sauce or pasta sauce of choice.

The best part of this recipe is that you can use anything you have on hand.  Picky eaters?  No problem!  They can have whatever their hearts desire in their pizzadilla!

Slow Cooker Chicken Tortilla Soup

Slow Cooker Chicken Tortilla Soup

This is the easiest soup you can make in the Crock Pot. Hands. Down.  I’m really not sure where I got the original recipe for this one, but I’ve adapted it slightly over time to make it even easier… if that’s possible.

Ingredients

  • 1 lb chicken breasts
  • 1 diced onion
  • 1 can red kidney beans, drained
  • 1 can black beans, drained
  • 1 can whole kernel corn, drained
  • 2 cans Ro-Tel tomatoes (I prefer cilantro lime for extra flavor, but original is great, too!)
  • 2 cans chicken broth
  • 1 pack taco seasoning
  • fresh or dried cilantro

For Serving

  • shredded cheese of choice (I use Mexican blend or cheddar)
  • sour cream
  • tortilla strips or crushed tortilla chips

Directions

  1. Mix all ingredients in crock pot.  Add chicken breasts to top of mixture.
  2. Cook on low 6-8 hours or high 2-4 hours until chicken is thoroughly cooked to an internal temperature of 165 degrees F.
  3. Serve with shredded cheese, sour cream, and tortilla strips or crushed tortilla chips.

To make life REALLY easy on a busy weekday, here are my tips:

  • Use frozen chicken breast-they cook great in this soup from frozen!
  • Use frozen diced onion instead of chopping a fresh onion.  This is my favorite substitute in a lot of meals-it cuts back on so much time and cleanup.
  • Use dried cilantro instead of chopping fresh.  I hardly ever keep fresh cilantro on hand anymore and this saves on grocery shopping and chopping!

Hope you enjoy this easy, hearty meal as much as our family does!

Instant Pot Egg Bites

Instant Pot Egg Bites

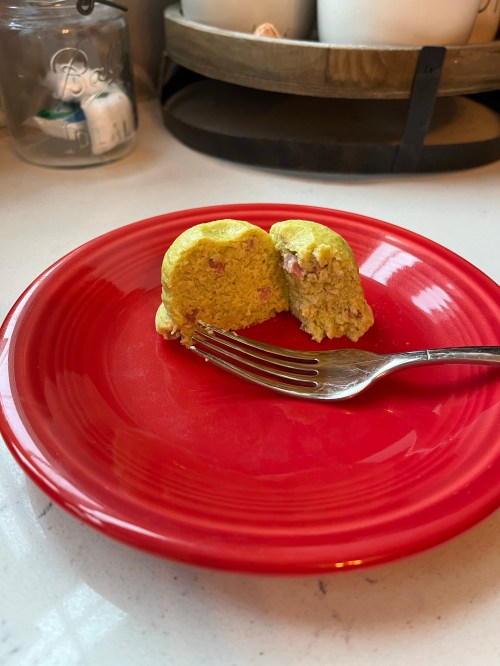
They always say breakfast is the most important meal of the day.  I’m never quite sure who “they” refers to, but in this case I concur with “they”.  I love savory breakfast foods and you can count me in for anything containing egg!  These egg bites were quick, easy, and best of all they can last all week in the fridge and are great from frozen.  Another great thing about these egg bites is you can just throw in whatever you happen to have on hand at the moment since they don’t contain any crazy ingredients.  I created my recipe by using the same concept in the Instant Pot Bacon-Cheddar Egg Bites recipe at Cooking with Curls.

Ingredients

  • 5 eggs
  • 1/4 cup milk
  • bacon, ham, or other meat of choice chopped
  • vegetable(s) chopped
  • 1 cup shredded Parmesan cheese
  • 1/8 tsp black pepper

This is where you can get creative with whatever vegetables or proteins you would like to include.  I originally planned on using spinach, but didn’t happen to have any.  Instead, I used a whole avocado, which basically made this batch taste just like an avocado.  Other vegetable ideas are onion, bell peppers, and spinach.

Similarly, if you’re like me and might as well be a full-blown carnivore, you can use any meat you’d like or leave it out altogether!

I used whole milk for my egg bites, but any milk substitute works great as long as it isn’t sweetened or flavored.

Directions

  1. Mix all ingredients in mixing bowl using immersion blender or blend in blender until smooth.  If you are adding vegetables like bell pepper and prefer them to hold their shape, save these until all other ingredients are blended, then mix in thoroughly.
  2. Pour mixed ingredients evenly into 7 sections of silicone Instant Pot mold.  Loosely cover silicone mold with lid or loosely with aluminum foil.
  3. Add 1 cup of water to Instant Pot. Place silicone mold onto Instant Pot trivet and carefully lower into Instant Pot.
  4. Secure the Instant Pot lid and make sure the steam knob is in the “sealing” position.  Press the “Steam” setting and set it to 8 minutes.
  5. Once the timer ends let the Instant Pot release pressure naturally (this should take about 5-10 minutes).
  6. Remove the egg bites and let cool in the mold for a few minutes. Turn the mold upside down and gently push the egg bites out of the silicone mold.
  7. Enjoy the egg bites immediately, refrigerate for up to a week, or freeze for later!
Vietnamese Rice Paper Rolls (Spring Rolls)

Vietnamese Rice Paper Rolls (Spring Rolls)

Vietnamese-Rice-Paper-Rolls-7-landscape
Photo Credit: RecipeTin Eats

Adding another somewhat time-consuming recipe this week, but it’s also a delicious one.  I love Vietnamese spring rolls, especially with a good pho (recipe for pho to come!).  This recipe isn’t terribly difficult, but takes a little prep and has ingredients that I don’t normally keep on hand, so it takes a little more grocery planning.  If you enjoy this recipe, take a look at other great recipes at RecipeTin Eats!


Vietnamese Rice Paper Rolls (Spring Rolls)

Ingredients

  • 7 – 14 sheets of 22cm/8.5″ round rice paper
  • 11 small cooked prawns/shrimp (about 12cm/5″ in length, unpeeled including the head)
  • 50g / 1.5 oz dried vermicelli noodles
  • 7 lettuce leaves – use a lettuce with soft leaves, like Oak or Butter Lettuce
  • 14 mint leaves
  • 1 cup bean sprouts

Vietnamese Peanut Dipping Sauce

  • 1 tbsp peanut butter, preferably smooth (crunchy is ok too)
  • 2 tbsp Hoisin Sauce
  • 1 1/2 tbsp white vinegar (or lime juice)
  • 1/3 cup milk (any fat %) (or water)
  • 1 garlic clove, minced
  • 1/2 tsp crushed chilli, samba oelak or other chilli paste, adjust to taste (optional)

Directions

  1. Combine the Peanut Dipping Sauce ingredients. Mix briefly (it won’t come together), then microwave for 30 seconds. Mix again until smooth. Set aside to cool. Adjust sour with vinegar, salt with salt and spiciness to taste.  Thickness can be adjusted with milk or water once cooled.

  2. Place vermicelli noodles in a bowl and cover with warm water for 2 minutes, then drain (or follow packet instructions).
  3. Peel the prawns, slice in half lengthwise and devein.

  4. Remove the crunchy core of the lettuce leaves.

  5. Tip – LETTUCE BUNDLE: Place some vermicelli noodles and bean sprouts in a lettuce leaf, then roll it up, finishing seam side down. Repeat.

  6. Fill a large bowl with warm water. The bowl doesn’t need to be large enough to fit the whole rice paper in one go.
  7. Place two rice papers together (if using 2). Note which side is the smooth side – this is supposed to be the outside of the spring roll. Submerge the rice papers into the water (both of them at the same time, together) for 2 seconds. If your bowl isn’t large enough to fit the whole rice paper in one go, that’s fine, just rotate it and count 2 seconds for each section you submerge into the water.

  8. Place both the rice papers (one on top of the other, they will stick together) on a board or the counter with the smooth side down.

  9. On the top part of the rice paper, place 3 prawns with a mint leaf in between, as per the photo.
  10. Place the lettuce bundle with the seam side down onto the middle of the rice paper.
  11. Fold the left and right edges of the rice paper in, then starting from the bottom, roll up to cover the lettuce bundle. Then keep rolling firmly. The rice paper is sticky, it will seal itself.

  12. If you placed the ingredients on the rice paper as per the photo below, your rice paper rolls should look pretty with the prawn and mint leaves on the smooth side of the roll and the seam on the side or underside of the roll.
  13. Serve immediately with the peanut dipping sauce.

Recipe Review

I love these spring rolls!  They’re packed with flavor and the peanut dipping sauce is delicious-it adds a great lightly sweet flavor to the spring rolls.  These take a little while to make, but rolling them (use 2 sheets of rice paper… it will make your life SO much easier!) is easy to master after just a few rolls.  They stick together very well after rolled, so if you’ve ever attempted sushi… don’t let this intimidate you.  It is MUCH, MUCH easier.

I have found a few shortcuts that make my life so much easier with this recipe.  The first is to purchase frozen salad shrimp.  There is already a lot of chopping, measuring, mixing, going on in this recipe, so this cuts some of the prep time down.  Just thaw a few of these little shrimp and they’re the perfect size for the spring rolls.  The second is the lettuce-it’s hit or miss what type of lettuce I can find in store or what’s on sale.  I usually use the ends of Romain lettuce, but don’t include any overly bulky stalks.  This usually adds a bit of a crunch without being too tough to bite through.

A great crock pot pho recipe that pairs well with these spring rolls will be coming soon, so be on the lookout!

Greek Turkey Burgers with Greek Salad and Tzatziki Sauce

Greek Turkey Burgers with Greek Salad and Tzatziki Sauce

GreekTurkeyBurger
Photo Credit: Fit Mom Angela D

These turkey burgers are a great, lean, flavorful dinner.  The only problem with this one is it takes A LOT of prep, so I only make it when I have a lot of time to prepare for all of the chopping, shredding, and mixing.  If you like this one, check out other healthy options at Fit Mom Angela D!

Tasty Greek Burgers

Burger Ingredients

3/4 cup grated zucchini, squeezed

1 1/2 lbs 93% lean ground turkey

2 cloves garlic, minced

1/4 cup red onion, minced

1 T oregano

3/4 tsp sea salt

3/4 tsp black pepper

1/3 cup Feta cheese, crumbled

1/2 tsp lemon juice

Greek Salad Ingredients

1/2 cup plain Greek yogurt

1/4 cup cucumber, grated and peeled

1 tsp white wine vinegar

1/2 tsp garlic powder

1/4 tsp dill

1/4 tsp sea salt

1/4 tsp black pepper

Tzatziki Ingredients

1 cucumber, peeled & diced

2 medium tomatoes, diced

1/4 red onion, sliced (or diced depending on how you like it!)

1/3 cup Kalamata olives

1 tsp oregano

Sea salt to taste

1 T Feta cheese, crumbled

Directions

Burger Directions

  1. After grating the zucchini, squeeze the moisture out with paper towels
  2. In large bowl, combine all of the Turkey Burger ingredients and mix well.
  3. Divide into 6 equal patties.
  4. Cook burgers on medium heat, about 5 minutes per side or until no longer pink in the middle.

Greek Salad Directions

  1. Combine all ingredients in a bowl and mix well.
  2. Refrigerate until ready to serve.

Tzatziki Directions

  1. Combine all ingredients in a small bowl and mix well.
  2. Refrigerate until ready to serve.
  3. Serve over a bed of Greek salad and top with Tzatziki.

Recipe Review

I’m always a fan of anything “Greek”… pasta, pizza, if it has feta or olives, I’m in!  File this recipe under “only-make-if-you-have-a-lot-of time”, but absolutely delicious!  It’s light, but filling, and has a great mix of healthy vegetables and dairy with the addition of feta.  The Tzatziki sauce is delicious and can be paired with a lot of other options.  This one is a winner for me!

Crustless Mini Quiche (Freezable!)

Crustless Mini Quiche (Freezable!)

img_9297Alright, everyone… it’s here!  The first installment of Recipe of the Week.  The format of these posts will follow the same format: recipe first (because who wants to hear me ramble on and on about a recipe that you have to scroll to the bottom to find… not me!), then comments on what I liked about the recipe, what I didn’t like, how easy (or not) it was to make, and just general comments.  This week’s was great because you can freeze them and they still taste like the day you baked them!   If you like the recipe, stop by Will Cook for Friends to find more great recipes.

Ingredients

Base:

  • 12 large eggs
  • 1/2 cup heavy cream
  • 1/4 cup milk
  • 1 tsp dried parsley (optional)
  • 1 tsp dried basil (optional)
  • 1/4 tsp. salt
  • 1/4 tsp. pepper

Vegetables:

  • 1 cup vegetables of choice (see below for some options!)
    • spinach
    • bell pepper
    • broccoli (diced very small)
    • avocado
    • jalapeno
  • 1/4-1/2 cup onion, diced fine

Add-Ins (optional):

  • 1 1/2 cups cheddar, gruyere, mozzarella, parmesan, feta, or other cheese, divided
  • 1 lb bacon, sausage, or other meat, fully cooked

Directions

  1. If using meat (bacon, sausage, etc.), cook fully first.  Set aside to cool, then cut into small pieces.
  2. Preheat oven to 375 degrees F, and thoroughly grease (butter, coconut oil, or non-stick spray) a muffin tin.
  3. In a large bowl, whisk together the eggs, cream, milk, parsley, basil, salt, and pepper.  Set aside.img_9295
  4. Dice all vegetables. Set aside.
  5. Add all vegetables to the bowl with the egg mixture and stir to combine.  Stir in half of the cheese and all of the meat, if using.
  6. Using an ice cream scoop or 1/4 cup measure, scoop the mixture into the prepared muffin pan.  Fill to about 1/4 inch from the top, then sprinkle a small amount of reserved cheese over each.  Place in the oven and bake for 20-25 minutes or until the egg mixture is fully set and the cheese starts to turn golden brown on top.
  7. Remove from oven and let cool for 5-10 minutes before running a butterknife around each muffin and gently removing from the pan.img_9296

Reheating, Freezing, and Thawing

Once cooled, the quiches should be stored in an airtight container in the refrigerator or frozen.  If heating from refrigerator, heat in the microwave for several seconds.  If reheating from frozen, heat in the microwave 30 seconds.

If Freezing:

Place each mini quiche in a small baggy.  Place all bagged mini quiches in a gallon size Ziploc freezer bag and place in the freezer.

Recipe Review and Suggestions

This is probably one of my favorite recipes to date.  It’s easy, filling, and convenient.  The recipe makes several servings, so I like to freeze them and grab them on my way out the door for work in the morning.  This recipe is also great because all of your favorite ingredients can be added.  My favorites are bacon or diced ham and asparagus.  I know it sounds strange, but the asparagus adds great flavor!  Here are some other great options I’ve tried:

  • Avocado, bacon, and cheddar
  • Ham, dill, and feta
  • Spinach, bacon or ham, feta, and shredded parmesan for topping
  • Bell pepper, ham, and parmesan
Easy Baked Chicken Thighs

Easy Baked Chicken Thighs

These chicken thighs are crispy on the outside, tender on the inside, and have just enough flavor to be delicious, but not overpowering.  They’re great for a busy weeknight because you season them, throw them in the oven, make a few simple sides to go with them and you have a simple, delicious dinner.  I found this particular recipe from allrecipes-check out more on their website if you like this one!

Ingredients

  • 8 bone-in chicken thighs with skin
  • olive oil
  • 1/4 tsp garlic salt
  • 1/4 tsp onion salt
  • 1/4 tsp dried oregano
  • 1/4 tsp ground thyme
  • 1/4 tsp paprika
  • 1/4 tsp ground pepper

Directions

  1. Preheat oven to 350 degrees F.  Line a baking sheet with aluminum foil.
  2. Arrange chicken thighs on prepared baking sheet and coat with olive oil.
  3. Combine garlic salt, onion salt, oregano, thyme, paprika, and pepper together in a small container with a lid.  Close the lid and shake container until spices are thoroughly mixed.  Sprinkle spice mixture liberally over chicken thighs.
  4. Bake chicken in the preheated oven until skin is crispy, thighs are no longer pink at the bone, and the juices run clear, about 1 hour.  An instant-read thermometer inserted near the bone should read 165 degrees F.

This has to be one of the easiest things to make on a busy weeknight.  There is hardly any prep time whatsoever and they taste great.  The good thing is, these are on sale frequently and you can purchase a large family pack that usually has anywhere from 8 – 10 thighs in a package.  You know what that means… LEFTOVERS FOR LUNCH ALL WEEK!  Maybe I’m the only one excited about that, but to me, that means no figuring out lunches for a few days.  I usually make a simple side like whole grain brown rice or my personal favorite… shells and cheese.  Make a simple vegetable and you’re good to go.

Most people don’t care for any bone-in meat or meat with skin, but the skin gives it so much more flavor.  Try it and see what you think!