Easy Oven Baked Pork Chops (with Slow Cooker Option!)

Easy Oven Baked Pork Chops (with Slow Cooker Option!)

I always buy pork chops or pork loin and never know what to do with them. I love breaded, pan fried pork chops, but it’s hard to pan fry them lately with a 2 year-old running into the kitchen every 5 minutes while I’m cooking hurling Hot Wheels cars across the floor. I mainly use this recipe as a dry rub for any kind of pork I prepare. Although this recipe is meant for baked pork chops, it’s also great on a pork loin in the Crock Pot for 8 hours on low. If you decide to use the slow cooker version, add around a cup of chicken broth to the Crock Pot.

This recipe was adapted from an Easy Oven Baked Pork Chops recipe from Lemon Blossoms.

Ingredients

  • 4 boneless pork chops
  • 2 Tbsp olive oil
  • 2 Tbsp brown sugar
  • 1/2 tsp garlic powder
  • 1 tsp paprika
  • 1/2 tsp Italian seasoning or dried oregano
  • 1/2 tsp sea salt
  • 1/2 tsp black pepper

Directions

  1. Preheat the oven to 375 degrees Fahrenheit. Line a baking sheet with aluminum foil or parchment paper.
  2. In a small bowl, mix the dry rub ingredients.
  3. Rub the pork chops with the olive oil and season them with the dry rub. Make sure to coat all sides of the pork chops.
  4. Place the pork chops onto the prepared baking sheet.
  5. Bake in the oven for 20 to 25 minutes or until the pork is thoroughly cooked.
  6. Remove from the oven and let rest 5 to 10 minutes, tented with aluminum foil. Serve and enjoy!
Communist States of America

Communist States of America

I never thought I would see things that I’m seeing happen before my very eyes in the land of the FREE (well… what used to be free…) and the home of the brave. Ladies and gentlemen, we are no longer a nation of freedom. We are a nation of censorship, division, and false information.

Today I encountered something I never thought would happen to me-censorship. Censorship of my personal social media account. With everything going on in our country at the moment (I’m not even opening that can of worms…), a quote came to mind: “If you tell a big enough lie and tell it frequently enough, it will be believed.”

The author if this quote is none other than… you guessed it… Adolf Hitler. The reason I decided to post this quote was to show that the media can’t be trusted. We are being fed lie after lie and not only is it being considered the truth, but no one is even questioning it. Where does the information come from? Is it a reliable source? Is it an OPINION? Contrary to popular belief, opinion isn’t fact. Just because you want to believe something doesn’t magically make it true.

Back to censorship. Posting this simple quote to try to inspire others to really think about what information is being digested left me banned from my personal Facebook account for two months. I was notified that my post was removed because it didn’t meet community standards. I was able to respond to the removal and stated that I didn’t feel I broke any community standards. What was wrong with my post? The fact that it was a quote from a communist dictator? Huh… the irony is strong with that one. Or maybe Zuckerberg doesn’t want mention of the Holocaust since it didn’t really happen *full eyeroll* Maybe it hit too close to home because of the current political climate. You know, gotta keep people as dumb as we can so they don’t know they’re being lied to. Regardless of the reason, this is blatant censorship at its finest.

Now, me being the stubborn person I am, I took this screenshot and naturally posted my outrage that this was removed and being censored. I’m sure you know what happened next…

Not only was my quote removed, but the post of the screenshot of my removal was removed and I was banned from commenting and posting for 24 hours or advertising or going live for 60 days… SIXTY… six zero days. Guys… that’s TWO MONTHS. Two. Months. Can you imagine how devastating this would be if this was done to a business?

This is why it’s important to pay attention to what is happening around us. We can’t keep letting this happen. I will not be silent about what I see happening around me. Don’t let yourself be silenced.

Roasted Beets with Citrus

Roasted Beets with Citrus

img_6410Beets are probably one of my favorite vegetables, but for some reason I’ve never actually purchased fresh beets.  I always heat them up out of a can, which I guess is ok, but of course like every other recipe post, Misfits Market changed that!  This week there were two giant golden beets in my box.  Finally, the search was on for a great beet recipe.

I found what seemed like the perfect recipe from Love & Lemons.  I altered the recipe a bit based on what I had in the kitchen, but it’s probably one of my favorite side dishes now.  If you prefer your beets warm, you could even just roast the beets according to the first few steps of the directions and call it a day.  They’re delicious simply roasted, even before marinating!

Ingredients

  • 6 to 8 small or medium red or yellow beets (I used the 2 large golden beets I had and they worked out great with this recipe!)
  • Extra-virgin olive oilfor drizzling
  • 1 large navel orange
  • balsamic vinegarfor drizzling
  • Juice of ½ lemonor to taste
  • Handful of watercress leaves, arugula or microgreens, or other leafy vegetable of choice
  • Sea salt and freshly ground black pepper
  • Flaky sea saltoptional

Optional Toppings

  • Goat or feta cheese
  • Chopped walnuts or pistachios

Directions

  1. Preheat the oven to 400°F.
  2. Place each beet on a piece of foil and drizzle generously with olive oil and pinches of sea salt and freshly ground black pepper. Wrap the beets in the foil and roast on a baking sheet for 35 to 60 minutes, or until soft and fork-tender. The time will depend on the size and freshness of the beets. Remove the beets from the oven, remove the foil, and set aside to cool. When they are cool to the touch, peel the skins. I like to hold them under running water and slide the skins off with my hands.
  3. Use a citrus peeler to peel long strips around the orange, avoiding the white pith. Grated zest would work here also. Slice ¾ of the orange into segments and reserve the remaining ¼ wedge for squeezing.
  4. Slice the beets into 1” wedges or chunks and place them in a bowl. If you’re using red and yellow beets, place each color into separate bowls so the red beets don’t stain the yellow beets.
  5. Drizzle with olive oil and sherry vinegar, then add the lemon juice, orange juice squeezed from the remaining wedge, and a few pinches of salt and pepper and toss. Chill until ready to serve.
  6. Taste before serving and season with more salt (flaky sea salt, if using) and pepper or more vinegar (for more tang), orange, or lemon juice, as desired.
  7. Serve on a platter with the orange segments, watercress, and citrus curls.
Baked Jicama Fries

Baked Jicama Fries

img_6236Misfits Market strikes again… yet another vegetable I’ve never prepared.  This was an interesting one-I had to Google pictures of root vegetables to figure out what it even was.  Now, I know that a jicama makes a delicious side dish!

I found this recipe from Spend with Pennies.  I paired this recipe with Lemon-Garlic Aioli and it was amazing as a side dish!

Ingredients

  • 2 large jicama
  • 2 tablespoons olive oil
  • ½ teaspoon garlic powder
  • ½ teaspoon seasoned salt
  • ½ teaspoon black pepper
  • ½ teaspoon chili powder

Directions

  1. Preheat oven to 425°F.
  2. Peel jicama and cut into ‘fries’. Boil 10-12 minutes.
  3. Drain and dab dry. Toss with remaining ingredients.
  4. Place on a parchment lined pan and bake 20 minutes.
  5. Flip and bake an additional 20 minutes or until golden
  6. Serve warm with ranch or aioli.
Crockpot Honey Lime Chicken Enchiladas

Crockpot Honey Lime Chicken Enchiladas

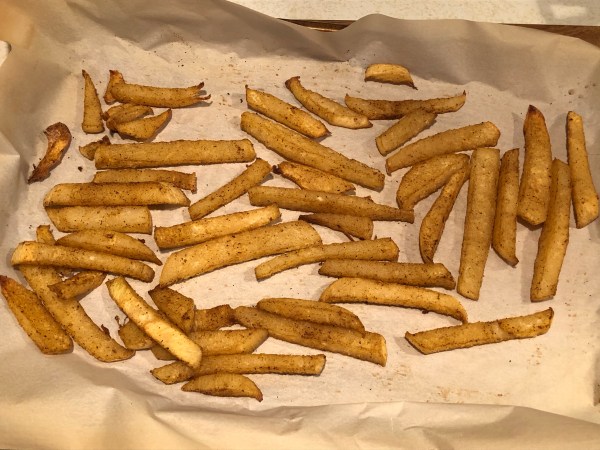
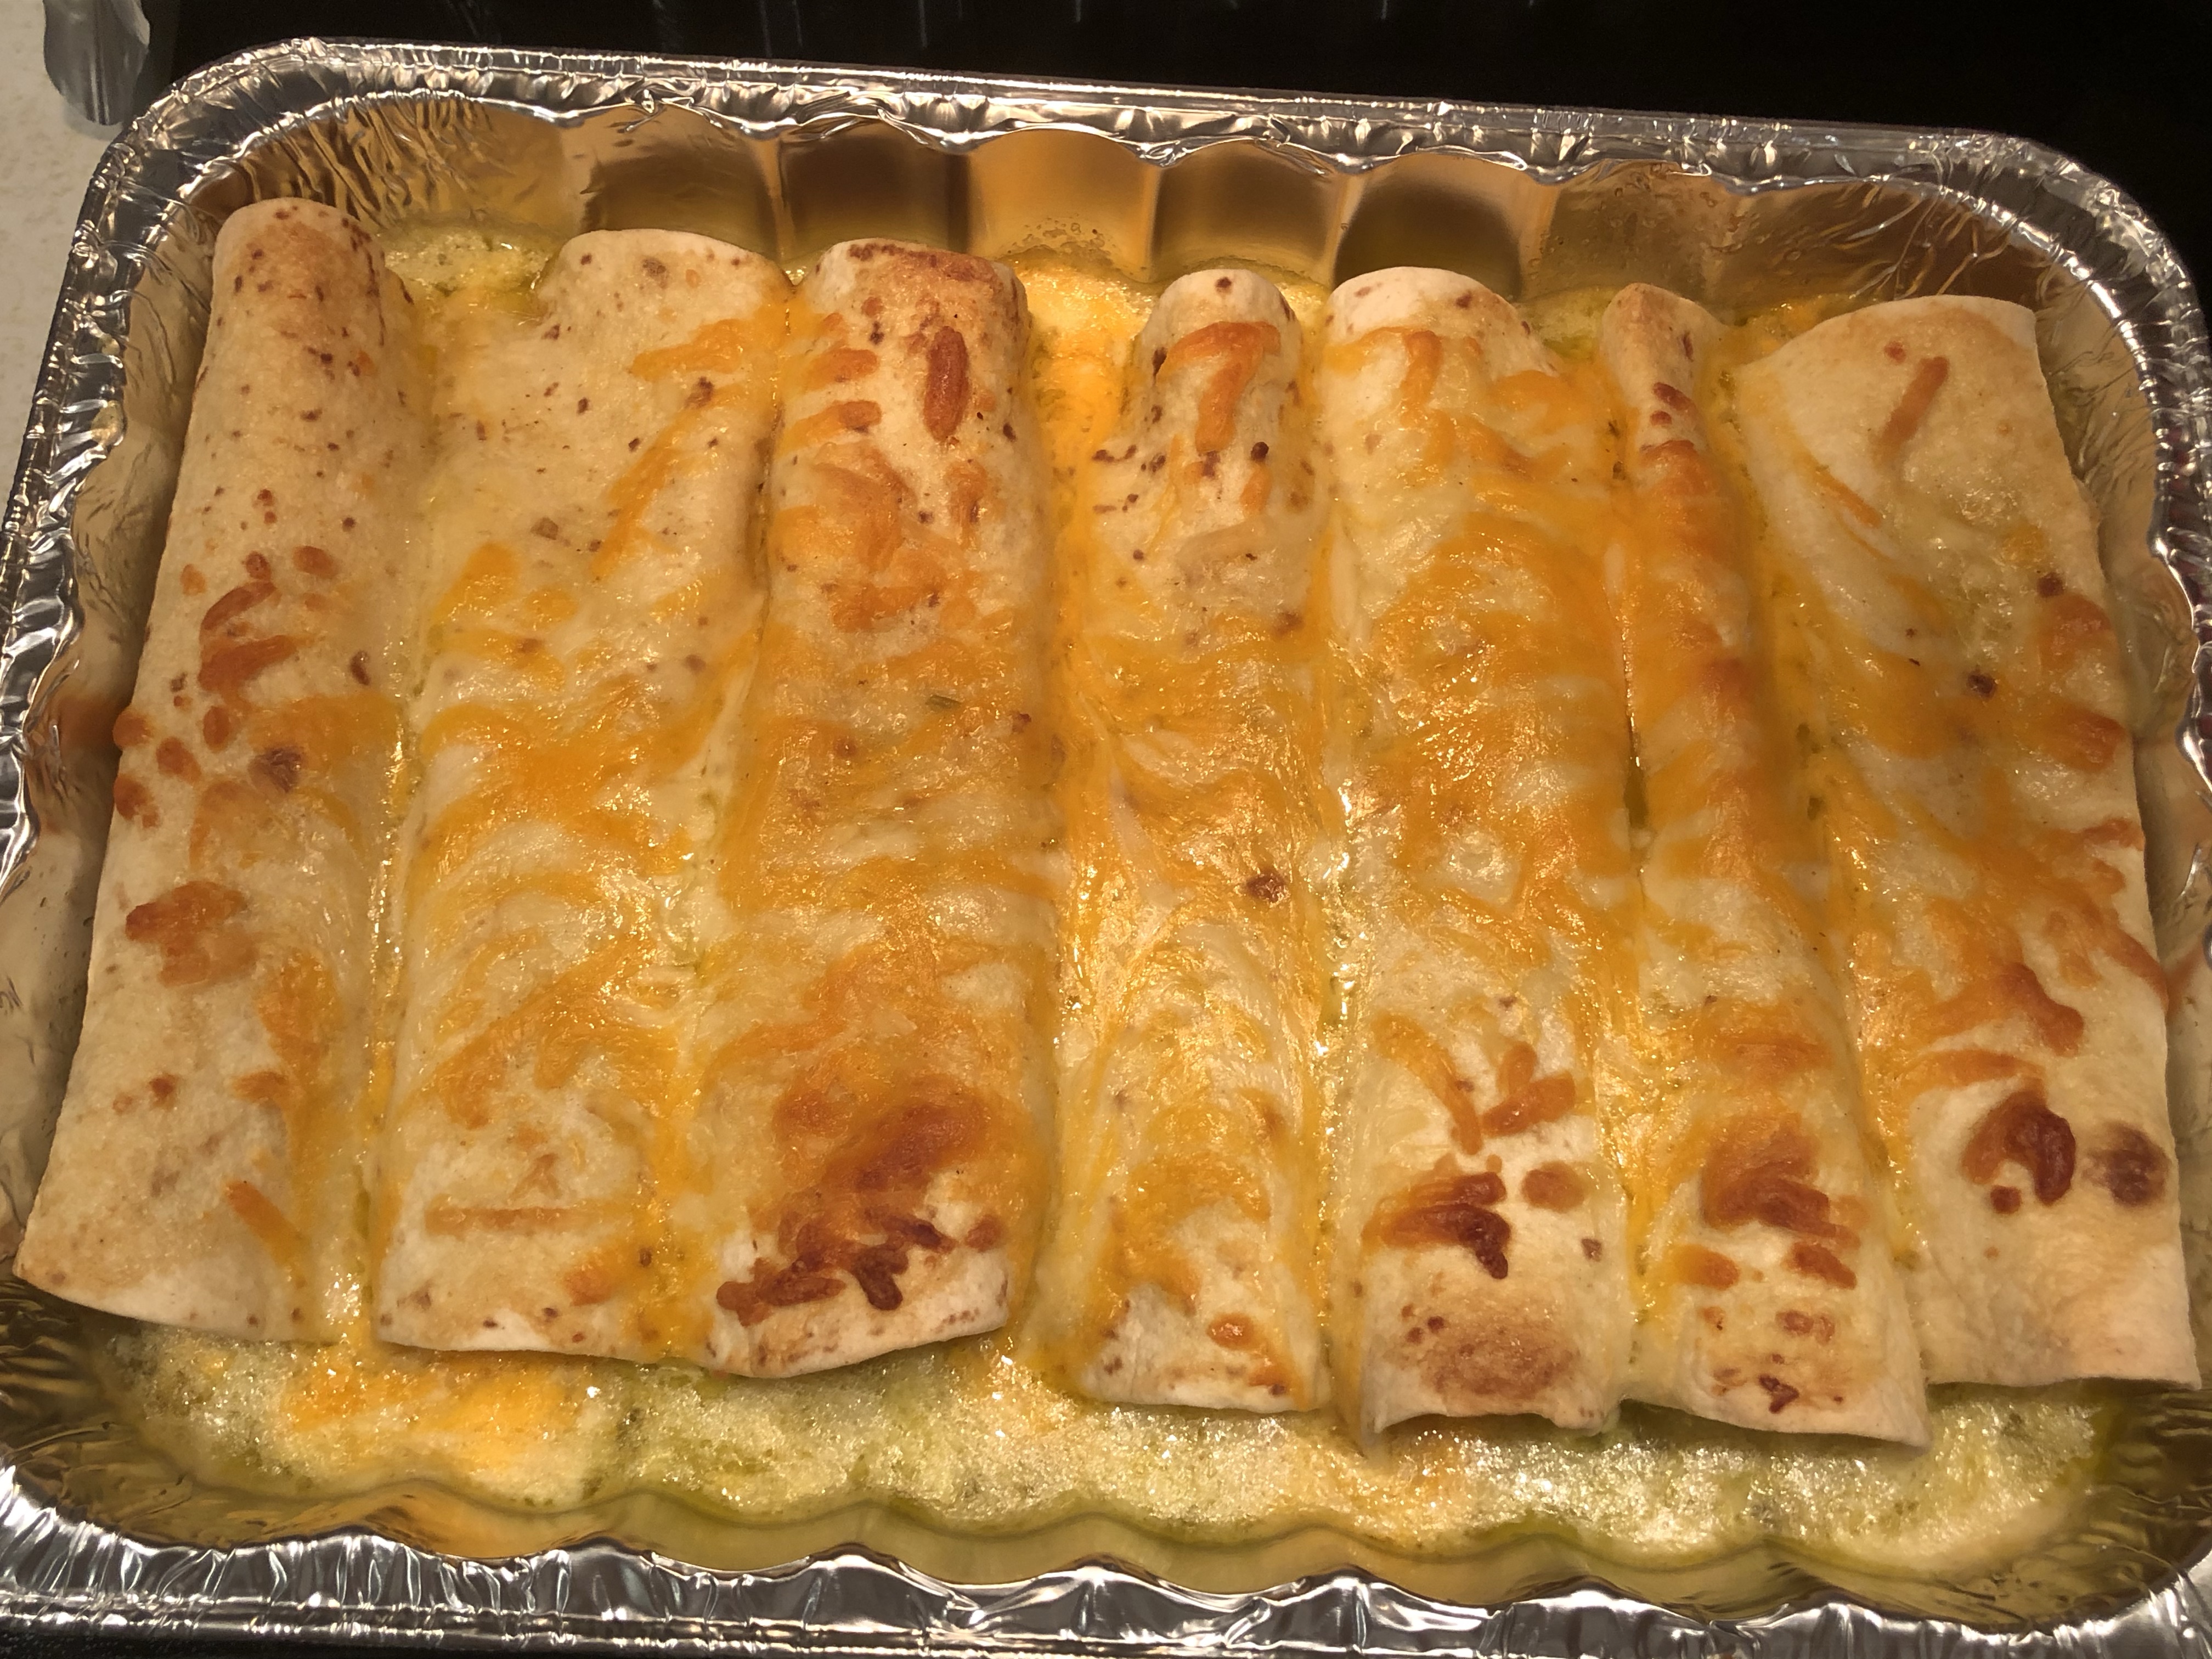
Enchiladas are always a big hit, but this is by far my favorite recipe and it’s so easy.  Crockpot… how do I love thee?  Let me count the ways… ok, you get the point.  Set it and forget it recipes are my favorite.  I love this recipe because it has such a different flavor than traditional enchiladas, but it always gets rave reviews.  The hardest part is putting the enchiladas together and baking, so I call it a win!

I have adapted this recipe over the years from a recipe I found from One Good Thing.  I use the slow cooker to cook the chicken in the marinade used in the original recipe.  Instead of marinating already cooked chicken, I find this really gets the flavor in the chicken and makes for great enchilada sauce in the end!

Ingredients

  • 6 Tbsp honey
  • 5 Tbsp lime juice (2 large or 3 small limes)
  • 1 Tbsp chili powder
  • 1/2 tsp garlic powder
  • 1 bell pepper (any preferred color), diced
  • 1 small onion, diced
  • 1 lb chicken (or extra to freeze for later!)
  • 8-10 flour tortillas (or corn if you prefer corn enchiladas)
  • 1 pound monterey jack cheese, shredded (or cheese of choice-I use whatever I have on hand and all varieties have turned out great)
  • 16 ounces green enchilada sauce
  • 1 cup heavy cream (don’t have heavy cream?  Make your own if you have whole milk and butter on hand – mix 2/3 cup whole milk with 1/3 cup melted butter.  No grocery trip, FTW!)

Directions

  1. Place chicken in crock pot.  Add diced bell pepper and onion.
  2. Mix honey, lime, chili powder, and garlic powder together until well blended.  Pour mixture over chicken and vegetables.  Cook on low 8 hours or until chicken is thoroughly cooked (at least 165 degrees).img_6187
  3. Shred the chicken and reserve the drippings for the enchilada sauce.
  4. Pour about 1/2 cup green enchilada sauce on the bottom of a 9×13 baking pan.
  5. Stuff the tortillas with the chicken mixture and shredded cheese, saving about 1 cup of cheese to sprinkle on top of enchiladas (or more if you love cheese… who doesn’t love cheese???).
  6. Mix the remaining enchilada sauce with the cream and leftover marinade from the chicken.
  7. Pour the sauce on top of the enchiladas and sprinkle with leftover cheese.
  8. Bake at 350 degrees for about 30 minutes, or until brown and crispy on top.
Pan Fried Zucchini with Easy Lemon Garlic Aioli

Pan Fried Zucchini with Easy Lemon Garlic Aioli

img_5795
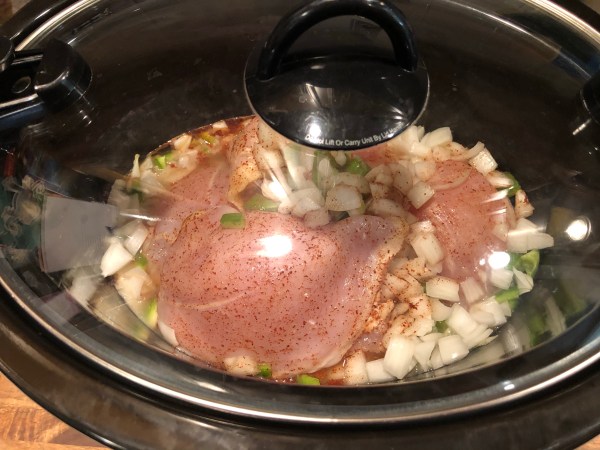
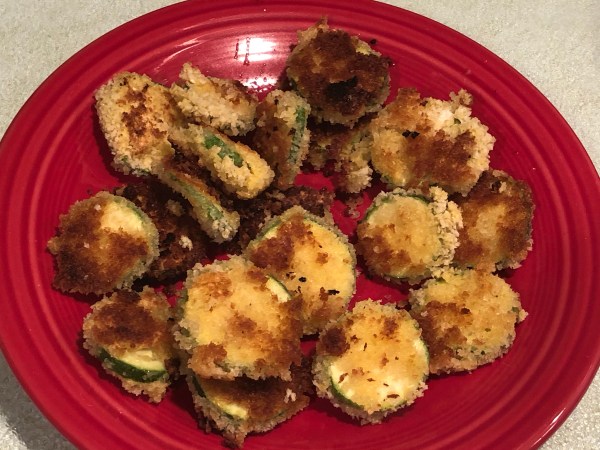
Yep… more zucchini.  There is an over abundance of zucchini this time of year, so I always try to find ways to prepare it other than zucchini bread.  This recipe is pretty simple and easy to prepare, although it’s a little more time consuming than baking.  If you want a side dish with a little crisp, this is the recipe for you!

This recipe comes from Maria’s Mixing Bowl if you’d like to check out the original!

Ingredients

Zucchini Bites:

  • 1 large zucchini
  • 1/2 cup all-purpose flour
  • 1 tsp. salt
  • 1/4 tsp. ground black pepper
  • 2 large eggs
  • 1 1/2 cups  Panko Bread Crumbs
  • 1/4 cup canola oil

Garlic Aioli Sauce:

  • 1/3 cup mayonnaise
  • 1 garlic clove, minced
  • 1/2 tbsp. lemon juice
  • 1/4 tsp. salt
  • 1/8 tsp. ground black pepper

Directions

Zucchini Bites

  1. Slice the zucchini into 1/2″ thick rounds.

  2. In a bowl, mix together the flour, salt, and ground black pepper. In a separate bowl, beat the eggs. And pour the Panko into a third bowl.

  3. Coat the zucchini with the flour mixture and then dip them into the beaten eggs. Cover them entirely with the Panko.

  4. In a large, heavy bottomed skillet, heat the canola oil over medium heat. Once heated, place zucchini bites flat in the pan (only one layer at a time), and cook for about 3 minutes on each side, or until golden and cooked all the way through.

Garlic Aioli Sauce

  1. Combine mayonnaise, garlic, lemon juice, salt and pepper in a small bowl.

  2. Serve zucchini bites hot with the sauce and enjoy!

Easy (No Cook!) Chicken Soft Tacos with Cilantro Slaw

Easy (No Cook!) Chicken Soft Tacos with Cilantro Slaw

Once upon a time I came across this awesome chicken soft taco recipe from Kroger in a packet of coupons.  I put that awesome recipe in my handy dandy recipe app to keep it “safe”.  Then, after upgrading my phone I lost all of my recipes.  The end.

Sorry… that story didn’t have a happy ending, but I was determined to find at least a similar recipe to the original.  I didn’t.  BUT… I am piecing together what may end up being even better than the original, so I’ve put it together here for the masses.  You’re welcome.

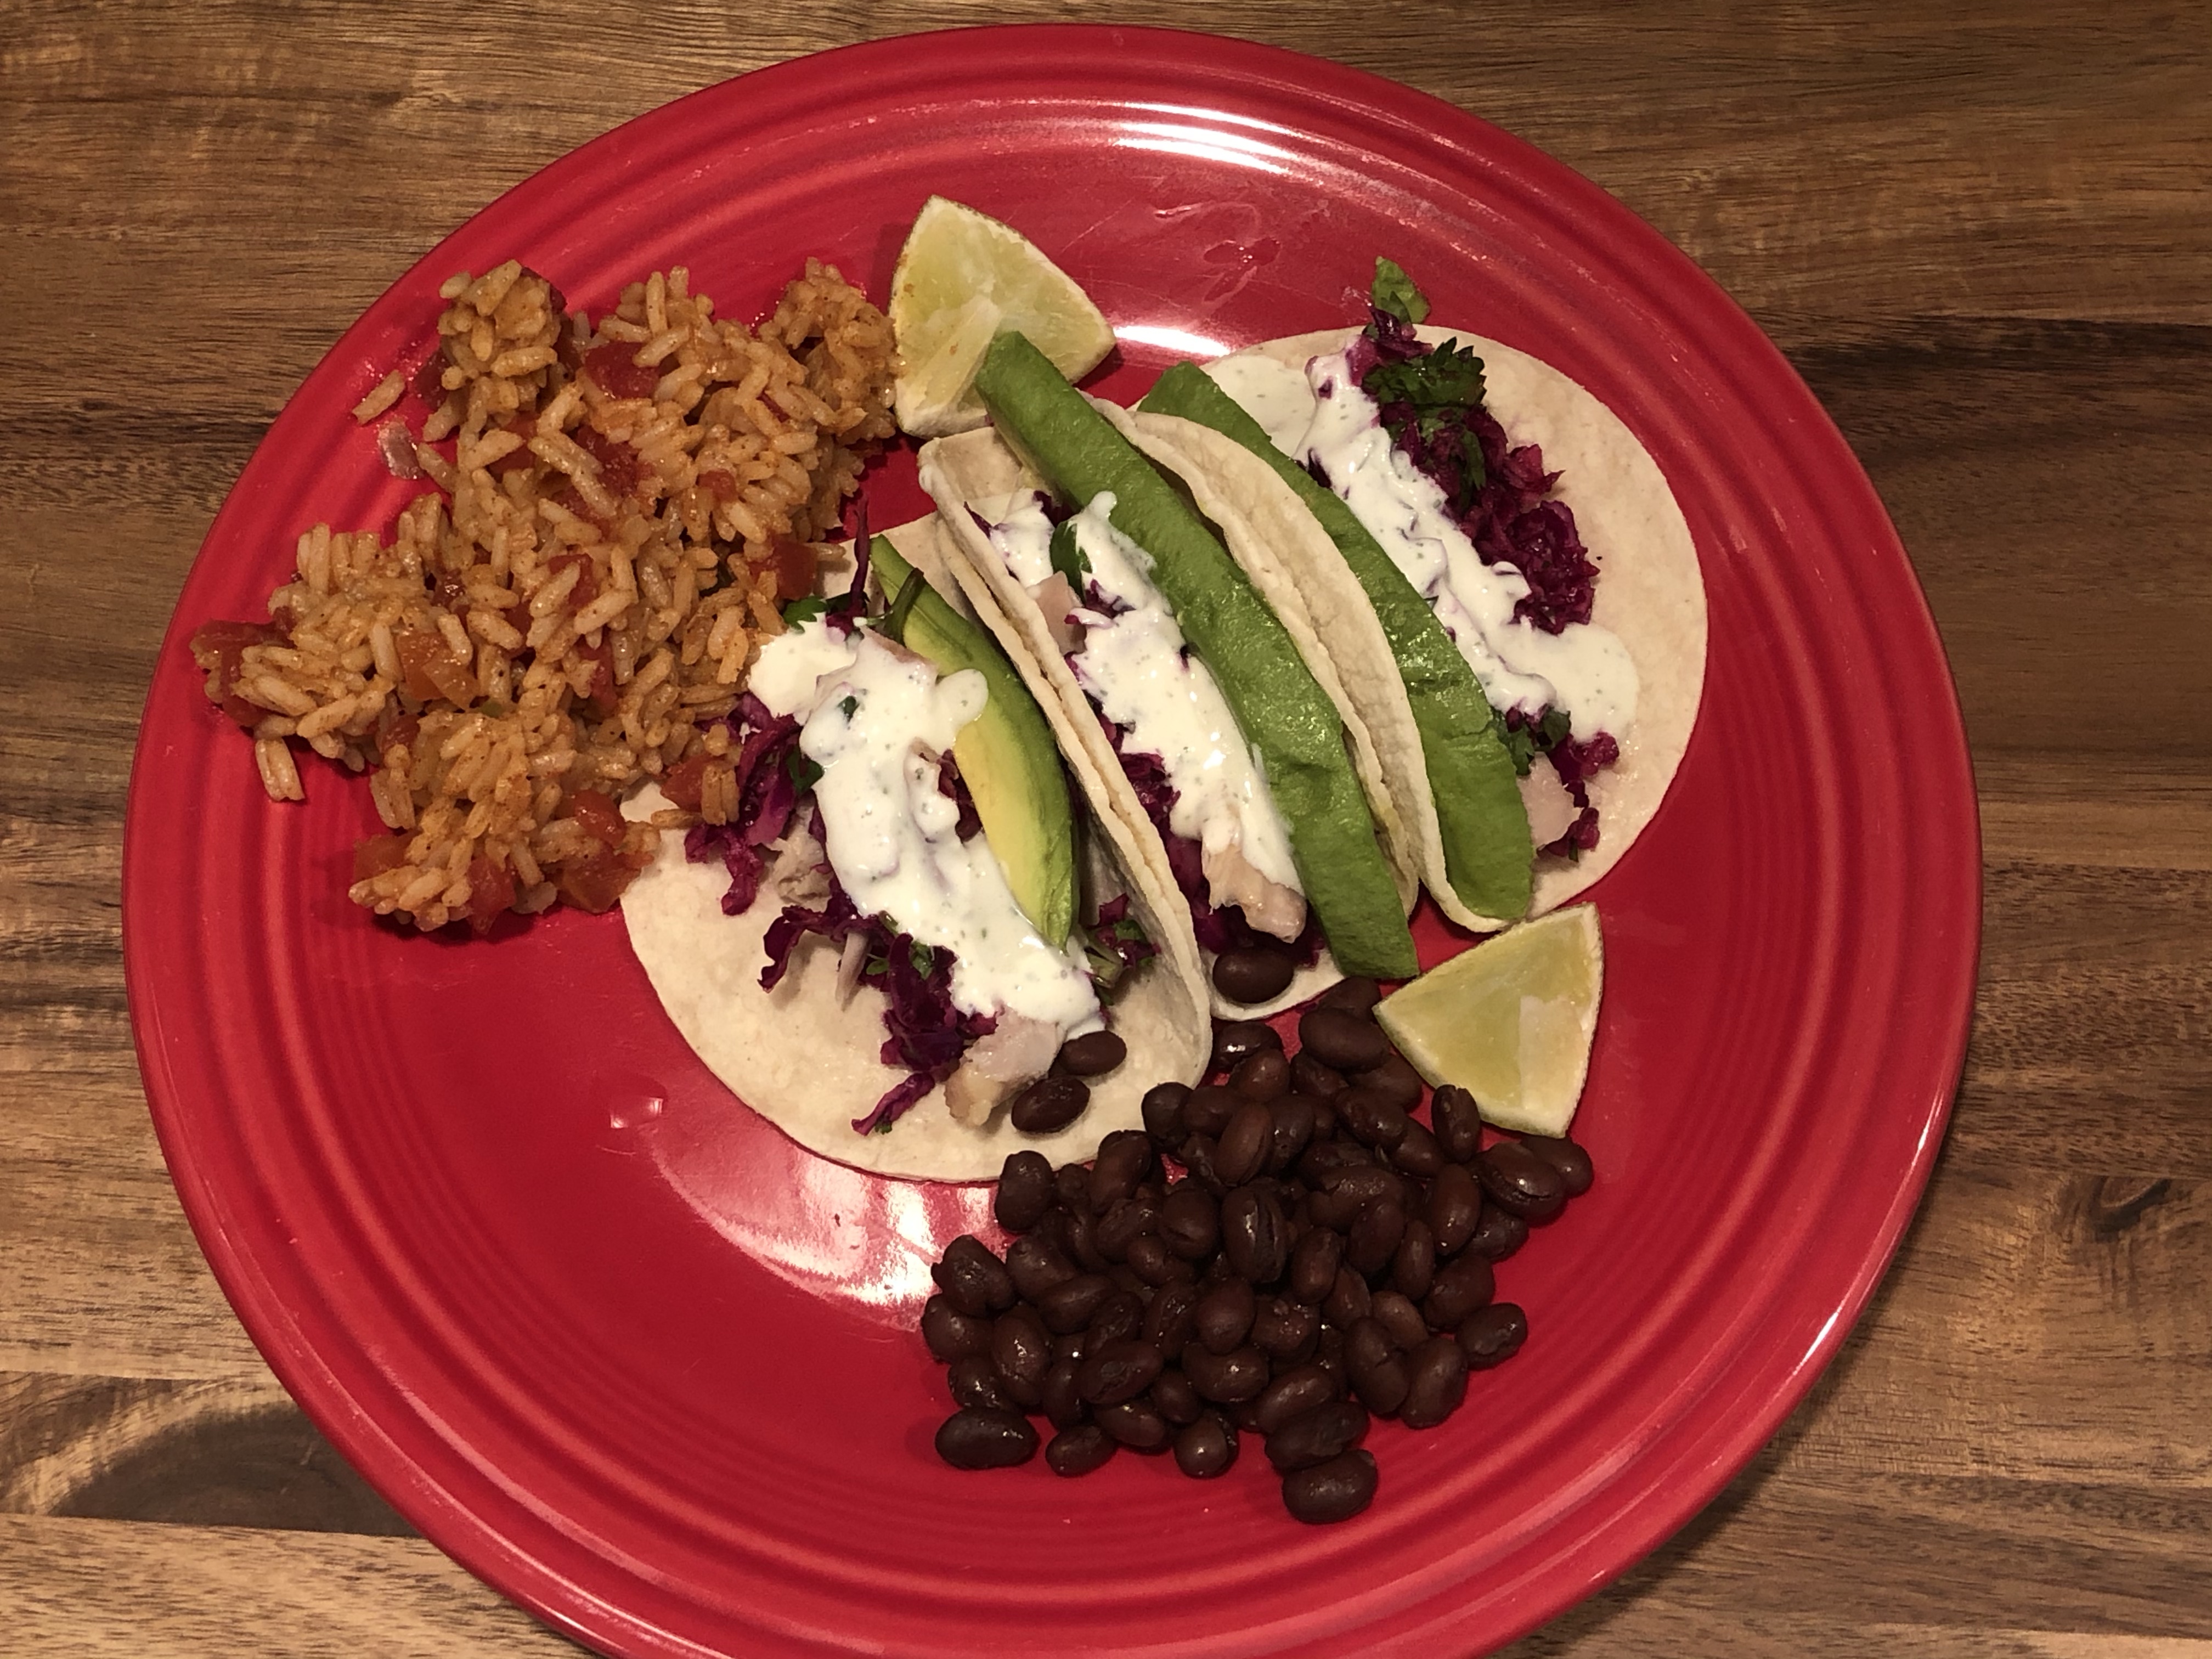
These tacos are delicious and there is no cooking involved.  Seriously!  No baking, grilling, or crock-potting.  Yes, I just made crock-potting a verb.  I also use my favorite Copy Cat Chuy’s Creamy Jalapeno dip recipe for these tacos.  The cilantro slaw portion of this recipe is inspired by One Lovely Life.  It is a great mix of sour, sweet, and crunch to top the tacos.  If you love the slaw, check out the rest of the recipe for great fish tacos!

Ingredients

Copy Cat Chuy’s Jalapeno Dip

  • 1 whole large jalapeno, chopped
  • 2 cloves garlic, minced
  • 3 Tbsp fresh cilantro
  • 16 oz light sour cream
  • 1 oz package of ranch dressing mix
  • 1/2 lime, juiced
  • 4-6 Tbsp milk

Cilantro Slaw

  • 2 cups shredded purple cabbage
  • 2 Tbsp cilantro
  • Juice of 1/2 lime
  • 3/4 tsp honey
  • 1/8 tsp salt
  • 1/8 tsp pepper

Chicken Tacos

  • 1 Rotisserie chicken, meat separated and shredded
  • Corn tortillas (or hard shells if preferred)
  • salsa of choice
  • avocado, sliced (optional)

Directions

Prepare Creamy Jalapeno Dip

  1. Combine jalapeno, garlic, and cilantro in blender or food processor.
  2. Pulse until finely chopped.
  3. Add light sour cream, ranch dressing mix, and lime juice and pulse to combine.
  4. Add milk and pulse. You can add it slowly to get the consistency you want. The Chuy’s version is pretty thin, so I liked 6 tablespoons.
  5. Refrigerate for a few hours to allow the flavors to combine.

Prepare Cilantro Slaw

  1. In a medium or large bowl, combine red cabbage, cilantro, lime juice (start with 1 Tbsp), honey, salt, and pepper.
  2. Taste and add additional lime juice or honey as desired.
  3. Stir to combine well and set aside until ready to serve.  The salt and lime juice will help soften and break down the cabbage.

Prepare Tacos

Add chicken, avocado, slaw, and jalapeno dip to a tortilla or hard shells and serve with fresh cilantro and lime wedges.  Enjoy!

Greek Zucchini Bake

Greek Zucchini Bake

I love having this recipe when I end up having an abundance of zucchini.  It’s that time a year again… zucchini season!  That means A LOT of zucchini will be consumed and we begrudgingly making a million loaves of zucchini bread.  While I love zucchini bread, sometimes I want something different.  This recipe is just that. My kids love it, too!

I found this recipe from Ready Set Eat.  This recipe uses Egg Beaters, but usually use regular egg and it turns out great-and possibly better.  It also has feta, so I’m usually a fan of any recipe with feta.  This is also a low-fat recipe, which makes it even better!

Ingredients

  • 3 small zucchini, sliced thin
  • 1 cup fat free small curd cottage cheese
  • 1 egg
  • 1 cup Italian seasoned croutons, crushed slightly
  • 1 can (14.5 oz) stewed tomatoes, drained
  • 1/2 cup crumbled feta cheese with garlic and herbs

Directions

  1. Preheat oven to 375 degrees Fahrenheit.  Spray an 8×8-inch baking dish with cooking spray.  Place zucchini in medium microwave-safe bowl.  Cover; microwave on high 5 minutes.  Drain well, patting dry with paper towels.  Layer zucchini in bottom of baking dish.
  2. Combine cottage cheese and egg in same bowl; mix well.  Spread cottage cheese mixture over zucchini.  Top with croutons and drained tomatoes; sprinkle with feta cheese.  Cover loosely with aluminum foil.
  3. Bake 15 minutes.  Uncover; bake 10 minutes more or until bubble around edges and set.  Let stand 5 minutes before serving.
Better Than McDonald’s Egg McMuffins (Freezer Friendly!)

Better Than McDonald’s Egg McMuffins (Freezer Friendly!)

img_4764
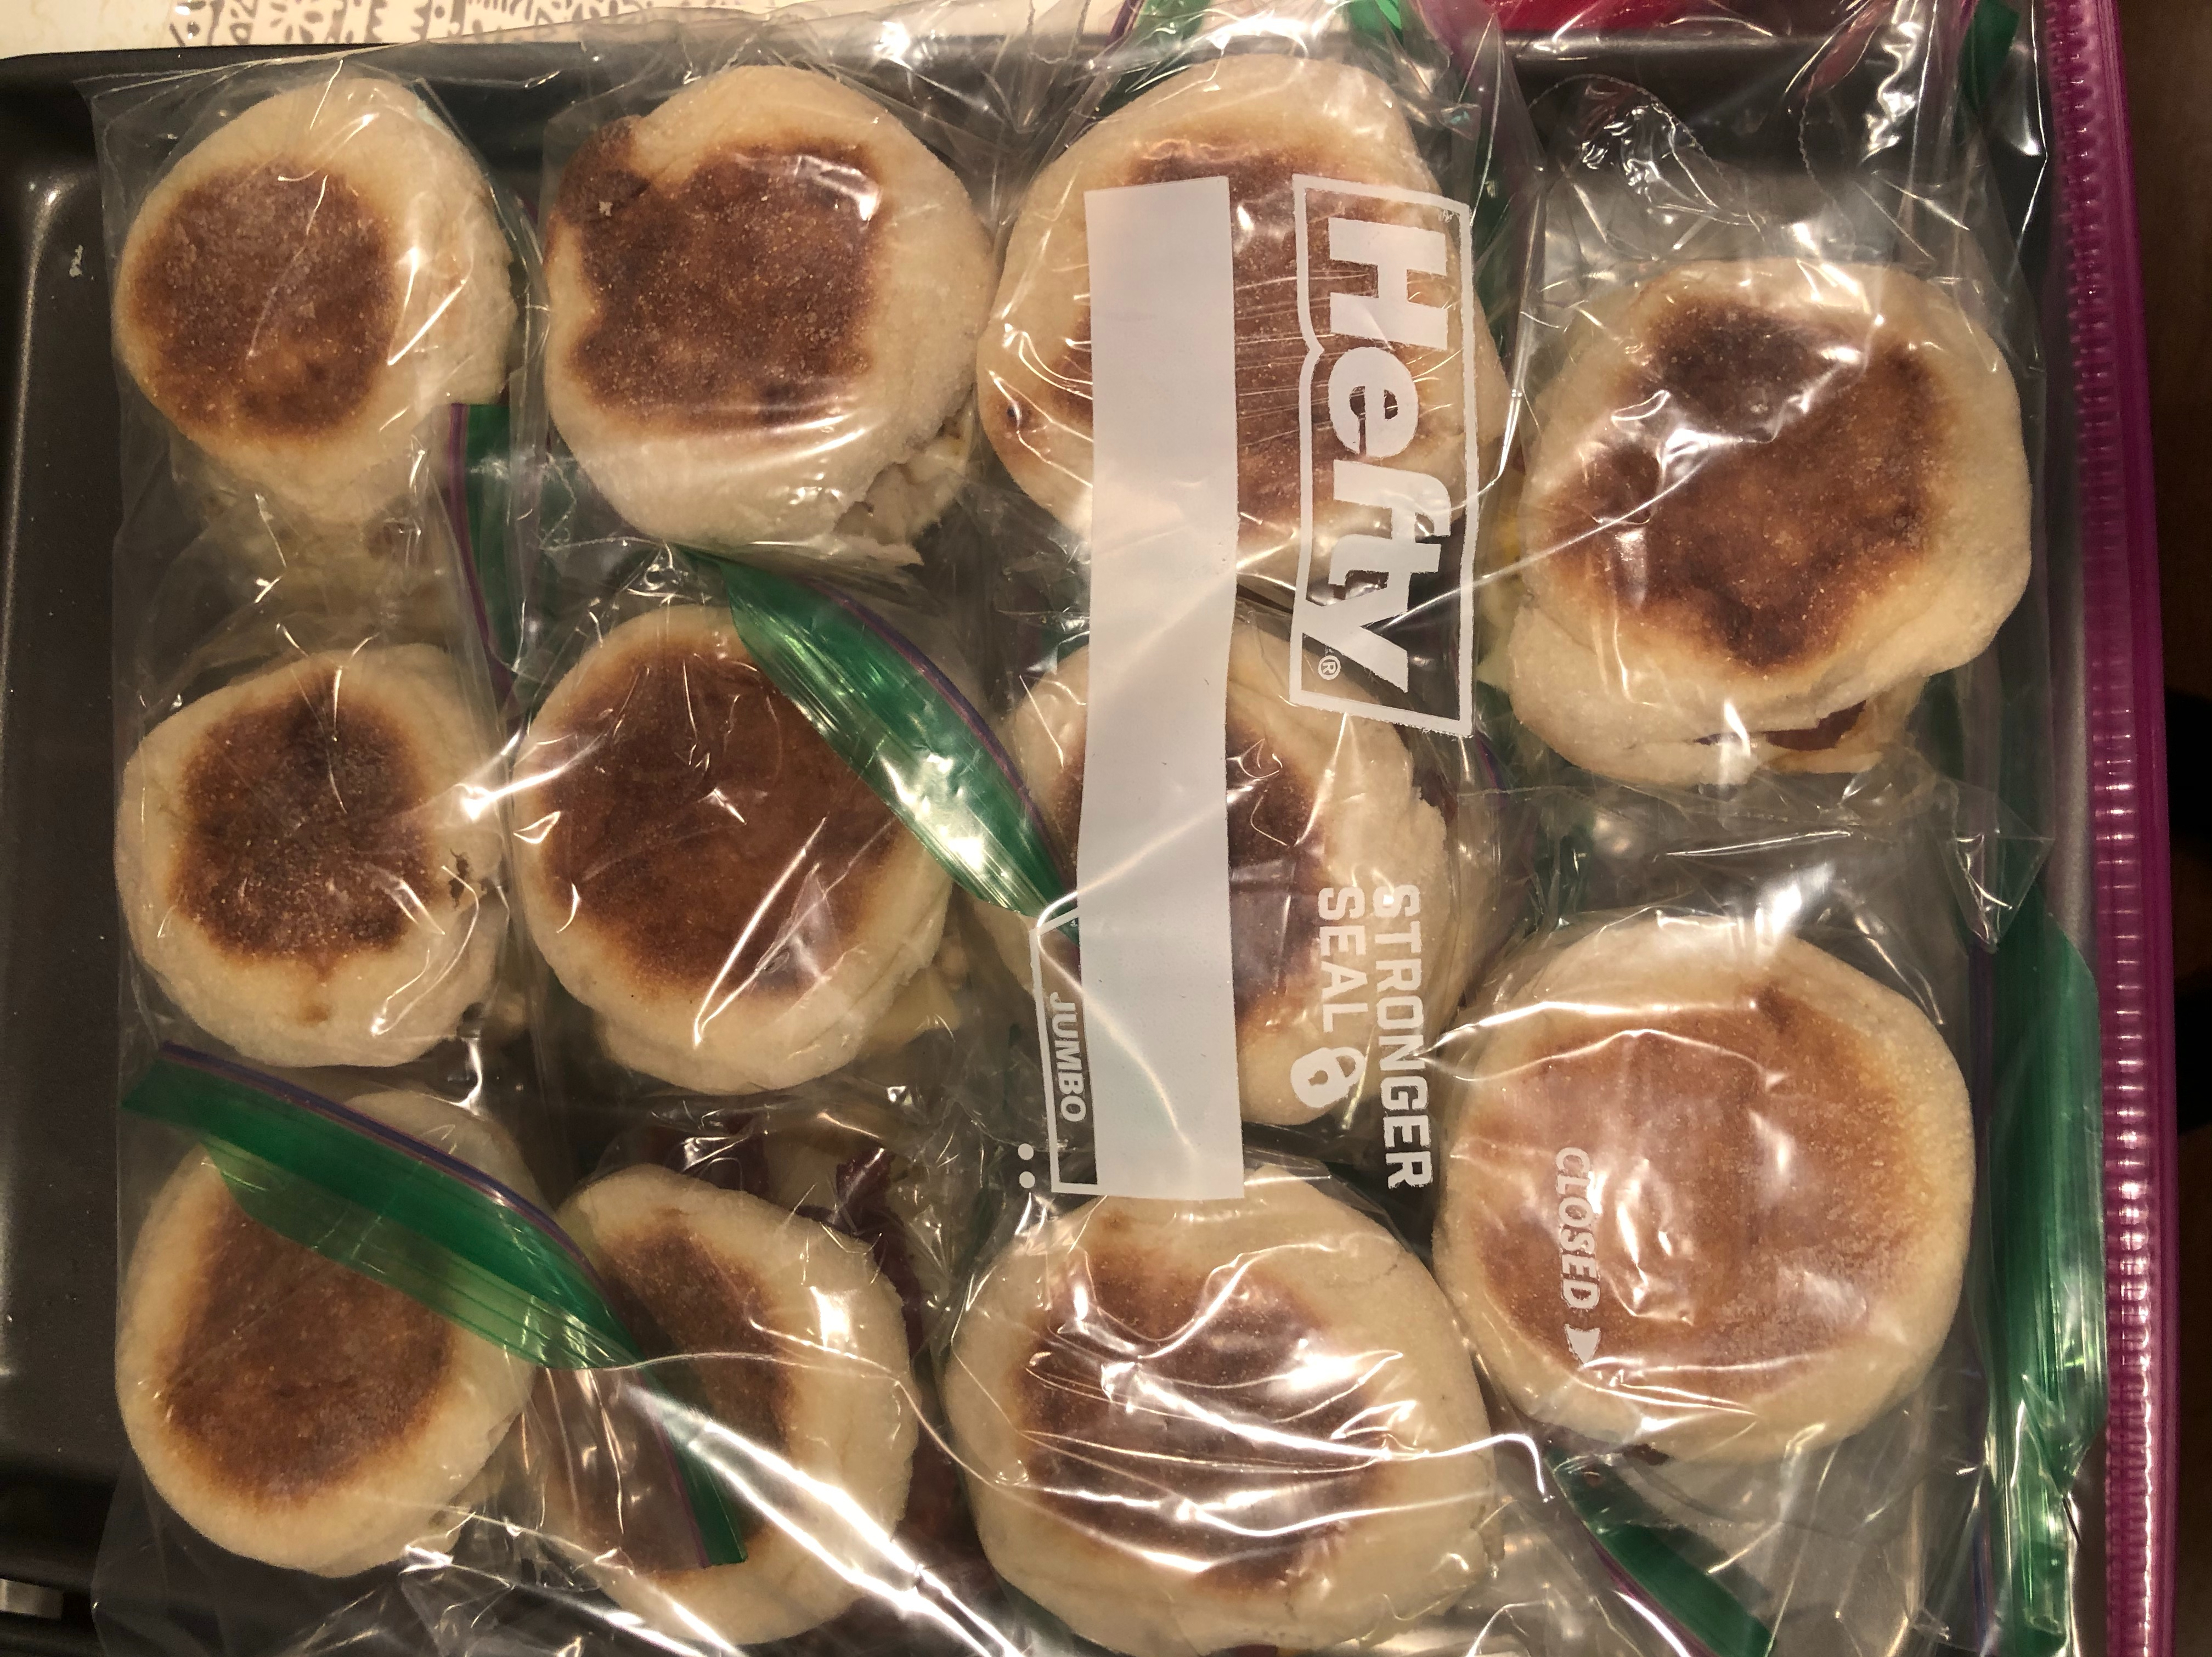
Breakfast foods are some of my favorite foods… biscuits and gravy, eggs and bacon, and of course… breakfast sandwiches!  I’ve made breakfast sandwiches at home for years, usually one at a time, but that became a pain when kids came along (ain’t nobody got time for that!).  Since then I’ve perfected my breakfast sandwich game big time.  I hope this saves you time AND money at the drive-thru!  The best part about making these is the kids LOVE them!  They’re so easy to freeze and thaw in the microwave and come out perfect every time.

I use a whoopie pie  or muffin top pan (you can find them on Amazon!) for perfect eggs.  You can also use a cupcake or muffin pan, but they don’t turn out as evenly done.  Ramekins also work, but I find that they’re a little more of a pain since they’re not confined to a single pan.

Ingredients

  • 12 English Muffins
  • 12 eggs
  • 12 slices White American cheese (or any other cheese that you prefer-Gouda is excellent on these sandwiches!)
  • 12 slices of bacon (usually about a pound turns out just right), 12 sausage patties, or 12 slices of ham (Canadian bacon)
  • salt
  • pepper

Directions

  1. Heat oven to 325 degrees Fahrenheit.
  2. Prepare bacon or other desired meat.
  3. Spray the whoopie pie or muffin pan with nonstick spray.  Crack an egg into each cup.  Gently break the yolk of each egg to allow for even cooking.  Add salt and pepper to each egg to taste.  Cook in the oven 10 – 15 minutes or until yolks are cooked through.
  4. While the eggs are cooking, separate all of the English muffins and place on a working surface like a pan or covered counter top.  Place a slice of cheese on the bottom half of each muffin.  Fold the corners in so no cheese will melt outside the muffin.
  5. Once eggs are thoroughly cooked, place an egg on each slice of cheese.  Top with bacon or meat of choice and add the top bun.
  6. Allow the sandwiches to cool completely and add to a Ziploc bag.  Place all sandwiches in a large freezer bag and place in the freezer.img_5384
  7. To thaw the sandwiches, wrap the sandwich in a paper towel and heat in the microwave for 3 minutes and 45 seconds on 50% power, turning the sandwich over every minute.
  8. Now, wave goodbye to the drive-thru line!

Roasted Fingerling Potatoes

Roasted Fingerling Potatoes

img_5286
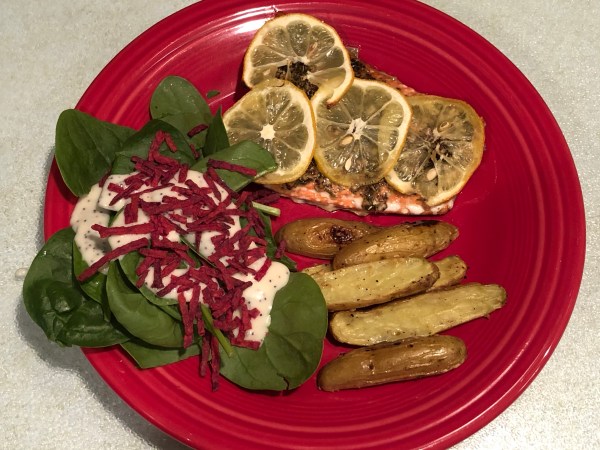
Fingerling potatoes – yet another thing I never would’ve tried if it weren’t for Misfits Market.  These potatoes are a bit like a regular russet potato roasted, but they seem to have a little more flavor.  This is definitely a new side dish I’ll be making from now on!  It’s easy, quick, and is a good twist on the typical potato side dish.  This recipe was adapted from a recipe from Inspired Taste.  Their recipe has a potato salad sauce that would be great with this side dish!

Ingredients

  • 1 1/2 lbs fingerling potatoes, scrubbed, and halved lengthwise
  • 1 tsp minced garlic
  • 2 Tbsp extra virgin olive oil
  • 1/2 tsp sea salt
  • 1/2 tsp black pepper

Directions

  1. Heat the oven to 400 degrees Fahrenheit.
  2. In a medium sized bowl, coat the potatoes in olive oil, garlic, sea salt, and black pepper.
  3. Place seasoned potatoes on parchment paper on a baking sheet and bake for 15 – 20 minutes or until browned to the desired golden color.