Easy No-Knead Dutch Oven Bread

Easy No-Knead Dutch Oven Bread

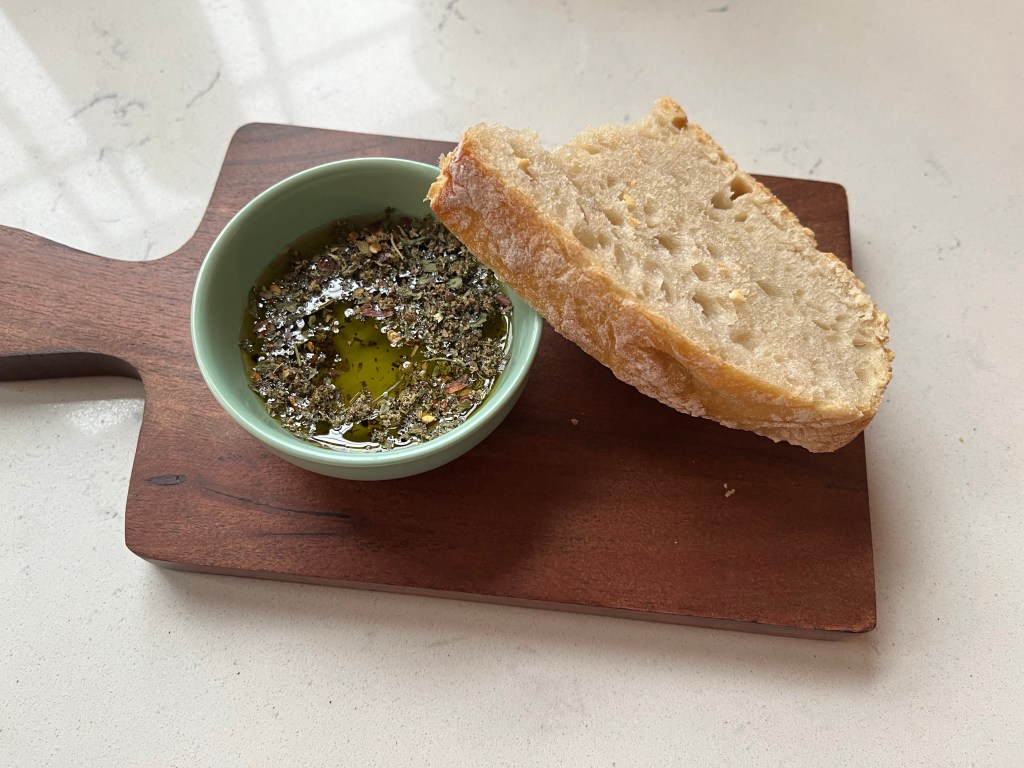
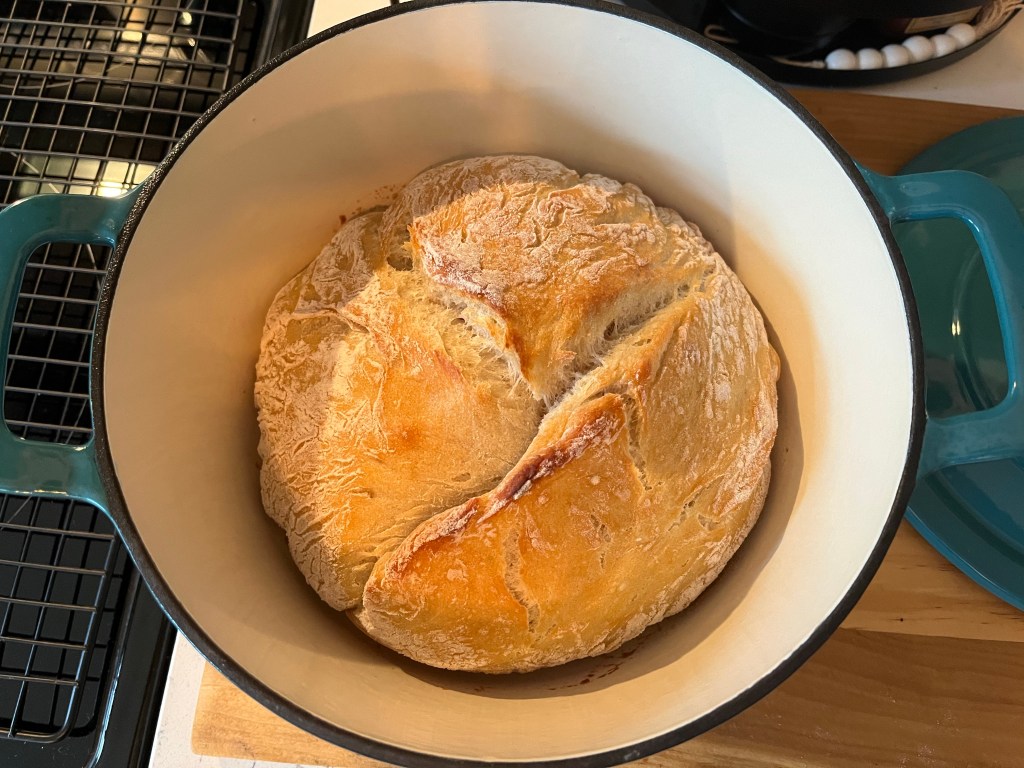
I apparently missed the bread making craze during the COVID lock-downs. I shouldn’t have overlooked all of the hype! Especially if I had known bread making would be THIS easy! Guys… GUYS! This bread reminds me a lot of the bread you’d find at Carrabba’s or the other amazing breads at Italian restaurants. This bread only has 4 ingredients (most I’m guessing you already even have in your pantry), no kneading needed (see what I did there 😉 ), and comes out moist on the inside with a great crust on the outside. I found this recipe from Joy Food Sunshine. Enjoy this with oil and herbs Carrabba’s style or for artisan sandwiches… you can’t go wrong however you eat it!

Ingredients

  • 3 cups all-purpose flour
  • 1 1/2 tsp sea salt
  • 2 tsp active dry yeast
  • 1 1/2 cups warm water, 105 degrees Fahrenheit (YES! The temperature is important… if the water is warmer than 105 degrees Fahrenheit it will ruin the active dry yeast and your bread won’t rise properly… it’s chemistry, y’all!)

Directions

  1. Mix the dry ingredients well in a mixing bowl.
  2. Mix the warm, 105 degrees Fahrenheit water into the dry ingredients well until it forms a dough.
  3. Cover the mixing bowl tightly with plastic wrap sprayed with nonstick spray. Cover the entire bowl with a damp tea towel.Place the bowl in a warm, undisturbed area of the kitchen for 18-24 hours to rise (preferably 24 hours).
  4. An hour before serving, preheat a small (approximately 2.4 L) Dutch oven with lid in the oven to 450 degrees Fahrenheit.
  5. Prepare the dough while the oven is preheating by removing the dough from the bowl onto a floured surface. Incorporate a few tablespoons of flour into the dough until the dough feels floppy or limp. Cover the dough with a floured tea towel to maintain moisture until the oven and Dutch oven are preheated.
  6. Remove the Dutch oven from the preheated oven and remove the lid. Spray the inside of the Dutch oven thoroughly with nonstick spray. Carefully add the floured dough to the Dutch oven and make sure the dough is dispersed in the Dutch oven easily. Replace the Dutch oven lid.
  7. Bake the dough covered for 30 minutes. Remove the lid from the Dutch oven and bake the bread uncovered for an additional 15 minutes.
  8. Remove the bread from the Dutch oven and allow it to cool on a wire rack before serving. Cover the bread in a tea towel to maintain moisture if not serving immediately.
  9. Serve with your favorite oil and herb or oil and vinegar combination, for sandwiches, or with your favorite soups. Enjoy!
Copycat Carrabba’s Dipping Oil and Herbs

Copycat Carrabba’s Dipping Oil and Herbs

Great bread calls for a great dipping oil. Enter Carrabba’s. Say no more, right? Enjoy this recipe from Savory Experiments! I think it’s spot on… let me know what you think! If you’d like an easy bread to try with your new favorite dipping oil, check out this recipe!

Ingredients

  • 1 Tbsp crushed red pepper
  • 1 Tbsp freshly cracked black pepper
  • 1 Tbsp dried oregano
  • 1 Tbsp dried basil
  • 1 Tbsp dried parsley
  • 1 1/2 tsp garlic powder
  • 1 1/2 tsp onion powder
  • 1/2 tsp dried rosemary
  • 1 1/2 tsp coarse sea salt
  • 3 cloves minced garlic
  • extra virgin olive oil

Directions

  1. Mix all dry ingredients well in an air-tight storage container.
  2. Place desired amount of dry ingredients/herbs in a small bowl or dish. Add desired amount of extra virgin olive oil and enjoy with bread.
Homemade Apple Pie

Homemade Apple Pie

We went apple picking this weekend and our youngest decided we didn’t have enough apples in our already full basket. My first thought was applesauce, but neither of the kids LOOOVE applesauce that much. Then I thought apple crisp. Then I thought apple pie. So, apple pie it was!

I’ve made pumpkin pie from scratch and I remember it being, well, an experience. It was a Monday holiday and I only had our youngest home with me that day, so I figured, why not? I have a whole day, right? For some reason I could only find good recipes for the filling OR the crust, but not both combined, so I took what I liked from two I found and compiled them for you here. The crust recipe came from New York Times cooking and the filling recipe comes from Allrecipes.

Crust

Ingredients

  • 1 1/4 cups all-purpose flour
  • 1/4 tsp salt
  • 10 Tbsp unsalted butter, cold and cut into cubes
  • 2 -4 Tbsp ice water, as needed

Directions

  1. In a food processor, pulse together the flour and salt. Add butter and pulse until the mixture forms small pieces. Slowly add ice water, 1 Tbsp at a time and pulse until the dough comes together. The dough should be moist, but not wet.
  2. Turn dough out onto a lightly floured surface and gather into a ball. Flatten into a disk with the heel of your hand. Cover tightly with plastic wrap and refrigerate for at least 1 hour and up to 2 days.

Filling

Ingredients

  • 8 Granny Smith apples (or other tart, firm variety), peeled, cored, and sliced
  • 1/2 cup unsalted butter
  • 3 Tbsp all-purpose flour
  • 1/4 cup water
  • 1/2 cup white sugar
  • 1/2 cup packed brown sugar

Directions

  1. Preheat oven to 425 degrees F.
  2. Melt the butter in a saucepan. Stir in flour to form a paste.
  3. Add water, white sugar, and brown sugar and bring to a boil. Reduce temperature and let simmer.

Preparing Crust, Filling, and Baking

  1. Once the crust has refrigerated for at least an hour, remove it from the refrigerator and place on a lightly floured surface. Roll the dough out with a flour coated rolling pin to approximately 1/8″ thickness. Roll the dough onto the floured rolling pin, then gently unroll over the pie crust. Cut excess dough approximately 1″ away from the rim of the pie pan. Fold the excess dough under and pinch the crust using an index finger and thumb all around the pan. Combine excess dough together and roll out with the floured rolling pin to 1/8″ thickness. If the dough becomes too warm to work with, refrigerate for 15 minutes or until firm enough to work with. Slice the dough into strips to later create a lattice crust or cut into shapes using a cookie cutter.
  2. Place apples into the center of the pie crust. Allow the apples to slightly mound in the pie crust. Add lattice crust or crust shapes over apples.
  3. Slowly pour filling mixture over the crust and apples making sure it doesn’t overflow, but is covered evenly.
  4. Bake in the oven 15 minutes. After 15 minutes, reduce the temperature to 350 F and bake for 35-45 minutes or until apples are soft and crust is golden brown.
Oops, there goes another rubber tree plant

Oops, there goes another rubber tree plant

I’ve never even given much thought to rubber tree plants, what they looked like, or if they were great plants to have. I happened to see a beautiful variegated plant that had some pink/ruby hues and thought it was one of the prettiest plants I had ever seen-surprise! Variegated rubber tree plant (ficus elastica ruby).

I purchased one from Rooted on Amazon. It arrived packaged perfectly and in perfect condition. I’ll share a few tips I’ve learned along the way about how to care for the Variegated rubber tree plant.

Water: This plant likes to always have moist soil, but not saturated. When in doubt, let it dry out! Overwatering is not good for this plant, so avoid over watering and if you’re not sure, give it a little more time before watering. Overwatering is the most common reason these guys bite the dust, so pay attention to its soil!

Light: The variegated rubber tree plant thrives in bright, indirect light. Variegation, which contains colorless portions of leaves, means that the colorless portions do not have chlorophyll. This means this portion of the plant cannot photosynthesize, so the more light the other portions of the plant can get, the better. Also, the more indirect light this plant receives, the more the beautiful, pink hues will begin to come through.

Yellowing/Dropping Leaves: If your plant’s leaves start to yellow or drop, this could be due to overwatering. Old leaves will also yellow and drop, so check which leaves are yellowing and dropping and check the soil to determine the cause.

Rotate Your Plant: Make sure to rotate your variegated rubber tree regularly to ensure that it receives adequate light to photosynthesize.

Easy Naan Pizzas

Easy Naan Pizzas

This is definitely one of my weeknight go-tos when I don’t have anything thawed or planned. I buy naan when it’s on sale and keep them in the freezer. They go from freezer to oven and bake for 5 minutes. YES… 5 minutes from frozen! You can customize them any way you like-my favorites are traditional and Mediterranean or Greek. You can find mini naan or regular sized naan in most grocery stores in the bread/deli section. The best part about naan pizzas is you can use anything you already have on hand!

Ingredients

  • Naan (frozen or fresh)
  • tomato sauce (I use Basil Garlic pasta sauce because I usually have it on hand, but pizza sauce will work, too)

Toppings

You can use any toppings you typically like on your pizza. Here are some combinations we’ve tried that have become our favorites!

Traditional

  • Shredded mozzarella
  • Pepperoni (we prefer turkey-it’s less greasy than traditional)
  • Black olives
  • Mushrooms

Mediterranean/Greek

  • Fresh sliced mozzarella
  • Fresh basil
  • Kalamata olives
  • Artichoke hearts
  • Feta cheese
  • Dried oregano

Directions

  1. Preheat oven according to naan package instructions.
  2. Place all pieces of naan on a baking sheet (fresh or frozen).
  3. Add sauce to each piece of naan. Top each piece of naan with desired toppings.
  4. Bake naan pizzas in oven according to package heating instructions or until cheese is melted and slightly browned.
  5. Enjoy!
The Beautiful and Easy to Grow Inch Plant (Wandering Jew)

The Beautiful and Easy to Grow Inch Plant (Wandering Jew)

I’ve seen these beautiful, purple and green (two of my favorite colors, I might add) plants and figured they were difficult to care for. Well, I was TOTALLY wrong! I now have two of these little guys and they have taken off over the last few months. Their color is so vibrant they brighten up a room. They’re very easy to care for and easy to propagate (definite bonus in my book!). I bought one of these from Rooted on Amazon and the other I picked up at Meijer, because… plant section, guys. Plant section. Here are a few things I’ve learned about Inch Plants while caring for them-enjoy!

Light: The plants enjoy medium to bright light. Be sure to keep them out of bright light and avoid dark or low light or they will become very leggy.

Water: These plants don’t like to become dry, but they also don’t like to have continually wet soil. Allow the soil to dry partially before watering again. Water these plants less in the winter, since this is their resting period.

Other Care: Aphids can become a pest issue for these plants. If your Inch Plant happens to have an aphid infestation, remove the infested leaves/stems and spray the entire plant down with water.

Propagation: Inch Plants can be very easily propagated. Cut a 2-3 inch piece of the plant and place it in water. The cutting will produce roots in about a week. Plant the rooted cutting in potting soil and voila! New plant!

Bird’s Nest Fern

Bird’s Nest Fern

I bought this adorable little Bird’s Nest Fern (Asplenium Nidus) at Meijer for $6. I’ve seen them here and there but never really paid much attention to them, but this one caught my eye in its little terra cotta pot. I thought its color was beautiful, its shape was so interesting, and it would brighten a room no matter where I placed it. So, I decided to put it in the kitchen to add a little homeyness.

I really didn’t know anything about these plants, but I noticed when its potting soil became extremely dry it would lose all of its color suddenly. Pretty handy watering reminder! Here are a few things I’ve found about this plant:

Light: Bird’s Nest Ferns do best in medium indirect sunlight, but will also tolerate low indirect light.

Water: These ferns should be watered every 1-2 weeks. Avoid watering in the center of the fern, but instead water around the base of the fern. Let the soil dry out about halfway down before watering.

Humidity: Bird’s Nest Ferns can tolerate a typical home’s humidity, but come from a tropical environment, so they prefer high humidity.

Size: In a home environment, Bird’s Nest Ferns can grow to approximately 2 feet in size.

If you ever come across a Bird’s Nest Fern, pick it up! You’ll be surprised how easy these little guys are to care for and what a statement they are. No one ever believes that mine is real – they’re that distinct!

Easy Stovetop Chili

Easy Stovetop Chili

Chili is definitely one of my top go-to recipes when I don’t know what to make. If its a little chilly outside (pun intended…), I need a complete meal in a pinch, or if I just don’t know what to make, it’s chili to the rescue!

I adapted this recipe from one I found on Food.com. This recipe is so versatile and can be made using lean ground beef or turkey. I usually decide on what to use based on whatever I have the most of at the time. Use whatever you have on hand! Don’t like kidney beans? Use black beans! Don’t like bell pepper? Don’t add any! Customize it how YOU like it.

Ingredients

  • 2 lbs ground turkey or lean ground beef
  • 1 onion, chopped (or use diced frozen onion to save time and cleanup!)
  • 1 bell pepper, chopped (I usually prefer red or orange, but any color will do!)
  • 1 (16 oz) can red kidney beans, undrained
  • 1 (16 oz) can black beans, undrained
  • 1 (16 oz) can stewed tomatoes, diced
  • 1 (6 oz) can tomato paste
  • 2 Tbsp chili powder
  • 1/2 tsp garlic powder
  • 1/2 tsp oregano
  • 1/2 tsp cumin
  • 1/2 tsp paprika
  • 1/2 tsp black pepper
  • 1/2 tsp salt
  • 1 1/2 – 2 cups water

Directions

  1. Over medium heat, spray a large dutch oven with non stick cooking spray.
  2. Saute ground turkey or beef, bell pepper, and onion until lightly browned and onion and pepper are soft.
  3. Add remaining ingredients and water and stir well.
  4. Cook covered over medium heat for 30 minutes.
  5. Serve with shredded cheese, oyster crackers, and sour cream. Enjoy!
Sheet Pan Chicken Thighs and Fall Vegetables

Sheet Pan Chicken Thighs and Fall Vegetables

I have no idea why, but I always forget about sheet pan meals. They’re delicious, healthy, and you can use whatever vegetables and seasonings you happen to have on hand. Today is the first day of fall, sooooo time for fall foods! This recipe is great because you can customize it however you like with whatever vegetables you happen to have on hand. Some great vegetables to use are squashes, brussel sprouts, or even cauliflower or broccoli. You could even use chicken breast or legs instead of thighs. I prefer the chicken thighs because they seem to come out crispy on the outside, but not too dry on the inside. I adapted this recipe from one I found from Flavour and Savour.

Ingredients

  • 8 skin on, bone in chicken thighs (any number will do!)
  • 2 medium sweet potatoes, cut into approx. 1 inch pieces
  • 1 medium zucchini, cut into approx. 1 inch pieces
  • small golden potatoes (any amount is fine, whatever you prefer)
  • 2 medium shallots, sliced
  • 1 honeycrisp, gala, or other sweet apple, sliced with peel on
  • 1 Tbsp thyme
  • 1 Tbsp rosemary
  • sea salt and pepper, to taste

Marinade

  • 1/4 cup olive oil
  • 2 Tbsp lemon juice
  • 2 cloves garlic, minced
  • 1 tsp dried thyme
  • 1 tsp dried red pepper flakes
  • sea salt and pepper to taste

Directions

  1. Preheat oven to 425 degrees F.
  2. Add chicken thighs to a plastic Ziploc bag. Whisk all marinade ingredients together in a small bowl and pour the marinade into the Ziploc bag with the chicken thighs. Seal the bag and allow the chicken to marinate in the refrigerator while preparing the vegetables.
  3. Cut all of the vegetables and fruit into uniform size pieces.
  4. Spray a sheet pan with cooking spray. Add all vegetables and fruit to the sheet pan.
  5. Place marinated chicken thighs on top of the vegetables and fruit and pour any extra marinade over the chicken.
  6. Bake in the oven 35-45 minutes or until the chicken reaches a temperature of 165 degrees F. If you prefer even crispier chicken, place the pan under the broiler for a few minutes after the chicken thighs have fully cooked.

Easy Ranch Ground Turkey Tacos

Easy Ranch Ground Turkey Tacos

Taco Tuesday is a weekly occurrence, so there needs to be some variety, right? Sure… variety is the spice of life (yes, pun intended). With grocery costs skyrocketing lately I grabbed the alternative to ground beef for our Taco night staple-turkey! It’s more cost effective, tastes great, and I’m sure our arteries will thank us later. This recipe isn’t short on flavor, but is lighter on fat! Customize these tacos however you’d like! I’ll make a list of what we usually top ours with, but get creative! There are also links to Copycat Chipotle guacamole and corn salsa, homemade white queso, and Copycat Chuy’s Creamy Jalapeno dip. I know you could drink that stuff with a straw… we all could…

Ingredients

  • 2 lbs ground turkey (or 1 lb if this recipe is only for a few people or you don’t like leftovers)
  • 1 packet taco seasoning (or make your own using this recipe!)
  • 1 packet ranch seasoning
  • taco shells or tortillas

Toppings

  • taco sauce
  • shredded cheese of choice
  • cilantro, finely chopped
  • black olives, sliced
  • sour cream
  • salsa
  • shredded lettuce
  • diced tomato
  • corn salsa (check out my Copycat Chipotle recipe here!)
  • guacamole (more copycat recipes-check out my Chipotle version here!)
  • queso (here’s a stovetop version)
  • creamy jalapeno dip (of course I had to use a Chuy’s Copycat version!)

Directions

  1. Prepare all toppings. Chop all the things!
  2. Brown the ground turkey on medium high until thoroughly cooked.
  3. Add one packet of taco seasoning and one packet of ranch seasoning if using 2 lbs of ground turkey. If only using 1 lb of ground turkey use 1/2 packet of each type of seasoning.
  4. Pile on the toppings! Enjoy!